


FaceTime es uno de los programas más utilizados por los usuarios de Mac y iOS para realizar llamadas de audio y video gratuitas. Sin embargo, es una lástima que no admita la grabación integrada, lo que hace que sea difícil para aquellos que prefieren reproducir las llamadas guardarlas. Entonces, ¿cómo podemos grabar rápidamente llamadas de FaceTime? Este artículo te guiará a través del proceso de grabación de la manera más sencilla. ¿Estás listo?
Una solución profesional para grabar llamadas de FaceTime en Mac
Dado que QuickTime solo puede funcionar como un grabador rápido y sencillo, si no estás satisfecho y deseas incluir más funciones, prueba uno más profesional: VideoSolo Screen Recorder.
VideoSolo Screen Recorder es uno de los mejores grabadores de llamadas de FaceTime profesionales hasta el momento, gracias a su versatilidad y facilidad de uso. Su versión para Mac admite la grabación de la pantalla, la cámara web y el audio. Puedes arrastrar fácilmente el marco de la región de grabación para que coincida con la ventana de FaceTime. Hay más funciones adicionales disponibles antes, durante y después de la grabación, como capturas de pantalla y anotaciones. Ofrece una versión de prueba gratuita con todas las funciones, excepto un límite de tiempo, y para aquellos usuarios que disfrutan usando la aplicación, pueden comprar una versión con licencia.
Paso 1. Descargar e instalar el grabador de llamadas de FaceTime
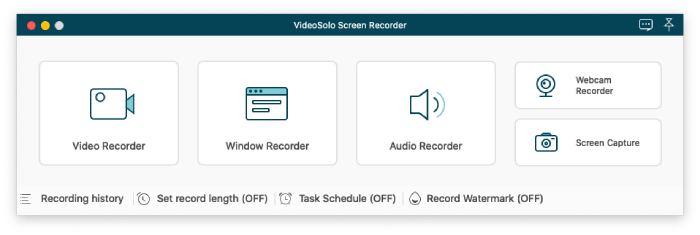
Descarga VideoSolo Screen Recorder desde el botón de arriba y luego ábrelo. En su interfaz principal, elige Grabador de Video. Ahora puedes abrir tu FaceTime en Mac.
Paso 2. Ajustar los parámetros de grabación
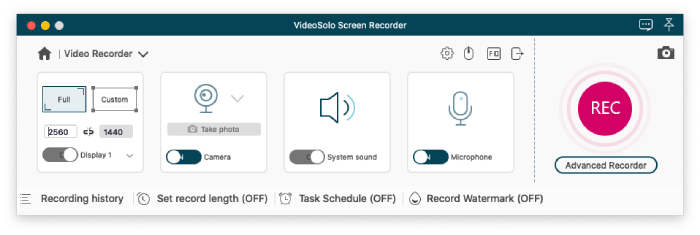
En el Grabador de Video, elige Personalizado para definir el área de grabación en la primera opción. Luego, arrastra la barra de volumen del sonido del sistema y del micrófono según tus necesidades.
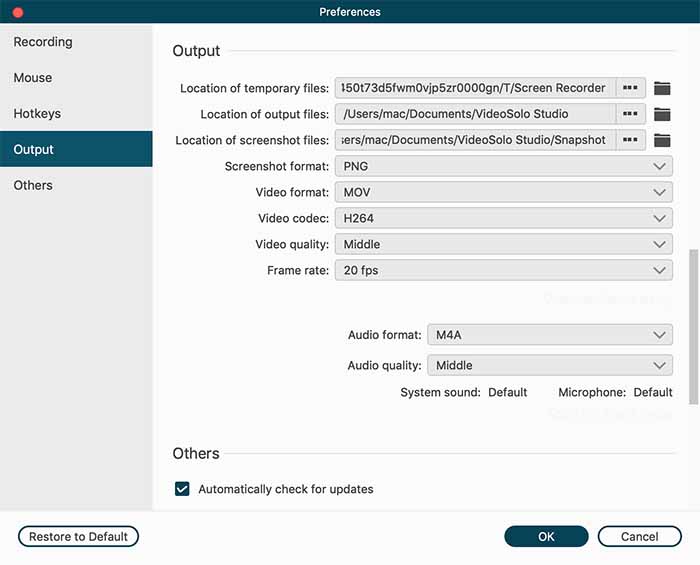
Haz clic en el icono Salir en la interfaz. Aquí puedes elegir el formato de video, la calidad de video, la tasa de cuadros y la ubicación de los archivos de salida.
Paso 3. Activar el micrófono en Mac
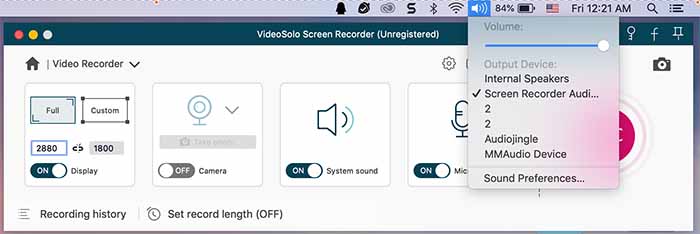
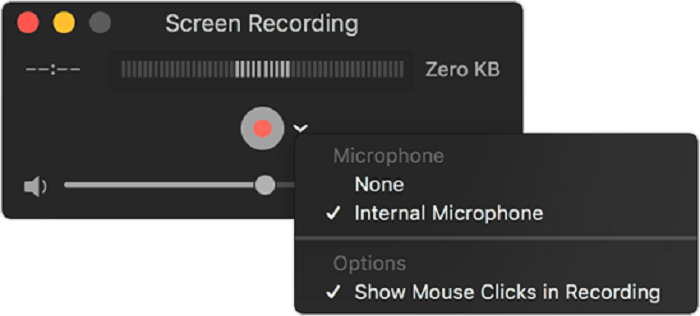
A continuación, abre una lista desplegable junto al botón del micrófono y marca Micrófono integrado. Debido a razones de privacidad en Mac e iDevices, solo se puede grabar el audio del micrófono, así que asegúrate de haber activado tu micrófono.
Paso 4. Grabar la llamada de FaceTime
Luego, haz clic en el botón rojo GRABAR en la interfaz principal de VideoSolo Screen Recorder. Después de que aparezca una ventana emergente con las teclas de acceso rápido, comenzará a grabar lo que sucede dentro del área de grabación. Ahora debes cambiar a la ventana de FaceTime e iniciar una llamada de video. Durante la grabación, se te permite usar la cámara web o usar la barra flotante para tomar capturas de pantalla según prefieras.

Paso 5. Recortar y guardar el video de la llamada de FaceTime
Para detener la captura de llamadas de FaceTime, puedes elegir usar las teclas de acceso rápido preestablecidas por defecto o por ti mismo, o elegir hacer clic en el botón de detención en la barra flotante. Luego, aparecerá una ventana donde puedes previsualizar el video. Si hay partes adicionales, puedes recortarlas en la columna inferior.
QuickTime Player - Grabar llamadas de FaceTime en Mac de forma gratuita
El grabador de pantalla integrado en el iPhone puede grabar la pantalla de FaceTime, pero no hay audio. Pero eso no es útil. Entonces, ¿por qué no elegir Mac para grabar una llamada de FaceTime? Aunque la gente tiende a hacer llamadas de FaceTime en los iPhones en lugar de en los Mac, será mucho más fácil si puedes cambiar a Mac cuando intentes grabar una llamada de FaceTime.
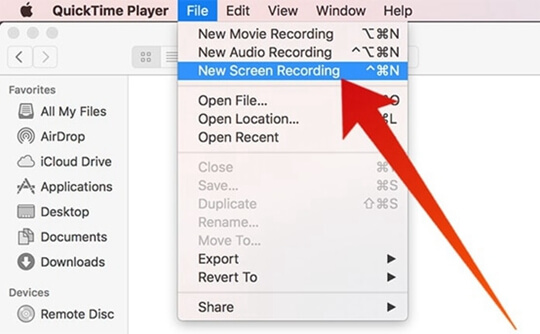
Paso 1. Comienza haciendo clic en "Archivo" > "Nueva grabación de pantalla".
Paso 2. Presiona el botón rojo y haz clic en cualquier lugar de la pantalla para comenzar a grabar toda la pantalla; de lo contrario, haz clic y mueve el marco del área a lo largo de la ventana de FaceTime siempre que el área de grabación incluya el contenido que deseas capturar.
Paso 3. Haz clic en el icono del triángulo invertido para marcar algunas de las opciones según tus necesidades, como incluir el micrófono y resaltar el cursor.
Paso 4. Ahora inicia una llamada de FaceTime en tu ventana de FaceTime. Haz clic en el botón de grabación en la barra superior.
Cómo grabar una llamada de FaceTime con audio en iPhone/iPad
En realidad, recientemente preferimos usar nuestros teléfonos para hacer llamadas de FaceTime en lugar de usar una laptop. Entonces, ¿cómo podemos grabar una llamada de FaceTime en iPhone/iPad con audio? Es un poco difícil, pero te tenemos cubierto. El método más sencillo para capturar una llamada de FaceTime con el sonido del micrófono en iPhone es usar el Grabador de Pantalla de iOS, la herramienta integrada, que se puede usar en versiones de iOS 11 o posteriores.
Pasos para grabar la pantalla de una llamada de FaceTime con sonido en dispositivos iOS
Antes de seguir los pasos a continuación para grabar tus llamadas de FaceTime, asegúrate de que el Grabador de Pantalla de iOS integrado ya se haya agregado al Centro de Control de tu iPhone.
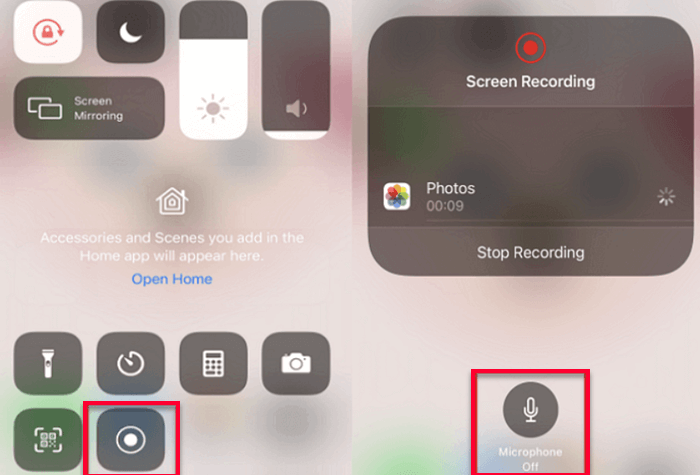
Paso 1. Ve al Centro de Control y luego haz clic en el icono de Grabación de Pantalla.
Paso 2. Comenzará una cuenta regresiva de tres segundos y aparecerá una barra roja en la parte superior de tu pantalla, lo que indica que se está grabando tu pantalla.
Paso 3. Si deseas capturar la pantalla con sonido, simplemente mantén presionado el botón Grabación de Pantalla para activar el micrófono. Ahora puedes comenzar tu llamada de FaceTime y presionar el botón Grabación de Pantalla nuevamente en el Centro de Control.
Paso 4. Después de unos segundos, comenzará la captura. Después de que termine tu llamada de FaceTime, simplemente haz clic en el botón rojo en la esquina superior izquierda de la pantalla para completar el proceso. En este momento, tu video se guardará automáticamente en Fotos.
Forma de encontrar la herramienta integrada Grabador de Pantalla en dispositivos iOS
Si el Grabador de Pantalla de iOS integrado no se ha agregado al Centro de Control de tu iPhone, consulta los siguientes pasos.
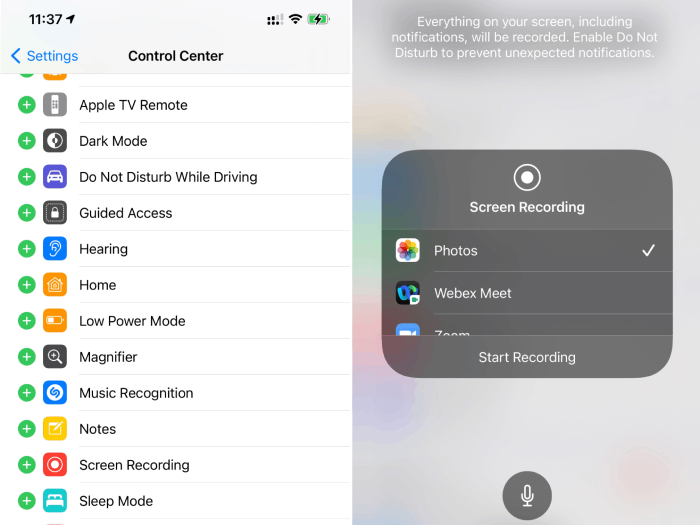
Paso 1. Ve a Ajustes > Centro de Control y haz clic en él. Desplázate hacia abajo en el menú para buscar Grabación de Pantalla y luego haz clic en el icono verde Agregar para instalarlo.
Paso 2. Regresa a la pantalla principal de tu iPhone y desliza hacia abajo desde la esquina superior derecha de la pantalla para encontrar el botón Grabación de Pantalla.
Cómo grabar la pantalla de una llamada de FaceTime con sonido en Android
Dado que las llamadas de FaceTime son muy convenientes y fáciles de usar, se están volviendo cada vez más populares. Por lo tanto, grabar estas llamadas de FaceTime en dispositivos Android también se ha convertido en una necesidad importante para las personas. Sin embargo, a diferencia de iOS, los dispositivos móviles Android no tienen la función predeterminada de grabación de pantalla. Por lo tanto, si aún deseas grabar una llamada de FaceTime en tu dispositivo Android, debes instalar una aplicación de grabación de pantalla de terceros. Aquí, te recomiendo la aplicación AZ Screen Recorder.
Después de probar varias aplicaciones directamente, descubrimos que la mayoría de las aplicaciones de grabación de pantalla en la Play Store de Google se limitan solo a la parte de video. Así que aquí, te ayudamos a encontrar una aplicación poderosa llamada AZ Screen Recorder que te permite grabar el elemento de audio interno junto con el video. Es una de las herramientas más poderosas para capturar la pantalla en un teléfono Android. La versión 3.9 de AZ Screen Recorder admite la grabación de audio interno junto con el video.
Veamos cómo grabar llamadas de FaceTime en dispositivos Android usando AZ Screen Recorder:
Paso 1. Descarga, instala y lanza AZ Screen Recorder en tu teléfono Android.
Paso 2. Después de instalar correctamente AZ Screen Recorder, habilita la función de permisos en tu AZ Screen Recorder. La aplicación puede solicitar permiso para el audio, el micrófono, el video y el administrador de archivos de tu teléfono.
Paso 3. Verás una pantalla emergente de la aplicación AZ Screen Recorder en tu dispositivo Android, y la pantalla te dará acceso para grabar tus llamadas de FaceTime.
Paso 4. Puedes elegir la opción de grabación de llamadas que prefieras. Luego, puedes comenzar a grabar tus llamadas de video de FaceTime sin problemas ni retrasos.

Conclusión
Después de aprender las dos formas de grabar llamadas de FaceTime en Mac, es posible que encuentres que las preguntas que antes parecían complicadas son bastante fáciles. Esperamos que este artículo realmente te ayude a resolver tus preguntas sobre la grabación de llamadas de FaceTime.

