


Windows 10 has a built-in camera app that automatically connect to your imaging hardware and eliminate need of additional imaging software. You may meet difficulties with your camera like failing to launch, camera drivers not working, error codec or simply cannot capture any content.
In this post, we have compiled the possible reasons and ultimate solutions for Windows 10 camera not working problems. You can try below mentioned tips to fix up issue with camera on your Windows 10 system.
Attention: If you have this problem in Windows 11, the solutions mentioned in this post also apply!
Possible Reasons for Windows 10 Camera Not Working
Several issues may cause your camera to malfunction or not work at your Windows 10 laptop. Check if your camera is working with these issues below:
- You have an outdated or uncommon driver device that can't compatible for your device.
- Your camera may be disabled because of software or privacy settings conflict.
- You may mistakenly change permissions for your Camera Roll folder.
- Camera app need to be reset or repaired
- Your antivirus software may block access to your computer
- The update of Windows 10 or Windows 11
Beside these software-related issues, your camera may also not work due to hardware problems. In this case, you will need to contact your manufacturer and get a profession fix.
Replace Built-in Camera with Another Webcam Capture Software
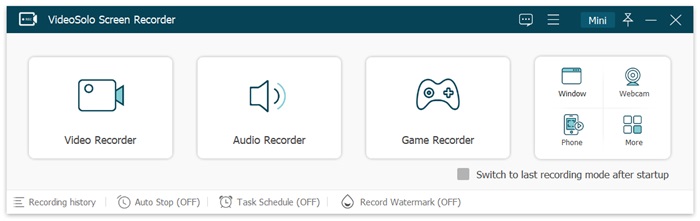
If you are tired of fixing those tricky problems on Windows 10 and seeking an alternative to Windows 10 camera, then you can't miss VideoSolo Screen Recorder, a great all-in-one webcam software with highly intuitive interface in the market and you can download the program for both your Windows and Mac computers.
Apart from recording the webcam in high definition, it can also help you record the desktop, running programs, computer audio, and microphone separately or at the same time. Besides, VideoSolo comes with various features that allow you to record, edit, and customize your videos with ease. The program also offers multiple output formats, including MP4, MOV, F4V, WMV, M4A, MP3, AVI, TS, WMA, and AAC, etc.
Using the following procedure, it is easy to record your webcam with VideoSolo.
Step 1. Download VideoSolo
Click the button below to download VideoSolo Screen Recorder to your computer and open it.
Step 2. Launch webcam video recorder
Select “Webcam” on the fourth option in the interface. Click it and it will pop up the Webcam window where you can record yourself. You can customize the recording area and frame rate.
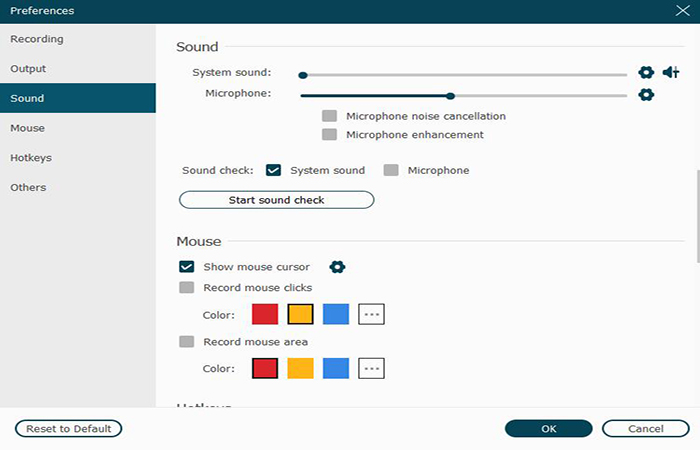
Step 3. Adjust camera settings and sound
The webcam window can be adjusted by dragging its frame. Then, you can adjust webcam settings such as webcam device, resolution, microphone device and rotation. If you want to record the webcam, mic audio, and PC screen simultaneously, you have to keep all the tools turned on.
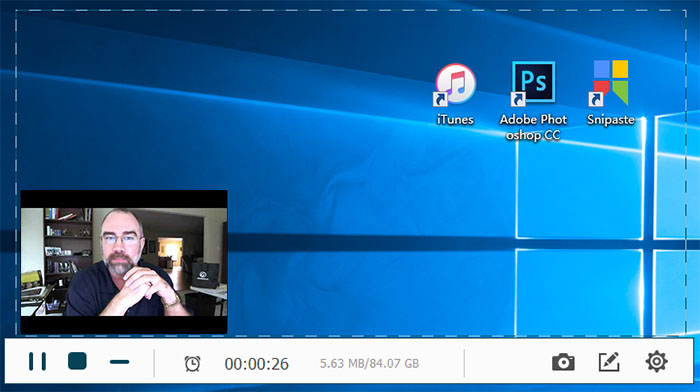
Step 4. Start to Record Webcam Video
When all settings are ready, click “Record” to begin to record yourself. Click the stop icon and it will pop up a preview window where you can clip & trim the unwanted part of the webcam video. If you are satisfied with it, just tap on “Save”.
Allow Access to the Windows 10 Camera App via Privacy Settings
Sometimes, the cause of windows 10 camera not working is not necessarily the camera is broken but that the camera is disabled for certain apps (such as Zoom, Skype) due to your Windows 10 privacy settings. At this time, you can choose to check the privacy settings first.
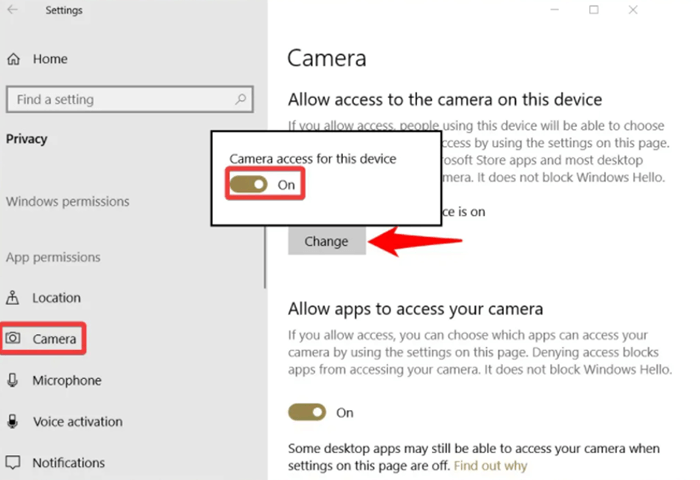
Step 1. Open Settings
Press Start and click settings above the power button
Step 2. Click Privacy and allow access to the camera
Click Camera on the sidebar, then choose Change to switch “Camera access for this device” to “on”. Scroll down and toggle “on” in “Allow apps to access your camera”
Step 3. Grant specific apps access to your camera
You can choose which apps to access to your camera in “Choose which Microsoft Store apps can access your camera”. Toggle to “On” for the apps you'd like to enable.
Install/Update Camera Driver with Device Manager to Fix Problem
If your camera has already accessed to Windows 10. Then may be your drivers need to be updated. Without a driver, your computer can't manage video cards, camera software and sound cards. You can update your camera driver with the help of the built-in Device Manager.
Step 1. Go to Start. Search and click on Device Manager.
Step 2. Expand the Cameras category, then right click on the device and select Update driver.
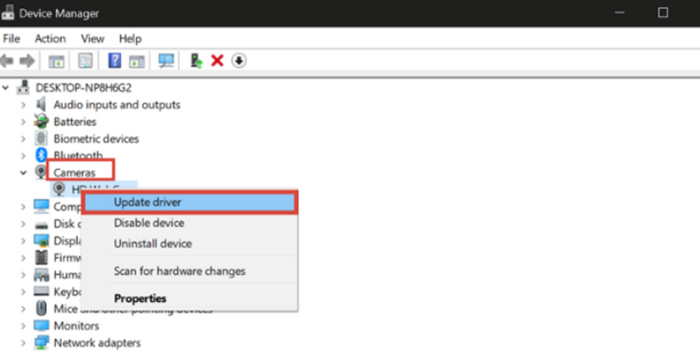
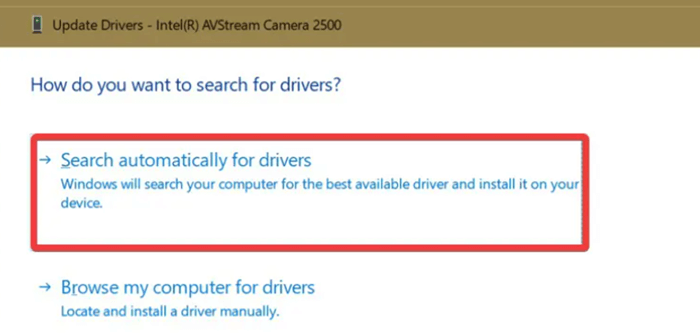
Step 3. If there is not new camera driver available. You can check the Support section and click “Search automatically for drivers” to search for the best available driver and install it on your device.
Step 4. Reconnect your device if necessary or perform a restart.
Rollback/Reinstall Webcam Driver Using Device Manager
If webcam worked earlier for you but not working now, it may be the source of your problem is an incorrect or damaged driver or there is a bug in the manufacturer's driver. Try to reinstall or rollback camera app using Device Manager
Step 1. Go to Start. Search and click on Device Manager.

Step 2. Expand “Imaging Devices”, “Sound, video and game controllers” or “Camera” category. Right click your camera or webcam in the list and choose “Properties”.
Step 3. Click on the Driver and then choose Roll Back Driver. In the pop-up window, choose “My apps don't work with this driver” and press yes.
Follow the Steps If You Want to Reinstall Webcam Driver
Step 1. Go to Start. Search and click on Device Manager.
Step 2. Expand “Imaging Devices”, “Sound, video and game controllers” or “Camera” category. Right click your camera or webcam in the list and choose “Uninstall device”
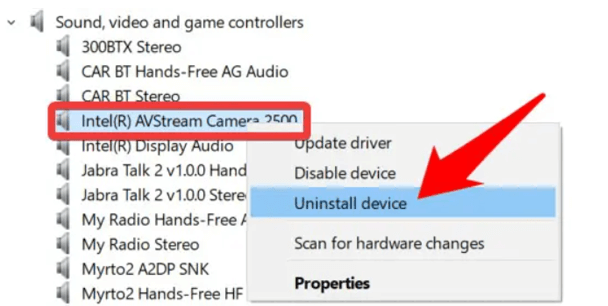
Step 3. Tick “elete the driver software for this deviceD” and press “Uninstall”
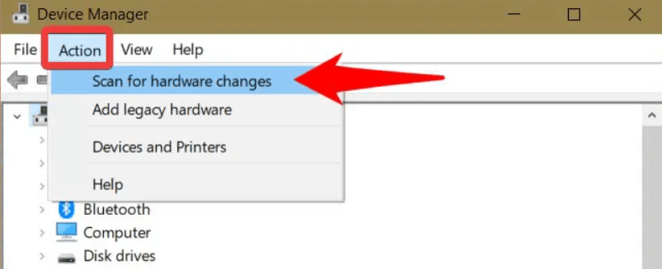
Step 4. In the top bar of Device Manager, click “Action”, then choose” Scan for hardware changes”. Windows will automatically detect your device and install the webcam driver for you. If it doesn't work, unplug your camera and restart your computer and plug it again.
Try to Remove an Update in Windows 10
Your camera may not work after the update of Windows 10. You can also try to remove the update in Windows settings menu.
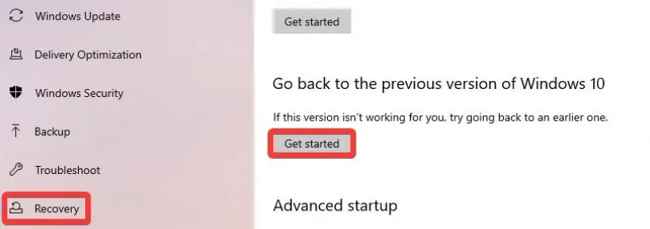
Step 1. Open Settings by pressing Start button.
Step 2. Click “Update& Security” and choose “Recovery”. Then you will find “Go back to the previous version of Windows 10”. Click “Get started”
Step 3. Choose “Earlier builds seemed more reliable” and press “Next”, then click “No, thanks” in the pop-up windows.
Step 4. Read “What you need to know” and “Don't get locker out”, then press “Next”. Here you will get the final screen, press “Go back to earlier build”. It may take some times and then your computer will automatically restart. After that you can check if your camera can work or not.
Fix Windows 10 Camera Not Working Caused by Error Codes
Error 1. We can't find your camera with error code 0xA00F4244
When camera application is not properly installed, the system may fail to detect it. Check to be sure that it's connected and installed properly, that it isn't being blocked by antivirus software. Different encoding standards and viruses in your computer can also lead to the error code. Here are some tips help to fix camera error code 0xA00F4244 on Windows 10.
Solution 1: Make sure the camera app is turned on
Press Win + I at the same time or press Start button to open Settings on Windows. And then click Privacy > Camera in the left pane. If it is off, turn it on.
Solution 2. Check for antivirus software
You can disable the antivirus software temporarily and see if the camera works. If it works, the problem is caused by the antivirus software. If you don't want to disable it or turn it off, in the antivirus software, you can check if there are settings related to blocking the access or permission to use the camera. If yes, change the settings.
Solution 3. Check if the webcam is disabled on your PC
Search and open Device Manager first, and then find “Imaging device, Camera or Sound, video and game controllers”, then right click on it and choose “Enable device” option. If the camera is not disabled, you will get “Disable device” option instead.
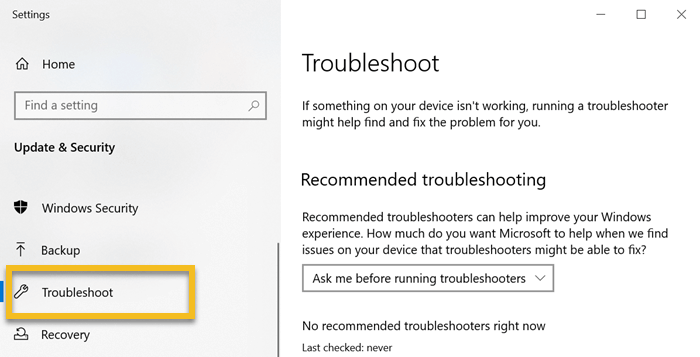
Solution 4. Run the troubleshooter in Store Apps
1. Press Win + I at the same time or press Start button to open Settings Windows.
2.Find Update and Security and click “Troubleshoot” on the left pane.
3.Scroll down and select “Store Apps”.
4.Click on the “Run the Troubleshooter“ icon.
Error 2. Can't start your camera with error code 0xA00F429F (0x887A0004)
If you receive error code 0xA00F429F, Windows 10 cannot start your camera when trying to use the Windows 10 Camera app, this may be due to an error in a recent update or a corrupt driver. It means you may need to restart your computer or update your driver.
Solution 1. Restart your PC
If you haven't restarted your device since the camera stopped working, you should do so. Select Start, then select Power > Restart. Waking up your device from sleep isn't the same thing as a restart.
Solution 2. Uninstall your camera driver and scan for hardware changes
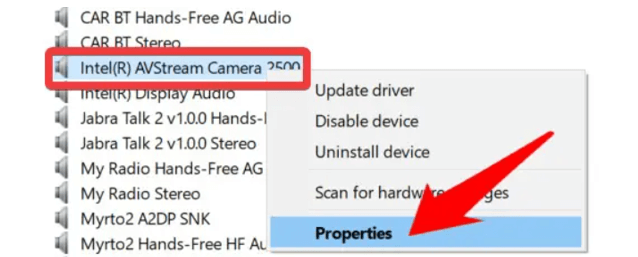
1. In Device Manager, right-click your Camera, and then select Properties.
2. Select the Driver tab, then select Uninstall Device. Select the check box for Delete the driver software for this device, then select OK.
3. In Device Manager, on the Action menu, select Scan for hardware changes.
4.Wait for it to scan and reinstall updated drivers, restart your PC, and then try opening the Camera app again.
Error 3. All cameras are reserved with error code 0xA00F4288
The error code 0xA00F4288 can appear due to the camera driver missing when third-party applications interfere with other programs. Most users complain that problems appear after OS updates. So you can go back to a previous version to solve the problems. Following are the simple three way to solve All cameras are reserved problems.
Method 1. Check Access to the Camera App
To begin, you need to check in the Windows system, your Camera App's access is turned on or not. Here are the steps:
1. Click on Start menu and select Settings > Privacy > Camera.
2. You can see the Camera access of this device is turned Off/On, if it is off, turn it on.
3. Scroll down the below and give the access to the apps which you want to use with Camera.
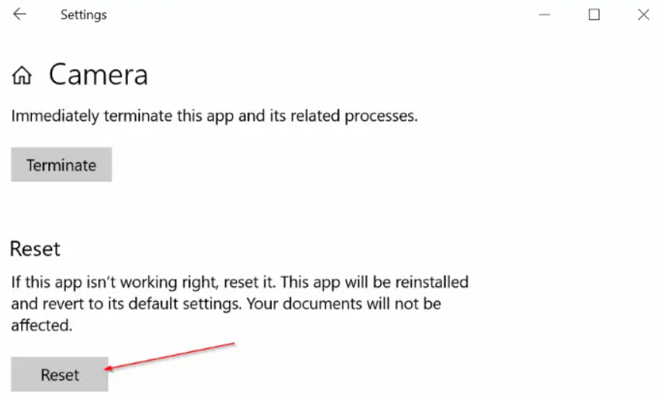
Method 2. Reset Camera App
1. Click on Start menu and select Settings. Go to Apps > Apps & Features.
2. In the Apps & Features, locate Camera, click on it. Click on Advanced Options.
3. Scroll down to the last, click on Reset option.
Method 3. Update Webcam Driver
Search and open Device Manager first, and then locate your Camera and right click on your camera and select the Update Driver option. Click Search automatically for updated driver software. If there is any update available, update the Driver. After that, relaunch the Camera and check for the issue, it is occurring or not.
Error 4. Media capture failed event with error code 0xA00F4271 (0x80070001)
Error code 0xA00F4271 (0x80070001) is an indication that your camera app is not functioning properly, which is frequently met by Laptop and tablet users. If all the method mentioned above still not working with you. Here are few solutions you can try to fix the camera error.
Fix 1. Reset your webcam
Just click Windows + I to open Settings, and then select App & features and find Camera on it. Click the Advanced options link, then press the Reset button and wait for the process to be executed.
Fix 2. Check for an incompatible camera driver
1. In Device Manager, look for your camera under Camera, Imaging devices or Sound, video and game controllers.
2. Right-click (or press and hold) on the name of your camera, and then select Properties.
3. Select the Driver tab, press the Driver Details button, and look for a file name that includes stream.sys. If it's there, your camera was designed before Windows 7 and you'll have to replace it with a newer camera.
4. If you don't find a file name that includes stream.sys, continue to the next steps.
Fix 3. Roll back the camera driver
Also in Device Manager, right-click (or press and hold) on your camera, and then select Properties > Driver > Roll Back Driver, and then choose Yes. After the roll back is complete, restart your device, and then try opening the Camera app again.
Conclusion
Hopefully this article can be helpful for you and solve your Windows 10 camera not working problems. Still, if you are a beginner to use webcam record yourself, while using Windows 10 camera being a little bit troublesome. VideoSolo Screen Recorder can be your first choice, it can help you record a video through a webcam in all platforms with high quality and it will no longer be a difficult job for you anymore.

