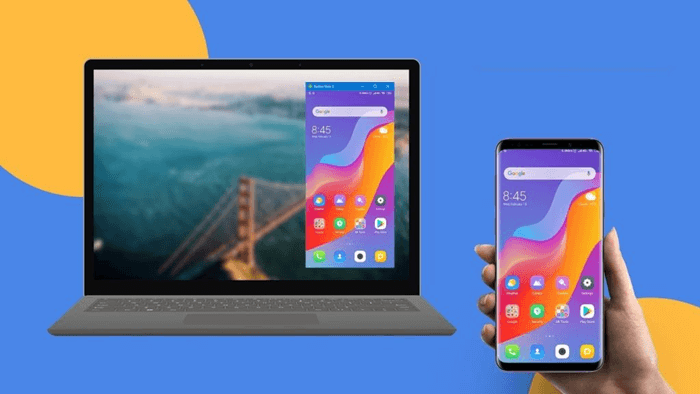
You may want to share Android screen with PC for meetings and presentations at the office or cast Android screen to PC for a better viewing experience when watching movies or playing games. Whatever the reason is, this guide will walk you through how to mirror Android screen to PC via USB or wirelessly. Now, let's cut the cliche and go straight to the methods.
How to Mirror Android Screen to PC via USB
USB screen mirroring Android to PC is useful when you have no internet or are looking for a more stable way to view phone screen on PC via USB. After enabling USB debugging, there are 2 methods for you to choose from.
Enable USB Debugging Beforehand
Before screen mirroring Android to PC via USB, you need to enable developer options on your phone and do the USB debugging first. The steps are as below.
Step 1. Find and tap the “Settings” icon on your device. Select “System“, then scroll the list and tap “About phone“.
Step 2. Find “Build number” and tap it several times (maybe 5-7 times) until a popup message informs you that you are now a developer.
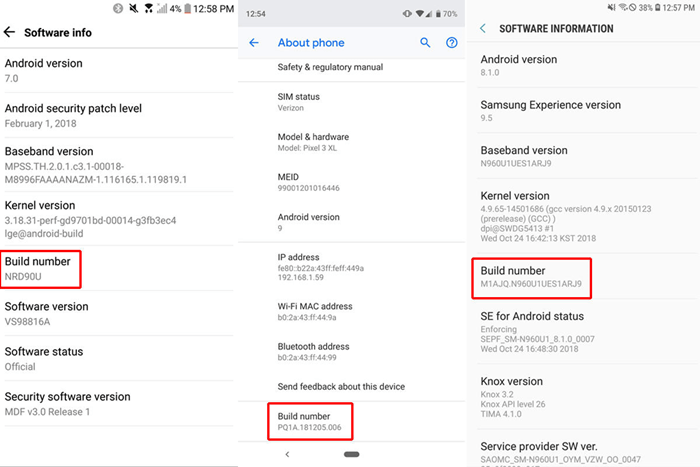

You might be asked to enter your security password like PIN code, pattern, or fingerprint scan to authorize this action.
Step 3. Back to the “System” menu and find the new-added “Developer options“. Tap and scroll down the list, and you will see the “USB debugging” option. Turn it on to allow USB debugging.
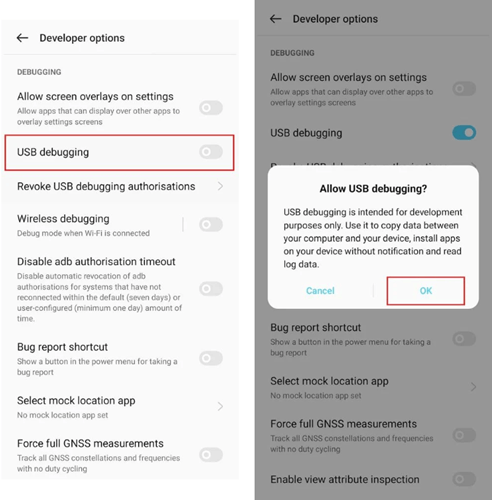
The operating step might be slightly different on various versions of Android.
Method 1. Cast Android Screen to PC with Mirror Ease
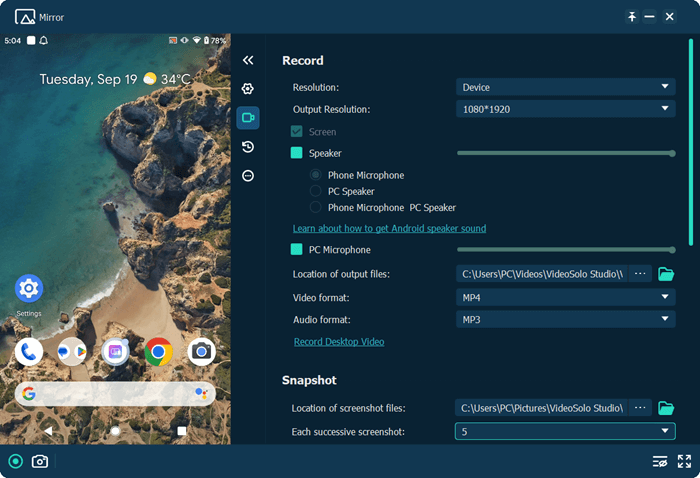
VideoSolo MirrorEase is a multi-functional screen mirror app that makes it easy to mirror phone to computer. Since it ensures the best video quality of up to 4K resolution, you're able to view any activities on a bigger screen clearly and sharply. Thanks to its top-notch technology, it delivers an excellent viewing experience for you to mirror Android to PC without any lag in real time.
- Full Control on PC – Do any activities on your Android through the computer using USB.
- Wireless or USB Screen Mirroring – Offer 2 ways to display phone screen on PC with or without USB.
- Recording/Snapshotting – Capture a video or screenshot at any time during the screen mirroring.
- Android/iOS Supported – Mirror any Android of all brands or screen share iPhone to PC.
- Various Outputs – Save videos in MP4/WMV/MOV, audio in MP3/M4A/AAC/WMA, images in PNG/JPG/GIF.
Taking a Samsung phone as an example, let's see how to start Samsung screen mirroring to PC via USB.
Step 1. To begin with, launch VideoSolo MirrorEase after you download and install it on a Windows PC.
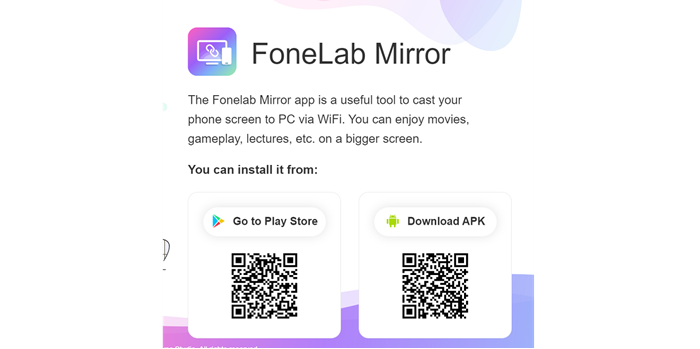
Step 2. Next, download and install FoneLab Mirror on Android, so it can build connection between devices.
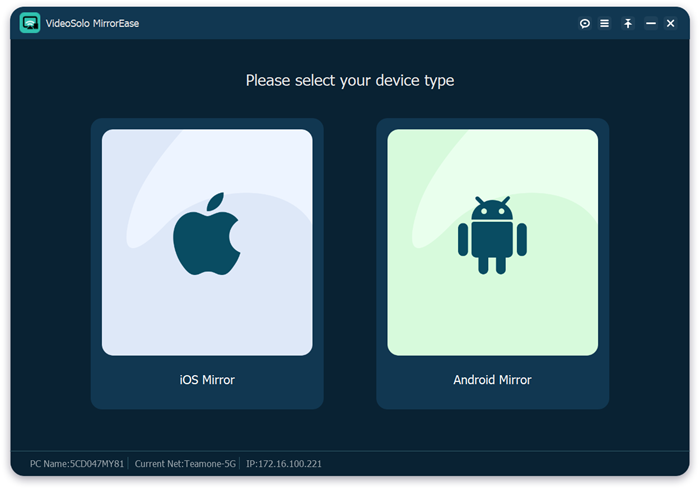
Step 3. Choose “Android Mirror” on PC and connect your Android to Windows using a USB cable.
Step 4. After that, you can cast Android screen to PC via USB.
Note that: You can display phone screen on PC with sound of the internal system or microphone.
Method 2. Mirror Broken Android Screen to PC Using Scrcpy
Scrcpy is a very popular software that can display Android screens on your PC via USB for free. It can even mirror screen broken Android to PC. Moreover, you don't need to download or install apps on your Android phone. It is very handy to use, yet the setup is a little rather complex. Now, let's see how to mirror Android to PC via USB without app.
Step 1. Navigate to the Scrcpy page on GitHub. Scroll down and download the Scrcpy zip file for your platform. Scroll down and find the “Get the app” section. Click to “download” the install file.

Step 2. Install and Run Scrcpy after the download.
Step 3. Prepare a USB cable to connect your Android phone and your PC.
Step 4. A popup window may ask you whether to allow USB debugging, tap “Allow“. And Scrcpy will start up automatically. Now you can share Android screen with PC.
With Scrcpy mirroring, you can use your physical mouse and keyboard to control your Android screen or apps inside your phone. For people whose phone is broken or without internet but still want to mirror or control the phone, Scrcpy is really a savior to cast Android with broken screen.
How to Share Android Screen to PC Wirelessly
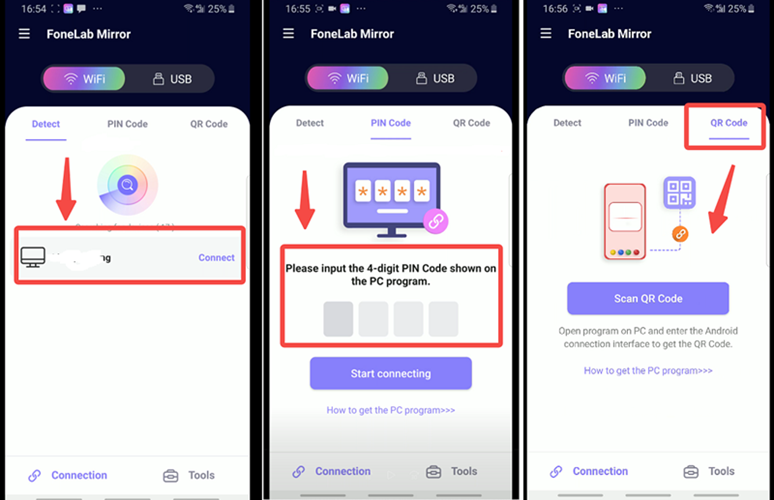
As introduced above, VideoSolo MirrorEase is also capable of wireless screen mirroring Android to PC. Meanwhile, it can keep a stable performance with an ultra-high quality of 4K. Compared to mirror phone screen to PC via USB, Wi-Fi Android mirroring allows you to build the connection in 3 ways by detecting the device, typing in the PIN code, or scanning the QR code. Here's how it works.
Step 1. Download and install VideoSolo MirrorEase on a Windows PC. Then, open the software.
Step 2. Also, please download and install FoneLab Mirror on Android for Wi-Fi screen mirroring.
Step 3. Choose “Android Mirror” on PC and choose “Wi-Fi” on Android.
Step 4. Choose a way to build the connection between PC and Android. After that, you can view phone screen on PC wirelessly.
FAQs about Screen Mirroring Android to PC
Why is it better to mirror Android screen to PC via USB?
By comparison with wireless screen mirroring, it's more stable and smooth to mirror Android to PC via USB. What's more, some of the best screen mirroring apps like VideoSolo MirrorEase allow you to control the Android right on the computer after connecting devices with a USB cable.
Can you mirror Android screen to PC without app?
No. Even though you can enable USB debugging on Android, it still lacks the capability of building a connection between Android and PC for screen mirroring. Therefore, it requires an app to make it possible to view phone screen on PC via USB.
Conclusion
After reading this guide, you should learn the first step is to turn on USB debugging on Android, and then you'll need to pick a preferred method. If your Android screen is damaged, Scrcpy is the ideal pick for you to mirror broken screen Android to PC.
Otherwise, you may give it a go at VideoSolo MirrorEase which lets you mirror and control Android on Windows with USB. Other than mirroring Android to PC via USB and wirelessly with 4K resolution, it can also enable you to record a video or capture a snapshot in real time.

