Subtitles ensure that everyone can understand and enjoy the content of a video or movie. Also, it is particularly useful for reaching a global audience or making content more accessible to non-native speakers. In addition, subtitles are widely used in educational videos and online courses in comprehension and reinforce learning. As a video creator, you may learn how to add subtitles to videos in 5 ways here to get all the benefits above. Now, let's kick in.
What's the Difference Between Caption and Subtitle?
To begin with, you'd better not mix subtitles up with captions. While the terms “subtitle and “caption” are sometimes used interchangeably, there are technical and functional differences between the two.
- Subtitles are primarily used to translate the spoken dialogue of a video into a different language commonly in movies, TV shows, and other videos. They focus on conveying the dialogue rather than providing all audio information.
- Captions are primarily intended to provide a text representation of all spoken dialogue, sound effects, and other relevant audio information in a video. They are essential for individuals who are deaf or hard of hearing.
How to Add Subtitles to a Video Permanently (Recommended!)
VideoSolo VideoPro (VideoSolo Video Converter Ultimate) must be recommended when you want to add subtitles to a video permanently. This top-rated program is equipped with a full-brown video edition feature, making you easily put subtitles on videos and permanently embedded in them. And a preview is available once the subtitle edition is done. Better yet, this full-fledged subtitle adder can ensure up to 8K Ultra HD quality output when adding subtitles to the video. Quality compression will not occur.
Explore More features of VideoSolo Video Converter Ultimate
- The user-friendly interface makes it easy to add subtitles to a video with 3 steps;
- Compatible with various video input formats to add subtitles;
- Ultra-high output quality options, such as HD, 2K, 4K, and 8K Ultra HD, are provided;
- Easily convert video and audio in bulk to over 300 formats;
- Customized output settings, like changing video/audio code, sample rate, bitrate, etc.;
- Ultrafast speeds up to 50X are provided to export video;
- Additional features like video editor, MV maker, collage creator, GIF maker, etc.
Now, let's see how to use VideoSolo VideoPro to add subtitles to video permanently.
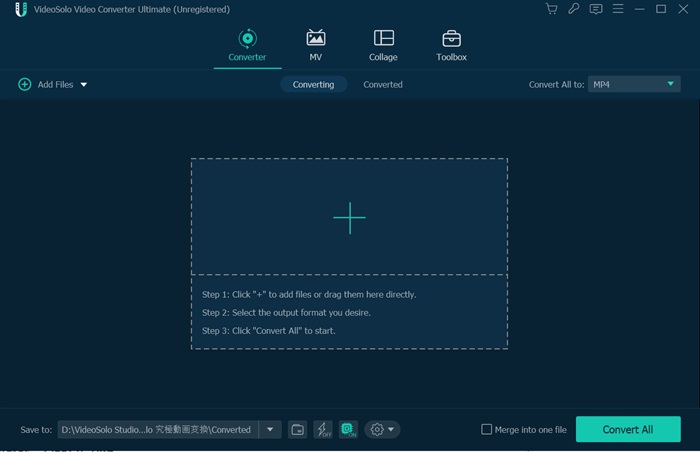
Step 1. Download and Launch VideoSolo VideoPro
Please download VideoSolo VideoPro by clicking the download button above and open it. To import video into the software, drag the file or select Add files.
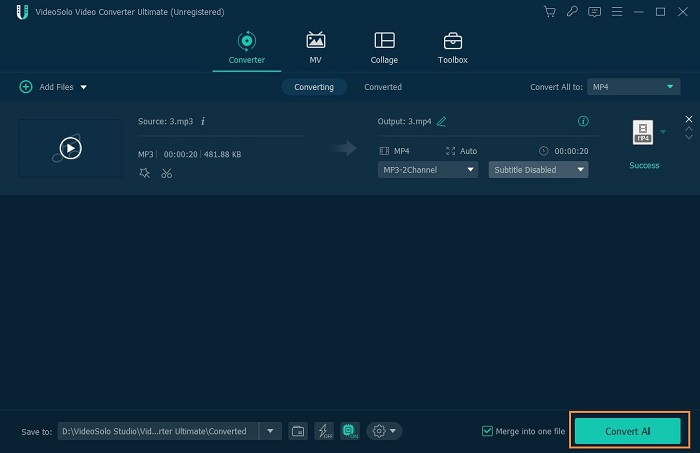
Step 2. Open the Edit Subtitles Windows
Clicking the Edit icon, and the window will pop up. In Subtitle, you can type the subtitles you want to add, which will be embedded into the video. Moreover, some other edition tools you can see at the top of the interface. Choose them, and try to crop, rotate, or add effects, a watermark.
Step 3. Convert Subtitled Videos
When you finish adding the subtitle, you can press the “Play” button to preview. If everything is OK, just click “Convert All” to add subtitles to video and export the subtitled video.
How to Put Subtitles on a Video with HandBrake
Come with free service, Handbrake can generally work with Windows, Mac, and Linux as a full-fledged video transcoder. More than that, this cross-paltform and open-source program can also do you a great favor if you wonder how to add SRT file to videos. Here are the specific steps to add subtitles to a video free of charge with Handbrake.
Step 1. Install Handbrake on your computer and launch it. Then import a video source from your local folder.
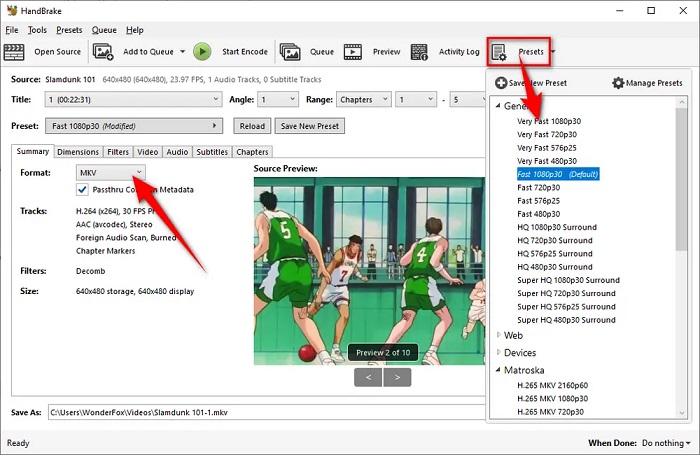
Step 2. Preset the output format by going to “Presets” > “Summary” > “Format” to choose the format you want to export.
Step 3. Click the “Subtitle” section, find “Tracks” and choose “Import Subtitle” to add an SRT subtitle file. A soft subtitle will be added to your video as a fault. If you want to hardcode the subtitle to the video permanently, you need to tick on the “Burn in” option.
Step 4. Click the “Browse” button in the bottom right corner to set up the output destination.
Step 5. Now, you can tap the green “Start Encode” button to add subtitles to the video permanently with HandBrake.
How to Embed Subtitles to a Video Permanently in VLC
Like Handbrake, VLC is also a countable subtitle adder. For one thing, VLC goes viral on Mac, Windows, iOS, Android, and even Ubuntu and is an open-source video tool. For another, considering its video compatibility, you can add subtitles to videos of almost any format in this VLC. So, this part is going to tell you how to embed subtitles to a video permanently in VLC.
Add Subtitles in VLC on Windows
Step 1. Open VLC on your computer, and click “Media” > “Stream” > “Add” to choose the video you want to embed subtitle.
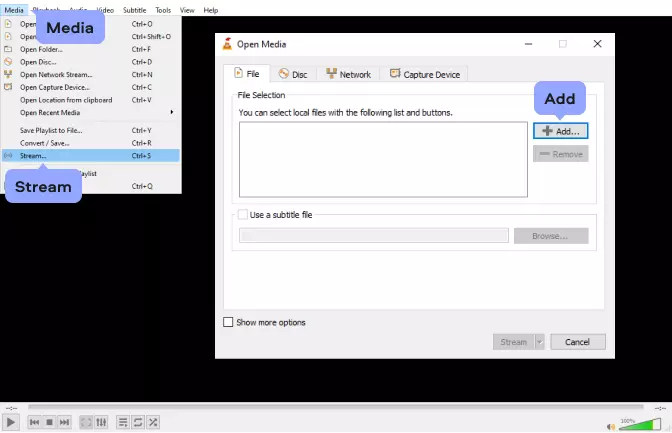
Step 2. Tick on the “Use a subtitle file” option and click “Browse” to select the corresponding SRT file. Then click “Stream” > “Next“.
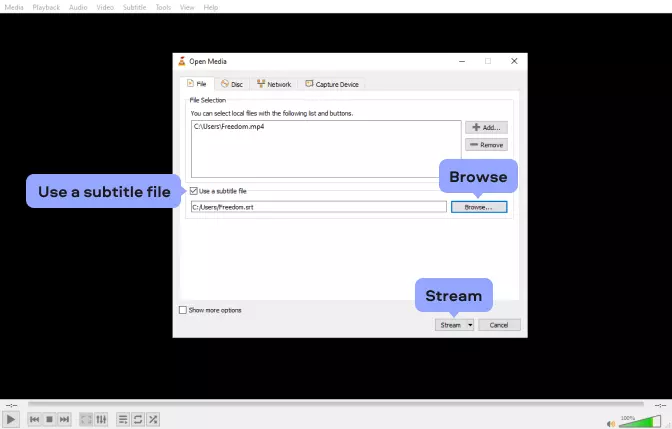
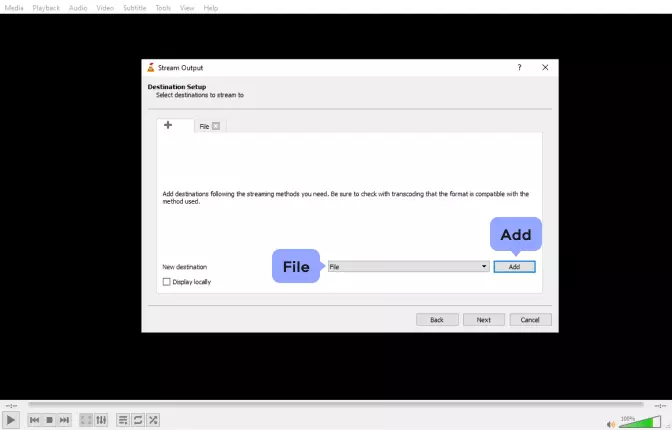
Step 3. Click “File” > “Add” to specify the export folder. Find the video you want to subtitle and make sure the filename ends up with “.mp4” or another extension. Then navigate to the location where you would like to keep the file and click Save. To proceed, click “Next“.
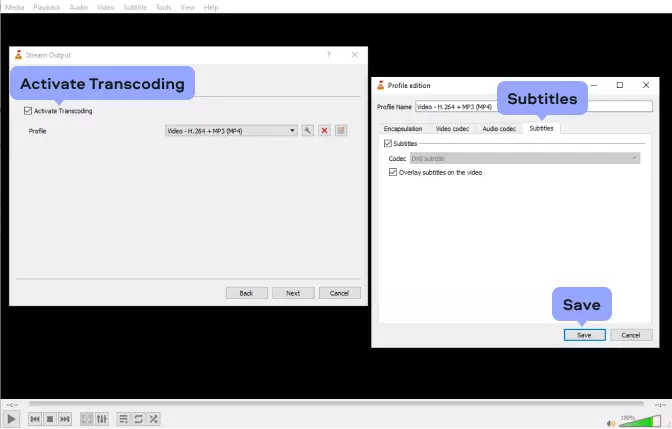
Step 4. Tick on “Activate Transcoding“. After that, hit the “Wrench” icon and select the “Subtitles” tab. Now you need to toggle on the two options (Subtitles and Overlay subtitles on the video) under “Subtitles“. Finally, Click “Save” and “Next“. In the new window, click “Stream“.
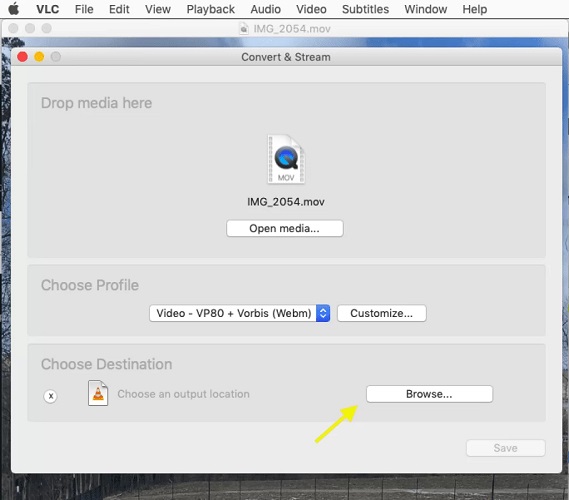
Add Subtitles in VLC on Mac
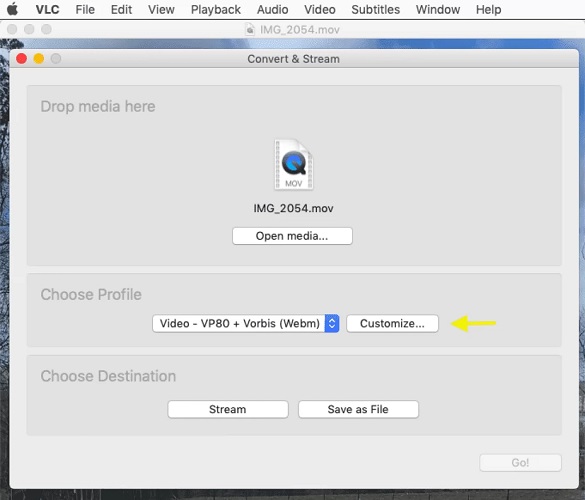
Step 1. Install and open VLC on your Mac. Then click “File” > “Convert/Stream“.
Step 2. Drag and drop the video source you want to add subtitle in the new pop-up window. Then click “Customize” to select the SRT file. A new dialog box will open, where you need to choose “DVB Subtitle“.
Step 3. Now click “Apply” to confirm adding subtitles to a video. Consequently, click on “Save File” and “Browse” to choose a folder as the subtitled video destination folder.
How to Add Subtitles in Movie Online
If you don't want to get any extra program installation, an online video edit tool named Kapwing will be a recommendation. Its “Magic Subtitles” feature can help you auto-generate subtitles for editing and burning. Not only that, this feature can also make all subtitles embedded into videos permanently. Now you can follow the process below and see how to add subtitles to a video free and online.
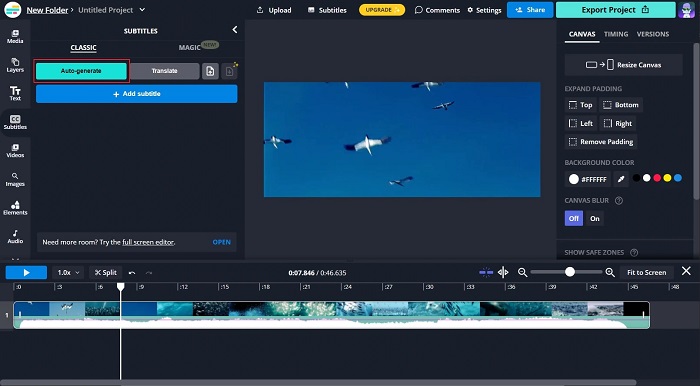
Step 1. Drag and drop the video source you want to put the subtitle in Kapwing.
Step 2. Navigate to the “Subtitles” tab in the left sidebar, hit “Auto Subtitles” and Kapwing will detect the video language to automatically create the subtitle for you.
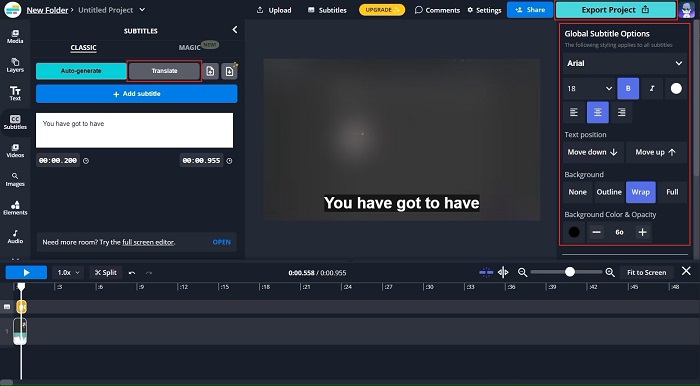
Step 3. If you want a different language subtitle, just go to the “Translate” tab to translate the subtitle. Also, from the right panel, you can change subtitle's text font, size, background, and other appearance settings. Once you finish the settings, click “Export Project” to add subtitles to video online.
How to Subtitle a Video Free with YouTube
YouTube has a feature that automatically generates subtitles for videos. The automatic subtitling feature uses speech recognition technology to transcribe the spoken content of a video and display it as subtitles. However, they may not be 100% accurate. Besides, you can also use YouTube to add subtitles to MP4 online. Here's how it works.
Step 1. Go to YouTube on your web browser and log in to your account.
Step 2. Click “Create” > “Upload video” to import your video.
Step 3. Fill out other information and click “Next” to proceed.
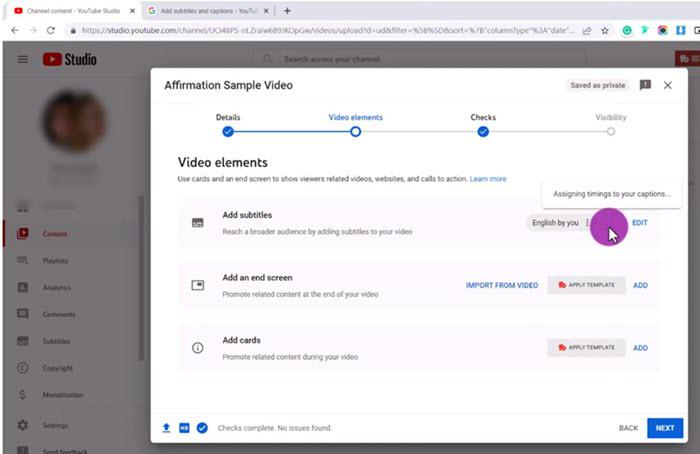
Step 4. Select “Add Subtitles” and upload the subtitles to YouTube.
Step 5. Get all the rest done, and click “SAVE” to add subtitles to video online.
Tip: How to Create SRT Files and Merge Subtitles Permanently
In general, the SRT files for movies are easily retrievable online, thus you can use the mentioned tools to permanently add subtitles. However, for some lesser-known films or self-made videos, there may not be readily available SRT files online. How to make subtitles file and permanently add them to these videos? In this part, the way to create SRT files and merge subtitles with video permanently with these files will be displayed. Check it and have a try.
How to create an SRT file on Mac
Step 1. Create a new file in TextEdit, type “1” as your first subtitle sequence, and then click “Enter” to move to the next line.
Step 2. Type in the beginning and end timecode in the format – “[hours]:[minutes]:[seconds],[milliseconds] –> [hours]:[minutes]:[seconds],[milliseconds]”, and then move to the next line by pressing “Enter”.
Step 3. Now you can type your subtitles. But remember to stay in the 32-character limit, 2 lines per subtitle, and be in line with the subtitle guidelines.
Step 4. When you finish the last line, you need to leave a blank line at the end to indicate the beginning of a new sequence. Then type “2” to repeat the process above until you have all subtitles written.
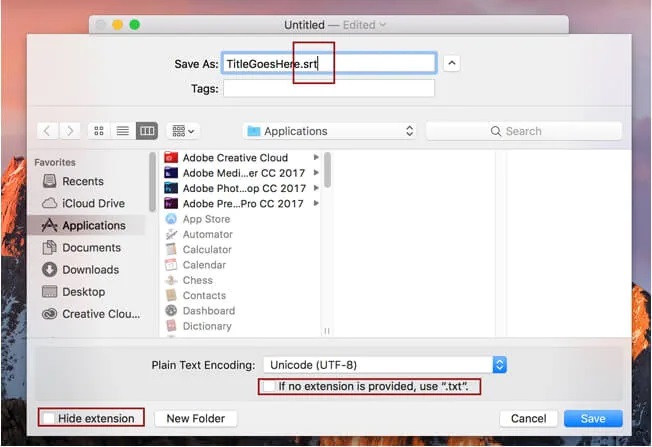
Step 5. Save your file as .srt by choosing “Make Plain Text”. Remember to Uncheck “Hide Extension” and “If no extension is provided, use .txt”.
How to create an SRT file on Windows
Step 1. Open a new file in Notepad. Then start by typing “1” and move to the next line by pressing the “Enter” button.
Step 2. The starting time for each subtitle should be written in “[hours]:[minutes]:[seconds],[milliseconds]” format. Consequently, you should type the ending time for the subtitle: “–> [hours]:[minutes]:[seconds],[milliseconds]“. The entire line looks like 00:00:01,120 –> 00:00:05,040.
Step 3. Enter to the next line and you can type the corresponding subtitles. Once finished, move to create line-space between the subtitle you just made and the next subtitle.
Step 4. Type “2” to repeat the above steps. Then likewise create “3”, “4”, till the last subtitle line.
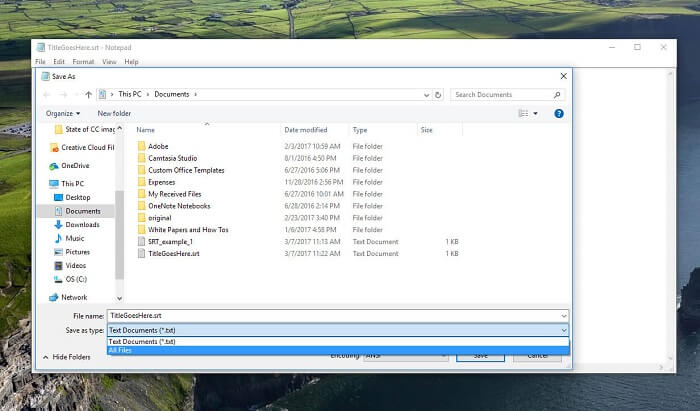
Step 5. Click “File” and then click “Save As” to save the subtitle file as .srt file.
Note: After creating a subtitle file, you can add subtitles to a video with VideoSolo VideoPro.
Comparison of 5 Ways to Embed Subtitles to Video
| Windows & Mac | Multiple Input Formats | Subtitle Edition | Video Editing Tools | Subtitle Preview | |
|---|---|---|---|---|---|
| VideoSolo VideoPro | √ | √ | √ | √ | √ |
| Handbrake | × | √ | × | × | × |
| VLC | √ | √ | × | × | × |
| Kapwing | √ | × | √ | × | √ |
| YouTube | √ | √ | √ | × | √ |
While each subtitle adder has its own strengths, VideoSolo VideoPro is most definitely worth a try for more stable and comprehensive support of your video creation. Better yet, its all-purpose features and smooth and easy operation can caption your all videos with no sweat.
FAQs about Adding Subtitles to Video
Where to Download Subtitles for Videos?
There are various websites that can help you get subtitles; VideoHunter is recommended because it can help you download videos with subtitles from most platforms or simply download the subtitle files at no cost. You can also try OpenSubtitles and Moviesubtitles.org, which have subtitles for some of the most popular movies and TV shows.
How to Add Subtitles to a Video on iPhone?
You can try iMovie to add subtitles on your iPhone. You may get the latest version of the iMovie program for free by performing a quick search for it on the Apple App Store. Now, let's see how to add subtitles in iMovie.
- On the timeline, tap the clip you wish to edit.
- Tap the T icon from there. After you do that, numerous styles will start to appear.
- Simply input the text for that specific clip after choosing the appropriate style.
- Choose the location where your subtitles will appear.
- To make sure your subtitles are correct, play the video.
- It's simple to modify if you see a spelling error or incorrect word. You must return to edit mode, choose the clip, then hit the T icon.
- Tap done after you're satisfied with your creative efforts and subtitles.
What is the Difference Between SRT/ASS/SSA Subtitles?
The three most widely used subtitles are SRT, ASS, and SSA and we will introduce the difference of these three types of subtitles.
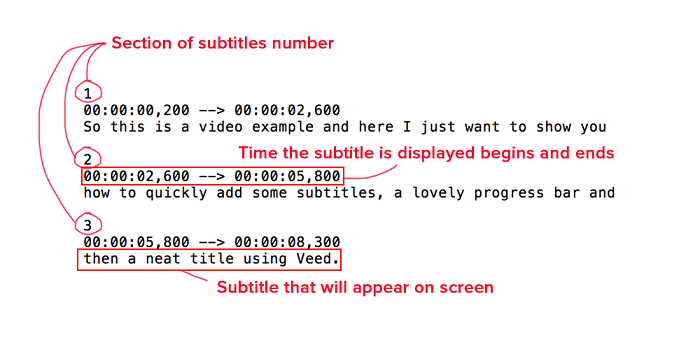
- SRT: SubRip Text is abbreviated as SRT. This is the most basic text subtitle type, consisting of a numeric counter, the time, and the subtitle text.
- SSA: SubStation Alpha is abbreviated as SSA. It is more potent than SRT. It offers a variety of colors, typefaces, and unique effects.
- ASS: ASS is an abbreviation for Advanced SubStation Alpha. It covers all of the characteristics of SSA as well as extensions based on the basic SSA features.
What is the App that Auto Generate Subtitles from Video?
Many apps support auto-generate subtitles from videos now. Except Kapwing and YouTube introduced here, you may also consider Google Cloud Speech-to-Text API, Microsoft Azure Speech to Text, Happy Scribe, and Rev.
Conclusion
All the methods above make it easy for you to add subtitles to videos on any device. However, if you want to become an excellent video creator and make appealing videos, VideoSolo VideoPro is more than a subtitle adder with versatile features. It lets you edit videos with MV effects, apply amazing filters, convert videos to any format with lossless quality, etc. Better try than never.

