


Imagine when you are having an online lesson or attending an online meeting and listening to valuable content. Or, you are too busy to watch desired streams on time. In these cases, you may want to record the screen on Windows 10 with audio for viewing afterwards.
There are optional methods available on the internet. Here, this blog has collected the five easiest ways to guide you on how to screen record on Windows 10 with audio. Just read on to explore!
Screen Record on Windows 10 with Audio via Xbox Game Bar
To cater to user demands, Microsoft has embedded a built-in recorder on Windows 10/11 PCs for users to process the screen record with audio on desktops without installing extra software or extensions to help. This built-in tool for screen recording on Windows PC is called the Xbox Game Bar. Now, you can record computer screen with audio on Windows 10 via the Xbox Game Bar following the guide below:
STEP 1. Enable Xbox Game Bar Feature
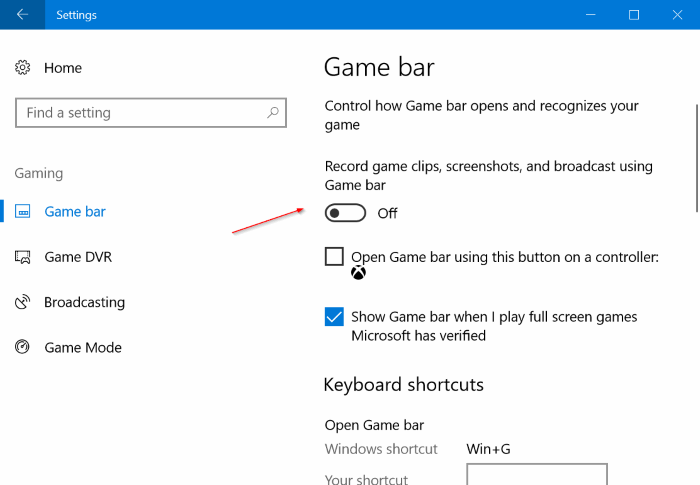
For first-time users, you are required to enable the Xbox Game Bar feature first. Directly navigate to “Start” > “Settings” > “Game Bar” and enable the “Record game clips, screenshots, and broadcast” option.
STEP 2. Use Xbox Game Bar to Record Screen
Press on the “Windows” + “G” keys on the keyboard and you can open the Xbox Game Bar quickly. Then on the “Capture” widget, simply hit the “Record” icon and the Xbox Game Bar will process to record screen with audio on Windows 10 computer for you.

STEP 3. Save Recording on Windows 10 Computer
Once the recording ends, give click on the “Stop” icon, then the recording will be saved to the “Videos” folder on your Windows 10 computer for later streaming.
Disadvantages of the Windows 10 Xbox Game Bar:
- Limited output settings to customize the recording;
- Not all applications installed on Windows 10 support the Xbox Game Bar recording;
- Other activities on Windows 10 desktop outside an app won't be captured via the Game Bar;
- The window that appears over the one you are recording won't be showing up while processing the recording.
Screen Record on Windows 10 with Audio Using VideoSolo Screen Recorder
As Xbox Game Bar is more appropriate for recording some simple screen activities because of its lack of customized settings, an alternative to it is needed to process more professional screen record with audio on PC. The best screen recorder for Windows 10 you can try is VideoSolo Screen Recorder.
VideoSolo Screen Recorder delivers professional screen recording functionality for computer users, with multiple recording modes to help capture your screens in any of your requirements. It can record the screen only, or with system audio, microphone, or even webcam turned on simultaneously.
In addition, the software provides customized output settings to adjust the recording area, audio volume, or output parameters as its dear users need. VideoSolo Screen Recorder can preserve the original quality for you. Hence, you are available to save the recordings with great quality for later playback.
VideoSolo Screen Recorder
- Specially designed recording modes for any scenario
- Capture system sound and mic audio together
- Support adding a webcam overlay to your recording
- Customized hotkeys for easy control
- Equipped with built-in editing tools
Windows 11/10/8/7/Vista/XP macOS 10.7 or above
With the lightweight body and intuitive design, it won't be a difficult task no matter what activities you are required to record on your PC. Now, follow the guide on how to record screen on Windows 10 with audio via VideoSolo Screen Recorder right away!
With the lightweight body and intuitive design, it won't be a difficult task no matter what activities you are required to record on your PC. Now, follow the guide on how to record screen on Windows 10 with audio via VideoSolo Screen Recorder right away!
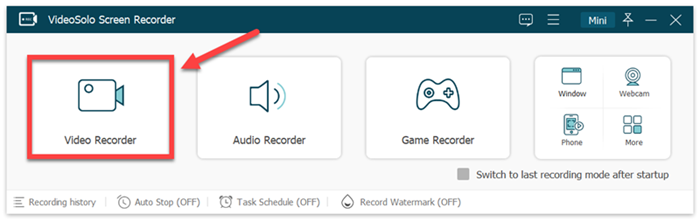
STEP 1. Select "Video Recorder" Mode
Launch VideoSolo Screen Recorder once the installation completes. You are required to select the “Video Recorder” on the interface of the recorder.
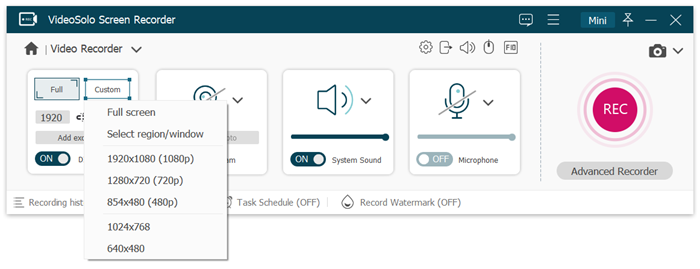
STEP 2. Adjust Recording Settings
Now in “Video Recorder”, adjust the recording area as you need. Also, as you are going to record screen with audio on Windows 10, just select to enable the system sound, microphone, or even webcam recording on based on your requirements. You are able to adjust the volume as you desire.
(Optional) STEP 3. Advanced Settings
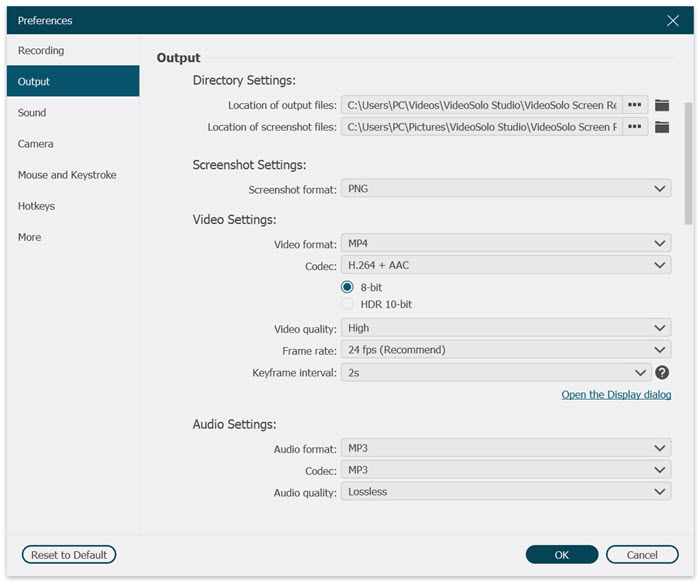
Hit the setting gear icon above the microphone setting box to open “Preferences”. Under the “Output” section, you are able to adjust the parameters for outputting the recordings accordingly.
STEP 4. Screen Record with Audio on Windows 10
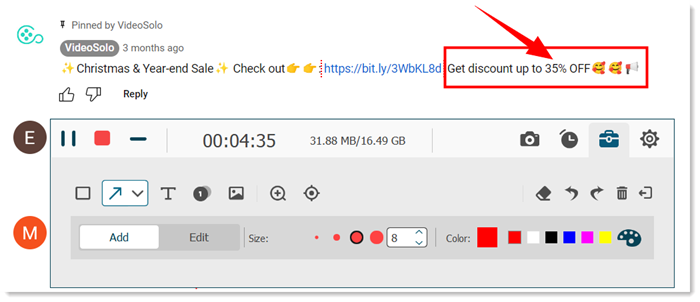
Then, hit the REC button on the “Video Recorder” interface or hold the hotkeys and the recording will be started. While processing the Windows 10 screen recording, you are able to use the floating drawing panel to take notes on the recording directly.
STEP 5. Edit and Save Recorded Video on PC
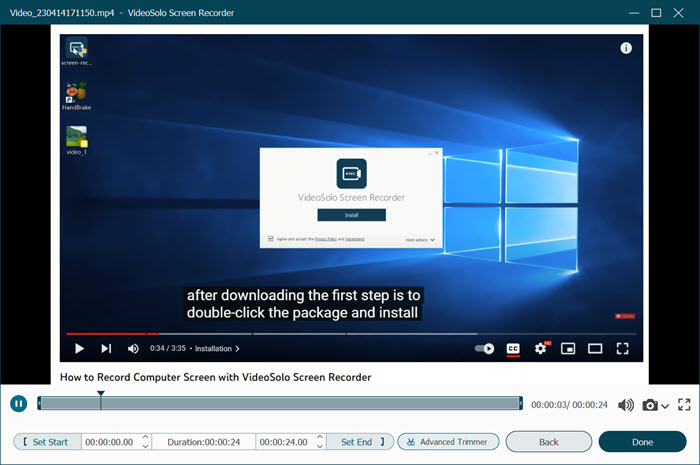
Once the recording is over, tap the stop icon and you will be navigated to the preview window. When you have trimmed the recording, hit the “Save” icon to preserve the recorded video on Windows 10 right away.
Screen Record on Windows 10 with Audio via Movavi
Screen Recorder
Movavi Screen Recorder is a user-friendly and no lag screen recordercompatible with both Windows and Mac operating systems. You can record the entire screen, a specific window, or a customisable area. Movavi can also capture webcam, draw annotations on recordings in real time, and highlight the mouse cursor. More conveniently, it allows task recordings, which can start and stop recording automatically. The output videos can be saved with high resolution in regular formats like MP4.
STEP 1. Install and Launch Movavi.
Download and install the screen recorder on your Windows 10 computer. Launch the program after the installation is complete.
STEP 2. Adjust the Recording Settings.
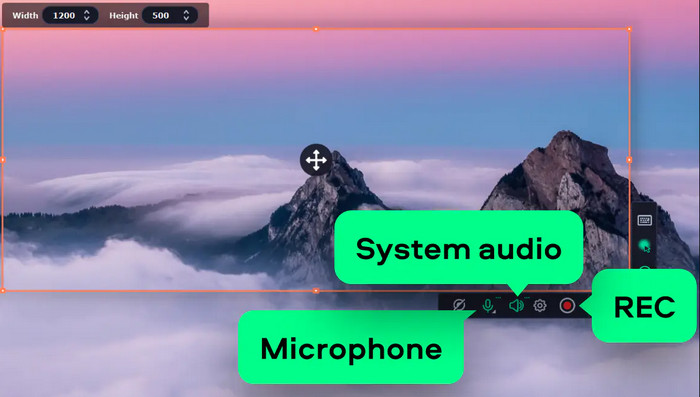
Click Screen recording on the sidebar and set the area you want to record. You can also open the microphone, system audio, or both by clicking their icons.
STEP 3. Start Recording.
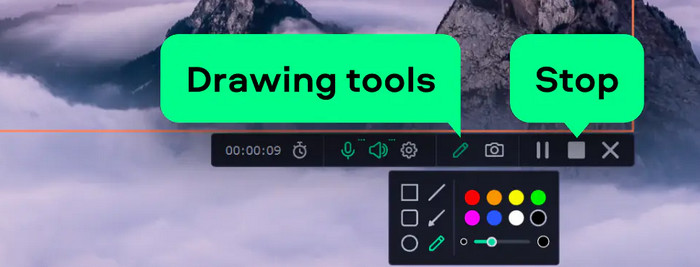
Click the REC button to start recording and Stop to finish. During recording, you can pause or draw with various tools to highlight the specific area.
STEP 4. Save the Recording.
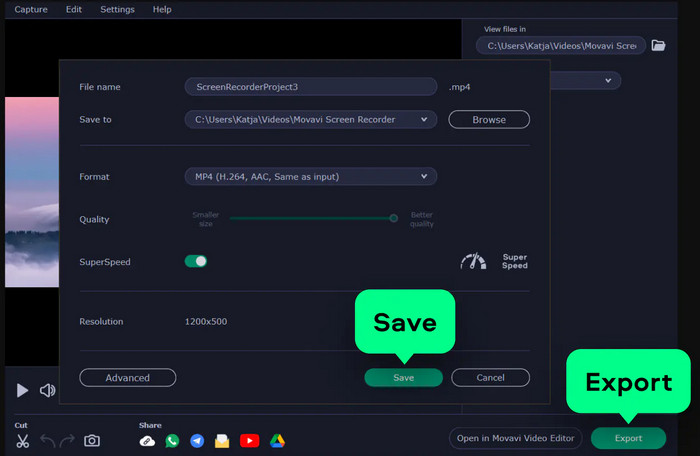
After recording, you can watch the recording. You can trim it by clicking the Scissors icon and adjust the sliders on the timeline to choose the part you want to delete. Then, press Export, set the output parameters, and hit Save.
Disadvantages of Movavi Screen Recorder
- The trial version adds a watermark to exports and limits recording duration.
- It only includes simple trimming and cutting; not suitable for advanced video editing.
- It may not perform smoothly on older computers.
Screen Record on Windows 10 with Audio Using OBS Studio
OBS Studio is a free and open-source screen recording tool. It can run on Windows, macOS, and Linux operating systems, and capture your screen, webcam, browser windows, games, and more simultaneously or separately. It is ideal for recording videos and exporting them as local files with various definitions up to 4K. Further, the custom transition feature helps you to switch naturally between scenes.
STEP 1. Install and Launch OBS Studio.
STEP 2. Adjust the Output Parameters.
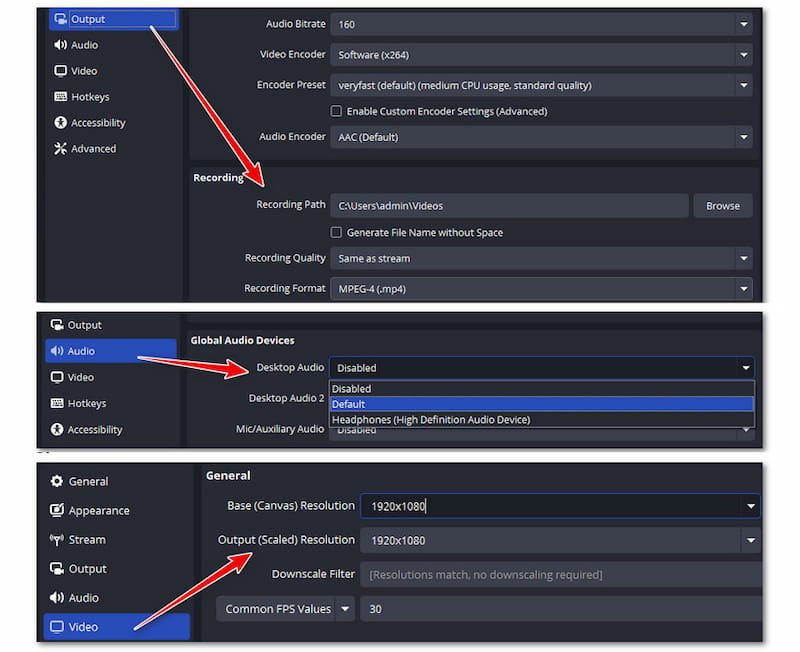
Click Settings in the lower right corner. Click Output to select the saving path and format. Select Audio to change audio source, and click Video to choose the desired resolution.
STEP 3. Set the Recording Window.
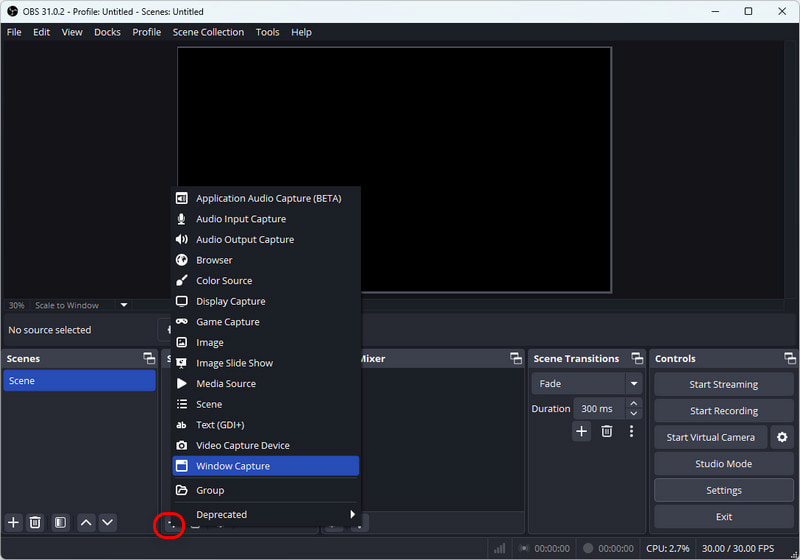
Tap + in the Source section and choose the area you want to record, then click "OK".
STEP 4. Start Recording and Stop.
Hit Start Recording in the lower corner and stop the recording when it is finished.
Disadvantages of OBS
- The interface and settings may be difficult for beginners.
- It does not offer tools for trimming or editing videos after recording.
- It requires big system usage, especially when recording in high resolution or streaming.
Screen Record on Windows 10 for Free with PowerPoint
There is also a tricky way for Microsoft Windows 10 users to screen record with audio on PC without installing extra software – which is to use the screen recording feature provided in PowerPoint! For any of you who have installed Microsoft PowerPoint, it can greatly save your time and expense in seeking another reliable screen capturing software.
Using PowerPoint to screen record on PC won't be complicated. Now, let's see how to use the feature to record screen with audio on Windows 10 with ease:
STEP 1. Enable Screen Recording in PowerPoint
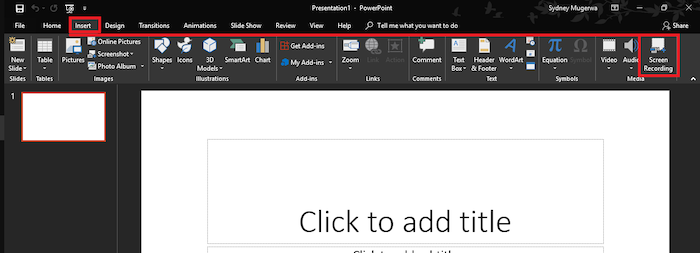
Create a new presentation in Microsoft PowerPoint. Then you are required to navigate to “Insert” > “Screen Recording”.
STEP 2. Enable Audio Recording
When the PowerPoint window is minimized, customize the recording area to cover the items you desire to record on computer. You are able to enable the audio recording at the same time by tapping the “Audio” icon in order to screen record with audio on Windows 10.
STEP 3. Start Recording Screen on PC
Now, start the screen recording simply by hitting the “Record” icon. Tap it again and you are able to stop the recording.
STEP 4. Save Recorded Video on Windows 10
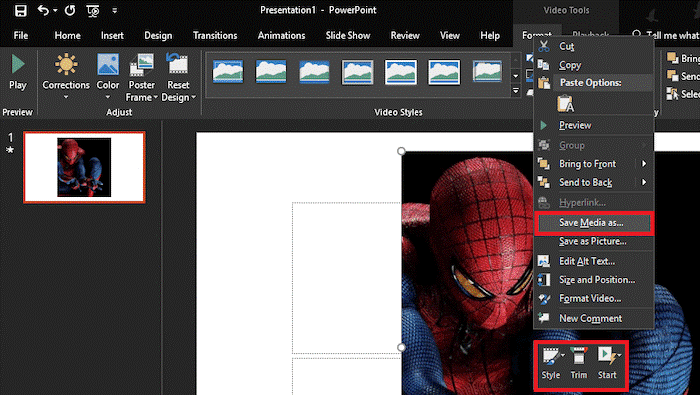
Once the recording is ended, the recorded video will be inserted to the PowerPoint right away. Simply right-click on it and select to “Save As” a video file on Windows 10.
Disadvantages of PowerPoint Recording:
- PowerPoint required to be opened every time to process the screen recording on Windows 10;
- Fewer customization settings to output the recordings;
- The output quality is not guaranteed
To bypass all these limitations, get started with VideoSolo Screen Recorder free trial to record screen with audio on Windows 10 without paying a penny!
FAQs about Screen Recording on Windows 10
Read more FAQs raised by others if you get confusions in recording screen on Windows 10.
How to screen record on Windows 10 with audio?
To record screen on Windows 10 with audio, VideoSolo Screen Recorder will be a better choice. Its flexible recording modes selection avails you to record screen with both system sound and microphone audio enabled on. In addition, the software is also equipped with more advanced settings such as soundcheck, noise cancellation, and audio enhancement features to ensure the best audio quality in capturing the voice. You can surely get the best recording output using VideoSolo Screen Recorder.
How to record screen on Windows 10 for free?
As introduced in the blog, using the embed Xbox Game Bar and Microsoft PowerPoint recording feature are both for free. In addition, VideoSolo Screen Recorder also provides free trial to enable a free screen record on Windows 10 without paying a penny. By comparison, the latter is able to deliver more professional help with more advanced recording features equipped.
Conclusion
It won't be a difficult task to record screens on Windows 10 with audio, as you get the most professional way using VideoSolo Screen Recorder and a good alternative, Movavi Screen Recorder, which can help you record screens in real-time and provide a convenient scheduled recording. Aside from the two, built-in Xbox Game Bar, free OBS and PowerPoint can meet your basic recording needs. Now, simply select your ideal method and process a quick screen record on your Windows 10 right away!
Still, VideoSolo Screen Recorder is a powerful screen recording program worth trying!

