


"Can you screen record on a Mac computer?"
To safeguard information security, Apple has disabled voice capturing while processing some activities with your Mac computers. But in some cases, like attending an online meeting, or making an important video call, you definitely need to screen record on Mac with audio.
Therefore, this post has prepared 5 ultimate ways to guide you on how to record screens on Mac with audio captured at the same time. Among these methods, you will also get the best screen recorder for Mac to help. Now, just dive into reading!
Screen Record on Mac with Audio Using VideoSolo [Best Method]
Best for: Available to screen record on Mac screen with audio from both system and microphone simultaneously.
The best screen record with audio software for Mac we recommend is VideoSolo Screen Recorder. It can serve you with the most processional and flexible recording modes to screen record Mac with audio, including both the internal and external sound.
To ensure the best audio quality while screen recording Mac, this best Mac recording software is also equipped with noise cancellation and voice enhancement features, ensuring better audio quality outputs for you. Furthermore, the program is also equipped with more beneficial features like the scheduled recording, locked window capturing, advanced trimmer, and more, providing you an effortless process to screen record on Mac with audio.
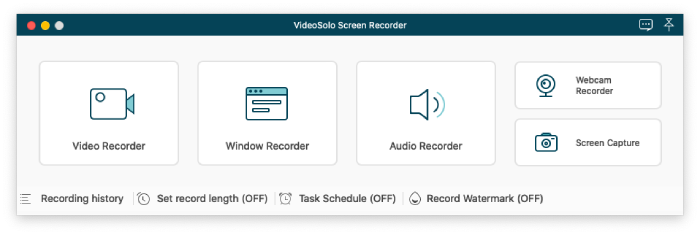
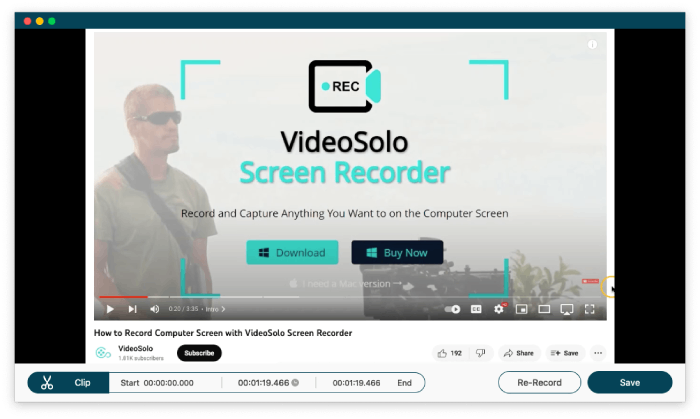
VideoSolo Screen Recorder
- Record video on Mac in up to 4K 60FPS ultra-high quality
- Customize the recording area to capture any onscreen activity
- Specially designed modes for screen recording in any scenario
- Support adding real-time annotations while recording
- Equipped with advanced trimmer to edit your recordings
- Add no watermark & support customizable watermark
Next, go through the following brief guide and grasp how to screen record Mac with audio using VideoSolo Screen Recorder:
Step 1. Install and Launch VideoSolo Screen Recorder
Download, install, and launch VideoSolo Screen Recorder. The free version has a recording time length limited to 3 minutes, but has no restriction to major features. You are recommended to experience its provided screen recording features before making a purchase.
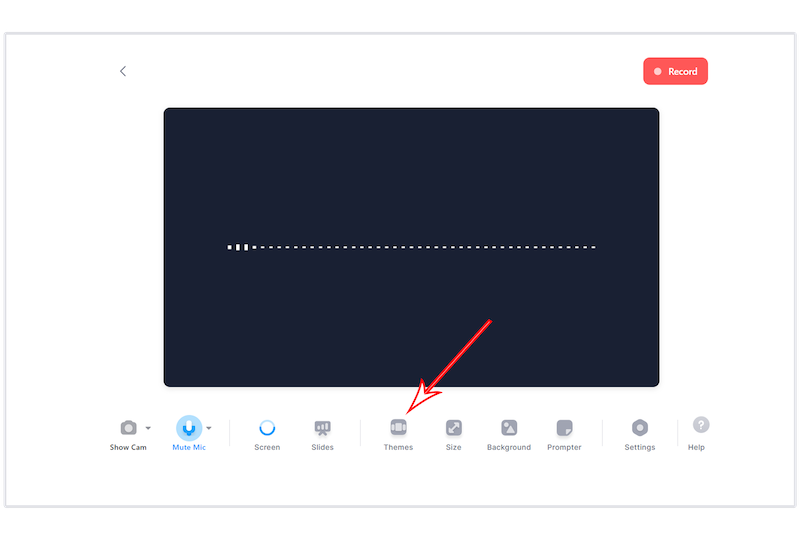
Step 2. Customize Screen Recording Area
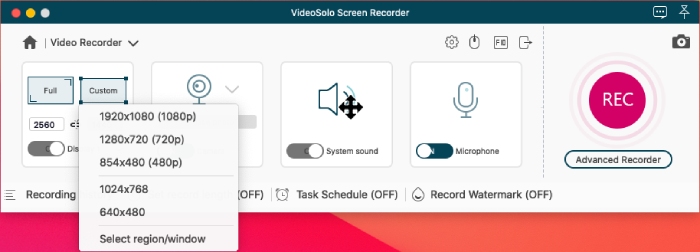
Launch this Screen Recorder for Mac, and choose “Video Recorder” from the main interface. Then you can define the region that you want to capture, like recording a full screen or a custom region in requirements.
Meanwhile, to record screen and audio on Mac at the same time, turn on system sound or microphone (you can turn both of them on to capture at the same time), then also adjust the volume in preferences.
Step 3. Configure Audio Recording Settings
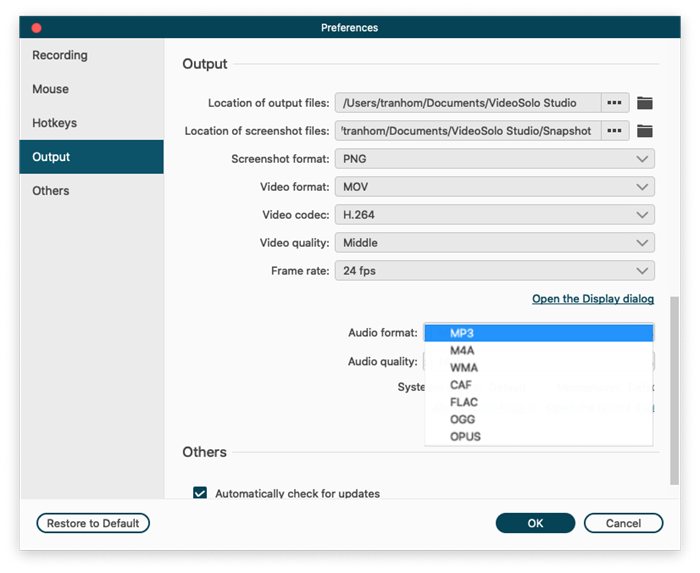
Now, click on the gear icon above the microphone setting box, you can open Preferences and further adjust the audio output in advance. Here, you can customize the audio quality and quality based on your needs.
Step 4. Start Screen Recording Mac with Audio
When you are ready to screen record on Mac, click the “REC” button. If you want to highlight something in the video, you are free to use the drawing panel to add real-time annotations.
Step 5. Save Recording on Mac
Once the recording finishes, simply tap the Stop button to end the process. Simply by clicking on the Save button, the recorded video with sound will be saved to your Mac computer for later playback offline!
Pros:
- Users can enjoy HD video quality.
- Scheduled screen recording is convenient and easy.
- It is allowed to custom watermark and webcam mode.
- Draw, annotate and highlight screen in real-time when recording.
Cons:
- In the free trial, you can only record 3 minutes.
How to Screen Record on Mac with Sound via Screenshot Toolbar
Best for: Using the built-in Mac screen recorder to screen record on Mac with microphone sound only (no third-party program installation needed)
The most hassle-free way to screen record Mac with sound is using the built-in recording feature – Screenshot Toolbar. This tool is pre-installed on your Mac (running macOS Mojave or above). You can simply launch it with hotkeys to process the recording tasks.
Screenshot Toolbar is an ideal Mac screen recorder if you only need to screen record Mac with external audio like your microphone sound. But it's a pity that this tool is not available to capture system sound directly.
Now, let's simply go through the steps below and grasp how to screen record on Mac with external sound through this embedded Screenshot Toolbar:
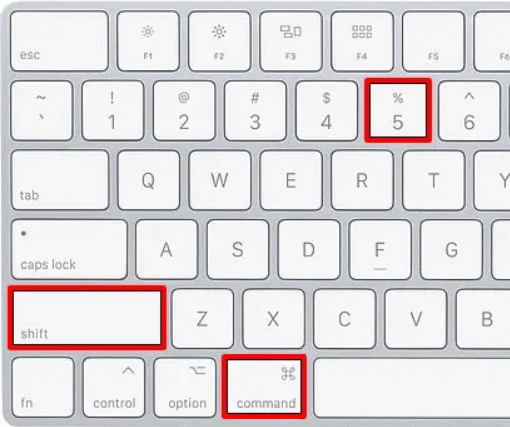
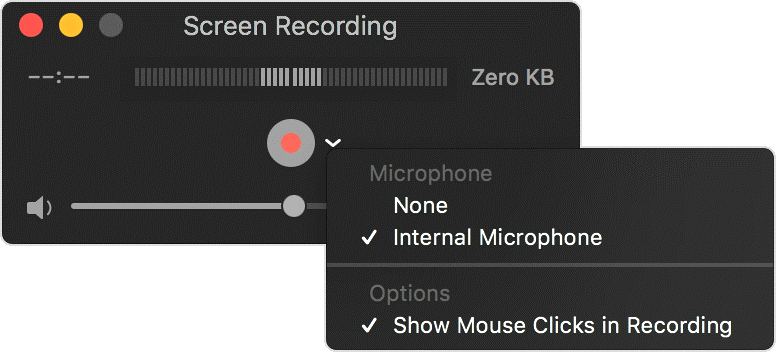
STEP 1. Launch the Screenshot Toolbar by pressing Command + Shift + 5.
STEP 2. Set the recording area:
- If you want to record entire screen of your Mac, just click on “Record Entire Screen”
- If you want to record a portion of the Mac screen, choose “Record Selected Portion” Then you can select the area you want to record.
STEP 3. To screen record on Mac with audio simultaneously, hit “Options” > “Microphone” and select the detected external sound-capturing device to record sound from.
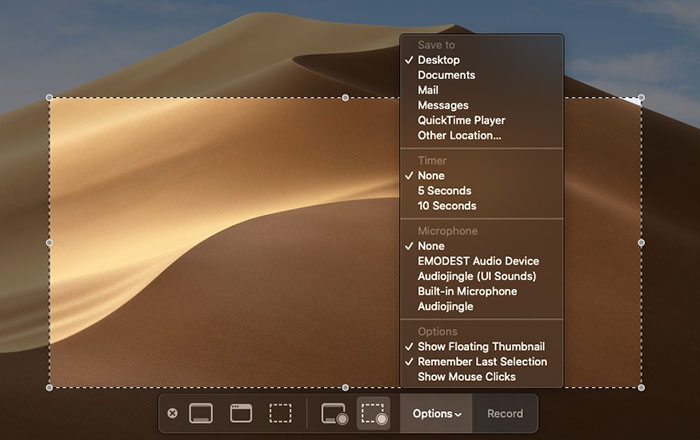
STEP 4. Click on “Record” to start the recording.
STEP 5. To stop recording, click the “Stop Recording” icon in the menu bar. Or press Command-Control-Esc (Escape) to end it.

After you stop recording, a thumbnail of the video appears briefly in the lower-right corner of your screen. You can click the thumbnail to trim, save and share this Mac screen recording video with sound as you desire.
Pros:
- No need to install third-party software - it's integrated into macOS.
- Users can easily access by Shift + Command + 5.
- Simple interface is user-friendly.
- Be lightweight with low impact on system performance.
Cons:
- It only supports external audio via microphone.
- There are no editing tools for trimming, annotations, or other editing features.
- It can only export recordings in MOV format.
- Users cannot record screens on a Mac on schedule.
How to Screen Record Mac Activities with Audio Using QuickTime
Best for: Recording Mac screen with microphone sound without third-party program installation needed
Another easy way to screen record on Mac with sound is using QuickTime. Although It is well known as a media streaming tool, QuickTime is also equipped with an embedded Mac screen recorder, providing free and effortless service to screen record on Mac with audio from external devices like your microphone simply by taps.
However, it is noted that system sound recording is also prohibited by QuickTime. Now, also turn to the steps below and learn how to screen record Mac with audio using this embedded program:
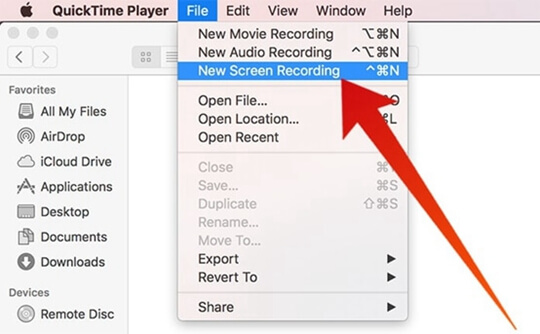
STEP 1. Launch QuickTime on your Mac when you get a demand to record Mac screen with sound.
STEP 2. Go to “File” > “New Screen Recording” to start a new recording project.
STEP 3. You are required to enable the audio recording by hitting the drop-down arrow button, then select “Internal Microphone”. (If you have plugged in an external microphone, choose the one you want to use.)
STEP 4. Click the red record icon to screen record Mac with audio.
When the recording is over, click the stop icon and the recorded video with sound will be automatically saved on your Mac.
Pros:
- There is no need to download extra software.
- Users can record the entire screen or the selected area.
- Microphone input is also available.
- It allows basic editing like trimming and exporting.
Cons:
- It is unable to record screens on Mac with internal system audio.
- It lacks advanced features like annotations, webcam overlay, or task recording.
- The output formats are limited (mostly MOV).
- Users cannot record screen and webcam at the same time.
How to Record Screen and Audio on Mac with OBS for Free
Best for: Professional screen recording Mac with both microphone and system sound equipped for free
If you want to use a totally free third-party Mac screen recorder with audio to capture Mac screen effortlessly and with high quality, OBS may be a good choice. As an open-source tool, OBS helps you to record screen on Mac with audio for free. It is equipped with multiple recording settings to define the outputs as you desire, trying to maintain a decent quality to deliver you a nice audio streaming experience later. Moreover, this free Mac screen recorder with audio will not insert watermarks into your recordings and affects video streaming. Therefore, it is a trustworthy program with reliable services to help screen record on Mac with audio in an easy process.
However, OBS would be comparatively complicated to operate with many professional functions hard to understand in a short while. And sometimes OBS may not record the audio properly. But still, you can follow the steps below and master how to screen record on Mac at no charge but in good quality with OBS:
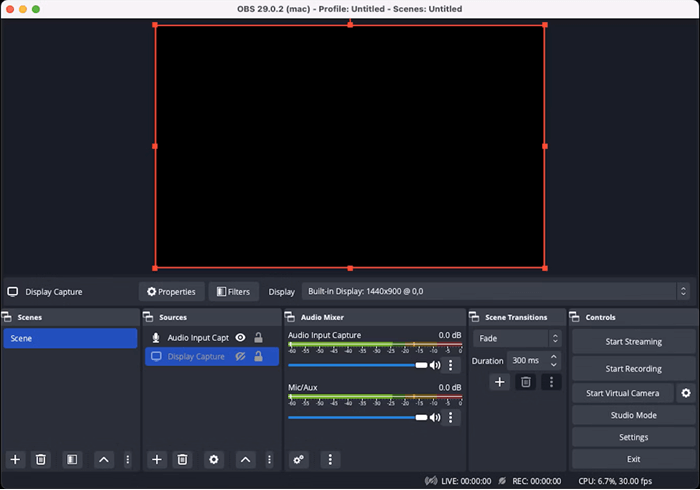
STEP 1. Open OBS on your Mac, and turn to its “Studio Mode” to separate the screen into two panes.
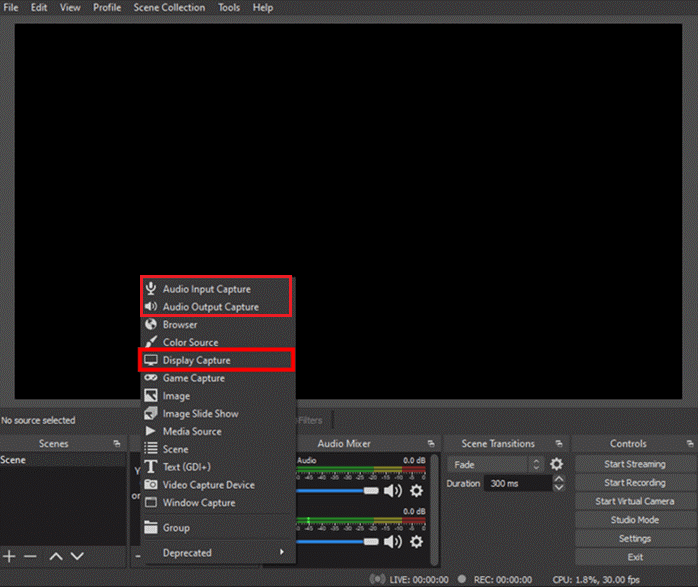
STEP 2. Now, click the “Sources” option and select “Display Capture” to “Create New” recording. Then you can select the window that you want to record.
STEP 3. To allow OBS to record Mac screen with audio, don't forget to set the “Audio Input Capture” and “Audio Output Capture” sections. Just as their icons show, the two options can be adjusted to record both your microphone sound and internal audio.
STEP 4. When you finish all settings, click “Start Recording” to begin to record Mac screen with audio. After the recording is ended, press “Stop Recording” and OBS will let you name the recording file and also select the format to save it. You can go to the output folder to check your video.
Pros:
- The full recording features together with live streaming functions for free use.
- It creates unlimited scenes and it is easy to switch to keep privacy.
- Provide various selections of source options.
- Great video and audio editing tools.
Cons:
- Too complicated for newbies to use.Meager assistance and guidance.
Screen Recording Mac with Audio Using Online Mac Screen Recorder
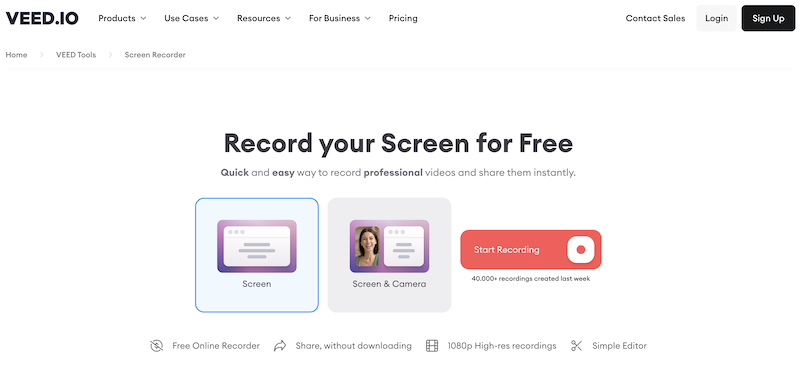
Replacing of installing a third-party Mac screen recorder, selecting an online screen recorder available for Mac systems is also a rational option to enable an effortless screen recording process on Mac. VEED.IO offers an intuitive main feed and easy manipulation to screen record on Mac with audio, only with a web browser but without any applications installation needed. It also provides multiple capturing modes and HD 1080P definition quality, ensuring a flexible control to record Mac screen in decent quality.
Next, please also follow the procedures to record Mac screen with audio easily:
STEP 1. Use a web browser to go to VEED.IO.
STEP 2. Select a recording mode to get started by clicking the red Start Recording button.
STEP 3. Before the recording proceeds, a notification window will pop up and ask you to select a windows tab to allow recording on it. Once the selection completes and confirm Start, the recording will begin.
STEP 4. On the recording window, you can access some helpful tools to control or adjust the recording effects in preferences.
STEP 5. Once the recording ends, stop it and the recorded video will be generated. Download it and you can save the recording as a local file offline on your device.
Pros:
- Easily accessible via browsers on Mac and no downloads required.
- Includes rich editing tools after recording.
- It can record screens with webcam and microphone simultaneously.
- Automatically save projects online for easy viewing and sharing.
Cons:
- It has high requirements for a stable internet connection to work smoothly.
- The free version has watermarks and time limits on recordings.
- It cannot record internal system sound on the Mac computer.
- There may be data security risk for users.
Comparison Table of 5 Ways to Screen Record on Mac with Audio
| VideoSolo | Screenshot Toolbar | QuickTime | OBS | VEED.IO | |
|---|---|---|---|---|---|
| Record System Sound | ✅ | ❌ | ❌ | ✅ | ✅ |
| Record Mic Audio | ✅ | ✅ | ✅ | ✅ | ✅ |
| Record Webcam | ✅ | ❌ | ❌ | ✅ | ✅ |
| Annotations | ✅ | ❌ | ❌ | ❌ | ❌ |
| Editing Tools | ✅ | ❌ | ❌ | ✅ | ✅ |
FAQs about Screen Recording Mac with Audio
How do I screen record on Mac with audio?
To screen record on Mac with audio, you can use VideoSolo Screen Recorder, the best screen recorder for Mac to empower capturing both system and microphone sound at the same time. Here guides you with simple steps on how to record screen on Mac with audio using this program:
- Download, install, and launch VideoSolo Screen Recorder.
- Choose Video Recorder, and customize your recording area.
- Adjust Audio settings in Preferences as you like.
- Record Mac screen with sound.
- Preview, edit, and save your recordings.
Can I screen record on Mac with system audio?
Yes, you can record system audio while screen recording on a Mac. In the audio source options within VideoSolo Screen Recorder, tickle to capture system audio along with your screen recording.
Is there a way to screen record specific app audio on Mac?
Unfortunately, the built-in screen recording feature on a Mac does not have the ability to record audio from a specific application only. It captures system audio as a whole. But if you specifically need to record audio from a particular app, such as recording browser audio, you may turn to VideoSolo Screen Recorder to help. The program will deliver the best experience to record screen on Mac regardless of what activities and contents are displayed.
Conclusion
Now, you've learned the 5 solutions about how to screen record on Mac with audio effortlessly. Comparing these 5 ways with different Mac screen recorders to help, no matter if you are a first-time Mac user, or an advanced user VideoSolo Screen Recorder is the best choice to record screen on Mac. It can record your system sound and microphone audio simultaneously, when those embedded screen recording tools equipped on Mac are not compatible with. Just click the download button to start right now!
After compressing, the resolution will remain original, but the bitrate will be lower in different levels according to the reduced size.

