


It would be difficult for Mac users to record the screen with audio, because Apple has prohibited people from capturing the interface sound for safety reasons. But there are still some cases you would need to do such recordings. As a result, this article will show you the 7 best ways and the used tools to record the Mac screen with audio, both the system and the microphone sound. If you also need a solution to break the limitation set by Apple and successfully screen Recorder your Mac with audio, have a look now.
Screen Record on Mac with Audio via VideoSolo Screen Recorder
VideoSolo Screen Recorder is the first recommended software that can work with Mac smoothly and provide the high-quality screen recording functions to people. It can record your Mac screen with both system and microphone sound at the same time. What's more, it offers an audio enhancement mode for capture the sound with better condition.
Main Features:
- Records any screen activities on Windows and Mac with the best quality
- Provides more modes such as Video Recorder, Audio Recorder, Webcam Recorder, Gameplay Recorder, and so on
- Allows to edit the video recordings during the recording process
- Supports to save the recordings with common plain formats
- Offers scheduled recording mode to process the recording at specific time
- Allows to trim or crop the recordings during the previewing time
Record Mac Screen with Sound - VideoSolo Screen Recorder
Step 1. To get started, you should install VideoSolo Screen Recorder on Mac and then go to the “Video Recorder” on the home screen.

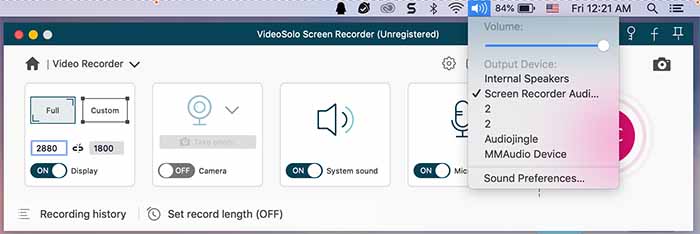
Step 2. In “Video Recorder”, you can change the recording area and size. Then by turning on the system sound or microphone, and also set the volume based on the needs, then you can record the audio when the recording starts.
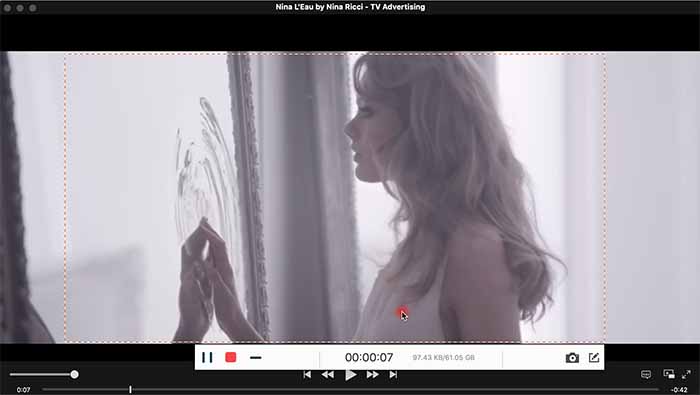
Step 3. After the settings, directly press the “REC” button and the recording will begin. VideoSolo Screen Recorder will keep capturing the screen activities and also the sound until you stop it.

Step 4. When you stop the recording, the software will be switched to the preview window. You can check and trim the recording before saving. Finally, press “Save” and the recorded video with audio will be saved to your Mac.
Record Mac Screen with Sound via Wondershare DemoCreator
Wondershare DemoCreator brings the professional functions for people to record the Mac screen with high-quality video outputs and also the best sound effect on computer. It will also provide some small functions for easily using to edit the recordings even during the recording process such as drawing on the video, take a screenshot, and so on. But still, Wondershare DemoCreator is an easy-to-use software and there are only several easy steps needed to finish recording Mac screen with audio.
Record Mac Screen with Audio - Wondershare DemoCreator
Step 1. Firstly, install Wondershare DemoCreator and open the recorder. You should select to enter “New Recording” on the main screen.
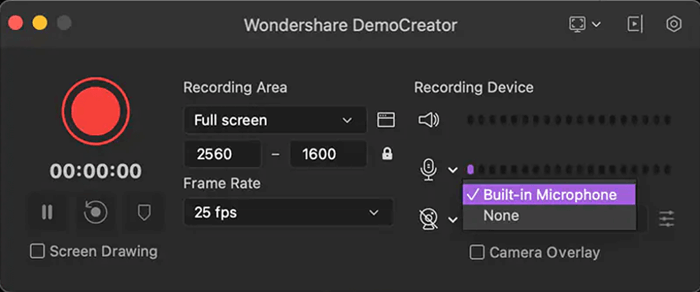
Step 2. You can set the video recording settings now. For example, adjust the recording area and also select the audio sources you need to record. It would also be better for you to test and set the volume now.
Step 3. Then you can play the video and start the recording process at the same time.
Step 4. When the video is ended, stop the recording by clicking the “Stop” button or press the shortcut Shift+Cmd+2. After this, you can get the recorded video with audio saved to your Mac.
Compared to VideoSolo:
VideoSolo Screen Recorder offers much clearer interface that helps everyone to quickly learn the ways to use the recorder easily. Try this user-friendly screen recording tool on Mac from today!
Record Screen on Mac with Audio via Movavi Screen Recorder
Movavi Screen Recorder has created a much simpler way for Mac users to record the computer screen with audio at the best quality with easy steps. By giving the scheduled recording function, people can set the specific starting and ending time to let Movavi Screen Recorder control the recording automatically when they go away. When exporting the recorded video, Movavi Screen Recorder can also speed up the speed and saves time for you.
Record Mac Screen with Audio - Movavi Screen Recorder
Step 1. When you have installed Movavi Screen Recorder, open the software and also the video or prepare the activity that you need to record with audio.
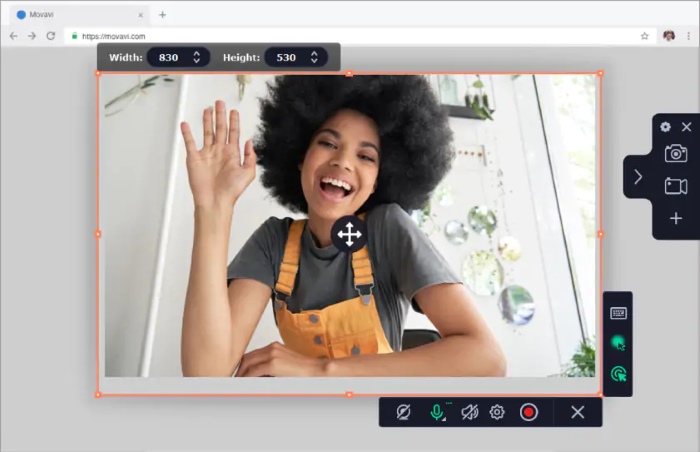
Step 2. When the widget of Movavi Screen Recorder opens, find the “Screen Recording” button and click it, then drag the recording box to the area you are going to record.
Step 3. After placing the recording box, a menu bar will show up and you can turn to the “Microphone” or “Speaker” for recording the audio for the video. Then start the recording by clicking the “Record” button beside.
Step 4. Directly press the “Stop” button and the recording will end. The recorded video with audio will directly saved to your Mac computer.
Compared to VideoSolo:
The screen recording process provided by VideoSolo Screen Recorder will be much simpler. You can easily learn the way to record your Mac screen with audio within seconds using VideoSolo.
Record Screen And Sound on Mac with EaseUS RecExperts
EaseUS RecExperts also provides the high-quality screen recording functions for Mac users. It allows people to choose to record the Mac screen with audio from the system sound or microphone freely. And at the same time, EaseUS RecExperts will make sure both the recorded video and audio can be kept at the best quality. As a result, you are surely to get a high-quality video recording with audio using the tool.
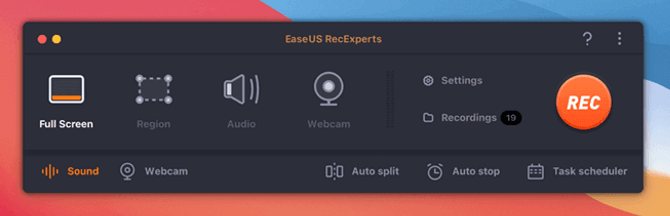
Record Mac Screen with Audio - EaseUS RecExperts
Step 1. After installing EaseUS RecExperts, open the software and also prepare the video you need to record with audio on your Mac.
Step 2. Choose to record the full screen or custom area in EaseUS RecExperts. For recording audio at the same time, press the “Sound” option in the lower-left corner for selecting to record system sound or microphone (or both) and also adjust the volume.
Step 3. Then you can play the video and start recording it with audio by pressing the “REC” button.
Step 4. When you stop the recording, the file will automatically be saved on your Mac. You just need to access it and playback the recorded video on Mac freely.
Compared to VideoSolo:
VideoSolo Screen Recorder provides more modes you can use in different cases to record the screen on Windows and Mac. Also, it will be much easier to use. Free download the software and have a try now!
Screen Record with Audio on Mac Through OBS
OBS Studio provides a free tool for Mac users to record their computer screens with audio with the most professional functions. The main targeted users of OBS are those who want to record high-quality line streamings and can control the whole aspects of the recorded videos. It would be a little difficult for new users to get started, but the output quality will be extremely good. OBS Studio is a high-class screen recorder and video creator for professional users.

Record Mac Screen with Audio - OBS
Step 1. After installing OBS on your Mac computer, open the software and create a new profile.
Step 2. Then you also need to create a new scene collection for starting a new recording. You can find the “Scene Collection” option on top menu bar, and click “New” to create one.
Step 3. Now in the workplace of the software, you can preset some settings based on your needs, such as adding a source, adjusting the settings, and so on.
Step 4. After the settings, start the recording by clicking the “Start Recording” button in “Controls” section. You can also choose to stop the recording by clicking the provided button here when the recording ends. Then the saved video will be kept on your Mac computer.
Compared to VideoSolo:
OBS is much more complex and difficult to use. By comparison, VideoSolo Screen Recorder just need very easy clicks to capture the screen with audio on Mac, and also with high quality. Quickly free download it to try the function now!
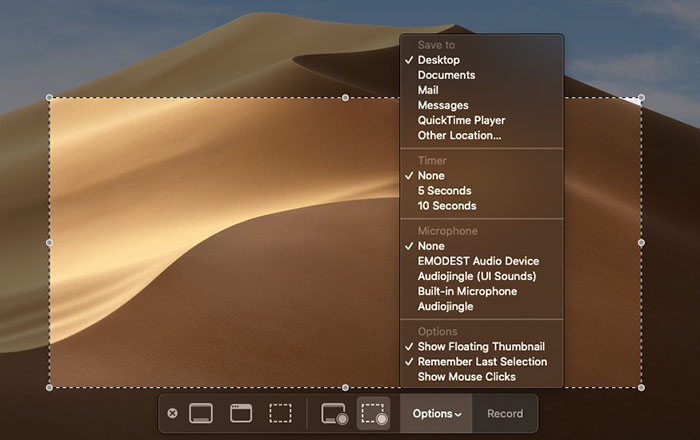
Record Mac Screen with Microfone Sound via Quicktime Player
As an in-built media player for Mac, Quicktime Player doesn't ask people to install an extract software because it has been provided there. It provides a screen recording function that can help people screen record the Mac with audio freely. This recording feature provided by Quicktime Player is simple to use, and its output quality is also good. The steps below will show you the way to control it.
Record Mac Screen with Audio - Quicktime Player
Step 1. Firstly, you need to go to utilities and find the Quicktime Player for opening it.
Step 2. Click on the “File” on the menu bar and you can see the “New Screen Recording” option. Select it and the screen recorder will be opened.
Step 3. Remember to choose “Audio recording” before starting the recording process. Making sure this is on, by pressing the red circle and the recording will get started.
Step 4. When the recording finishes, the recorded video with sound will be save on Mac.
Compared to VideoSolo:
Quicktime Player is an easy-to-use feature provided on Mac, but it has less controls on the recording and related settings. As a result, it is recommended to select VideoSolo Screen Recorder to record Mac screen with audio and customized settings.
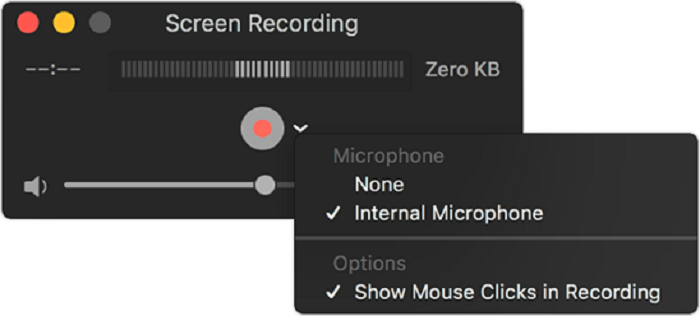
Record Mac Screen with Microfone Sound via Quicktime Player
If you are using iOS Mojave system or newer ones, you can enjoy the in-built screen recording feature provided by Apple. There provide hotkeys for Mac users to easily control the recording feature and record the screen with audio on Mac. This steps will show you how to use it.
Record Mac Screen with Audio - Use Hotkeys
Step 1. Hold the Command + Shift + 5 on keyboard to let the screenshot toolbar show up.
Step 2. Now click the “Options” button on the toolbar and select “Audio/Microphone”. Then you also need to adjust the recording area based on your needs.
Step 3. After the settings, press the “Record” button and the screen will be captured with audio.
Step 4. When the recording finishes, press Command + Control + Esc keys at the same time and the recording will automatically be saved on Mac for offline playback.
Compared to VideoSolo:
Using hotkeys would be convenient because people don't need to download any other software. However, the recording tool provides less settings and its performance may not be fluent or high-quality as VideoSolo Screen Recorder.
Record Mac Screen with Microfone Sound via Quicktime Player
Before ending this article, let's make a simple conclusion on the similarities and differences of these 7 methods to record Mac screen with audio through the following table:
| Software | Platforms | Customized Size | Audio Source | Easy to Use |
| VideoSolo | Windows, Mac | Full, custom | System, microphone | Easy |
| DemoCreator | Windows, Mac | Full, custom | System, microphone | General |
| Movavi | Windows, Mac | Full, custom | System, microphone | Easy |
| EaseUS | Windows, Mac | Full, custom | System, microphone | Easy |
| OBS | Windows, Mac, Linus | Full | System, microphone | Difficult |
| Quicktime | Mac | Full | Microphone | Easy |
| Hotkeys | Mac | Full, custom | Microphone | General |
When you choose a reliable and professional screen recorder, you get the best services to record Mac screen with audio at the best quality. From these 7 ways, I would select VideoSolo Screen Recorder for its easy operations but high-quality recordings. What about you?

