


 Download Screen Recorder For FREE!
Quick Navigation
Both Windows and macOS offer free built-in tools for basic recording tasks. However, if you need to record high-quality screen activity with system audio and real-time annotations, dedicated desktop recorder software like VideoSolo Screen Recorder provides a more versatile and flexible solution. Here is a guide on how to capture your computer screen using different methods.
A screen recording video can clearly and intuitively show the steps for an activity, such as a tutorial, educational lesson, how-to video, software bug report, or a gameplay video. How to make such videos? Here, we have picked some easy-to-use recording tools on Windows/Mac for making perfect screen-recording videos.
Method 1: VideoSolo Screen Recorder [Editor's Choice]
You may need to record from different sources like your computer screen, microphone, or the web for different purposes. In this case, you should choose the best screen recorder that can satisfy all your needs. Among them, VideoSolo Screen Recorder can be your great assistant.
You can record any activities, including your webcam face, along with audio on your desktop. Audio can be recorded from both the computer microphone and system audio. During recording, versatile features are provided, such as adding annotations or drawings on the screen and taking screenshots. And its performance is perfect and stable, without lag or crashes.
I suppose these features can meet the demands of the majority of desktop recording makers. The free trial version allows you to evaluate its functions, and you can download it below.
 Features
- Various recording modes for gameplay, video, audio, etc.
- Provide scheduled recording and auto-stop recording.
- Record your screen in quality up to 4K/60FPS.
- Offer noise reduction & audio enhancement.
- Advanced editing tools to polish your videos.
- 10+ output formats for different devices' compatibility.
- Customize handy hotkeys in preferences for quick recording.
 pros
- Record your screen with low latency.
- Trim, duplicate, compress, add, merge, or convert videos.
- Lock targeted windows for a clean and mute-notification recording.
- Scheduled recording lets you be free from constantly monitoring.
 Cons
- No webcam shooting and noise cancellation for free users.
- Can’t record audio from a specified application before purchasing.
How to Record Computer Screen via VideoSolo?
Step 1. Select "Video Recorder"
At first, download VideoSolo Screen Recorder and install on your computer. Then, launch the program and choose “Video Recorder” from the pop-up main interface for recording the computer desktop.

Step 2. Define Your Recording Region
It is easily observed that there is a preset capture frame, so you can move the frame and resize it. Otherwise, try to select one of the recording region modes from the drop-down list beside the first button. And you can optionally turn on the webcam according to your recording content.

Step 3. Adjust Audio Accordingly
If you are going to record the system audio, click on the third button and move the adjacent sliders right or left to adjust the volume.
Equally, click on the fourth button and move slides to adjust microphone sound, if you want to capture your own sound.
Step 4. Specify Parameters
Head to define your preferences if necessary by clicking “More settings”. You may want to tick “Hide desktop icons when recording” under the column of “Recording” if you are afraid that your desktop will betray your privacy. You are also able to hide the toolbar during recording by ticking the corresponding box. Above all, highlight your procedures by ticking the buttons under the column of “Mouse” in order to be audience-friendly. Hotkeys and output formats are also free to change in the section.

Step 5. Do Editing During Recording
Go for “REC” to start recording your computer desktop. During desktop recording, you can select the pen icon on the floating bar to draw or add annotations in a way to help your audience better understand the screencast.

Step 6. Save and Share Your Desktop Recording
Hit the stop button (the solid rectangular icon) on the upper left corner. After previewing the video, click “Save” and follow the final instruction.
After successfully saving the recorded clip, you can choose to revise the fixed name by default and share it with your friends via trending media, like YouTube and Instagram.

Method 2: Record PC Desktop with Built-in Tools
Windows comes with native tools that allow you to capture screen video without installing third-party software. While convenient for quick tasks, both tools have notable limitations depending on what you intend to record.
Xbox Game Bar
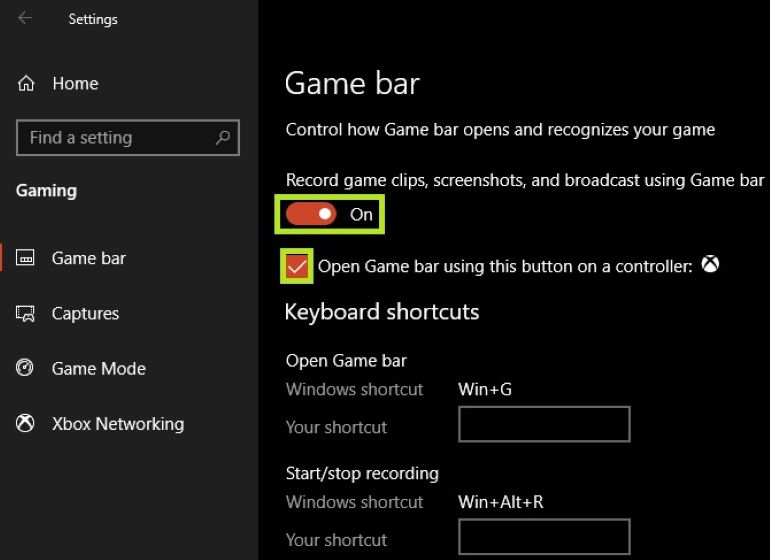
Step 1. Go to Settings > Gaming > Xbox Game Bar and ensure the toggle switch is turned on.
Step 2. Press Win + G on your keyboard to bring up the Game Bar overlay.
Step 3. In the Audio widget, choose whether to capture sound from your active app, system audio, or external microphone.
Step 4. Open the app you wish to capture, then click the Record button (the white circle) on the Capture widget, or press Win + Alt + R.
Step 5. Click the Stop button on the floating recording bar. Recordings are automatically saved as MP4 files in your Videos/Captures folder.
Keep in Mind
• No Desktop or File Explorer Recording: Xbox Game Bar can only capture individual active windows or gameplay. It cannot record your full Windows Desktop or File Explorer.
• Limit to Single Window: If you switch to another app during recording, the capture will automatically pause or stop.
• No Annotation Tools: You cannot highlight your mouse cursor, draw on screen, or add real-time notes.
Windows 11 Snipping Tool
Step 1. Press Win + Shift + S or launch Snipping Tool from the Start Menu.
Step 2. Switch from the camera icon to the Video (Camcorder) icon on the top toolbar.
Step 3. Click New, then click and drag your cursor to select the specific screen area you want to capture.
Step 4. Toggle your microphone or system audio settings on the toolbar, then click Start to record screen on Windows 11.
Step 5. Click Stop when finished. You can preview, trim, and save the MP4 video file.
Limitations
- Support Basic Function Only: Does not support fixed aspect ratios, webcam overlays, or high-fps gameplay recording.
- Lack of Advanced Audio Control: Audio settings are minimal, making it difficult to adjust individual sound levels or eliminate background noise.
Method 3: Record Desktop Screen on Mac
Mac users can record screen activity using macOS built-in shortcuts or QuickTime Player. While great for basic video screen captures, recording video on Mac with internal audio remains a major hurdle.
Native Shortcuts
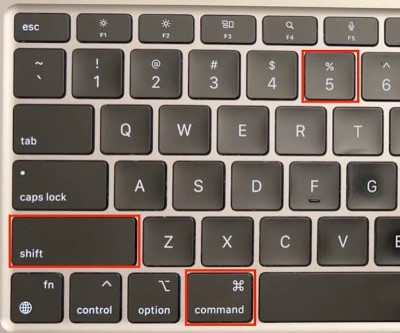
Step 1. Press Command + Shift + 5 on your keyboard to display the screenshot and screen recording control bar at the bottom of your screen.
Step 2. Choose your preferred capture mode:
- Record Entire Screen: Captures everything visible on your desktop display.
- Record Selected Portion: Allows you to drag a box to define a custom recording zone.
Step 3. Click Options to select your audio input (e.g., Mac Built-in Microphone), set a timer, or choose where to save the file.
Step 4. Click Record to begin. To finish, click the Stop icon in the top menu bar or press Cmd + Ctrl + Esc.
QuickTime
Best for: Users on older macOS versions or those who prefer using a dedicated application interface.
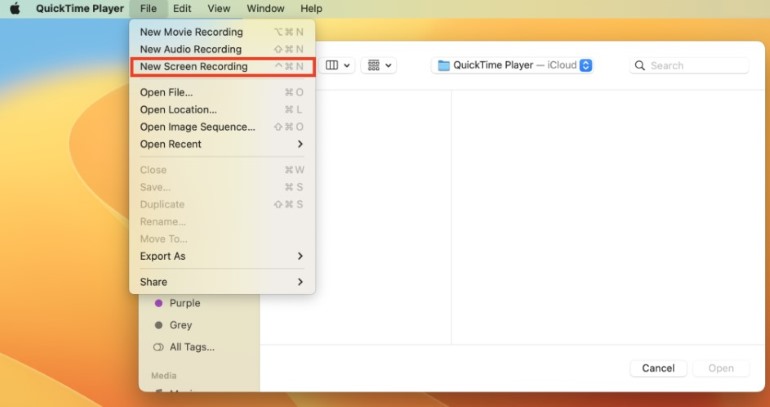
Step 1. Open QuickTime Player and click File > New Screen Recording in the top menu bar.
Step 2. Click the arrow next to the red Record button to choose your microphone source and enable option indicators like mouse click visuals.
Step 3. Click anywhere on the screen to capture the full screen, or drag to define a recording area.
Step 4. Click the Stop icon in the menu bar to save and export your video.
The Major Concern: System Audio
Apple blocks recording audio on Mac (such as YouTube videos, Zoom meetings, or game sound effects) by default. Need System Audio on Mac? To capture both screen and internal audio natively, Mac users must download and configure virtual sound routing drivers like Soundflower or BlackHole—a process that can be technical and confusing. So you can choose VideoSolo Screen Recorder to bypass this issue completely, capturing both internal and external sound in a single click.
Method 4: Record Desktop via Open-Source Software
OBS is a well-known screen recorder due to its free but powerful features. It provides high customization for recording and supports complex multi-source scenes, overlays, and advanced audio mixing. But consider if it is right for you; you should know:
• Overwhelming for non-technical users who just want a quick screen recording.
• Windows display settings or GPU switching conflicts frequently result in a blank or black screen output if improperly configured.
• High CPU/GPU Usage can lead to frame drops or lag on mid-to-low-spec computers.
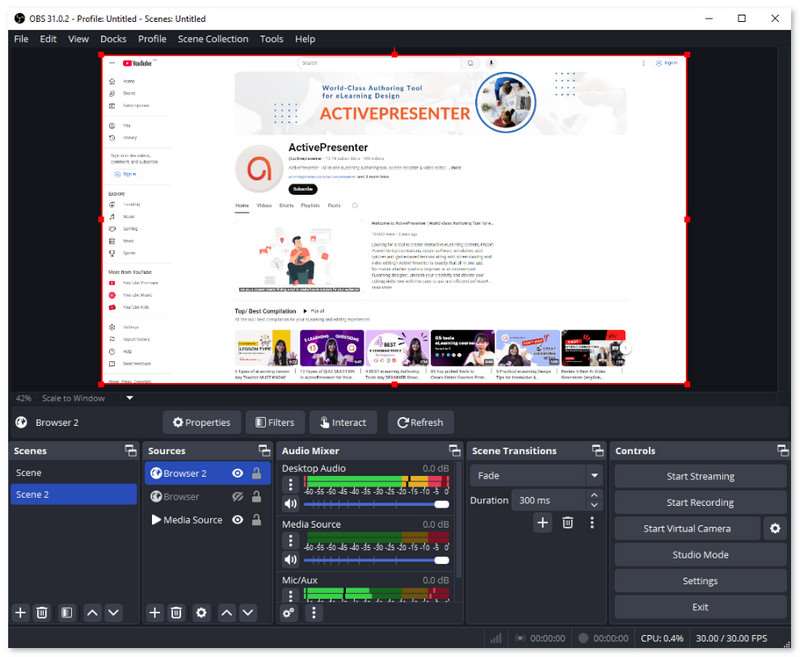
Steps to Record Your Desktop Screen with OBS Studio
Step 1. Launch OBS Studio on your computer.
Step 2. Add a Scene: In the Scenes box at the bottom left, click the + button to create a new recording scene.
Step 3. Add Display Source: In the Sources box, click + and select Display Capture (to record your entire screen) or Window Capture (for a specific application).
Step 4. Configure Audio Output: Click + in Sources and select Audio Output Capture to record system audio, and Audio Input Capture for your microphone.
Step 5. Adjust Output Settings: Go to Settings > Output, choose your recording path, video format, and encoder preferences.
Step 6. Start Recording: Click Start Recording in the Controls panel at the bottom right. Click Stop Recording when you are done.
Related Reading:
FAQs on Screen Recording on a Computer
How can I record my Mac internal audio with BlackHole?
Step 1. Download the BlackHole 2ch audio driver installer on your Mac.
Step 2. Go to Applications > Utilities > Audio MIDI Setup to create a Multi-Output Device (combining BlackHole and your Built-in Speakers) and an Aggregate Device (combining BlackHole and your Microphone).
Step 3. Go to System Settings > Sound > Output and switch your active audio output to your newly created multi-output device.
Step 4. Select your custom aggregate device as the microphone source, and start recording.
How to hide notification pop-ups while recording?
Lock a special window to prevent distracting notifications on your screen. VideoSolo Screen Recorder allows you to customize a target region or select the window. After selecting, you can customize the recording area of the selected window by dragging the border in the preview area.
How to balance your recording quality and file size?
MP4 is a common video format that balances video quality and file size depends on choosing the correct settings. Set your output encoder to H.264 and lock your framerate to 30fps or 60fps depending on your tutorial type.
Conclusion
If you only need a quick, occasional capture and don't mind missing system audio on Mac or desktop limitations on Windows, native will get the job done. However, if you want a seamless, all-in-one recording experience without any complex configuration, VideoSolo Screen Recorder is your ultimate solution.
More Reading
Capture screen activities, audio, webcam, gameplay, and mobile screens on Windows and Mac with high quality.

