


If you've updated your computer operating system from Windows 10 to Windows 11, or you've bought a new Windows 11 PC, you may want to know how to record a screen, create video tutorials, make presentations for work, capture splendid gameplay, or any other screen activity on it.
In this article, we will introduce five ways for recording screens on Windows 11. You can do the basic recording with some built-in tools, such as Xbox Game Bar, PowerPoint, and Snipping Tool. If you want to enjoy more flexible and advanced functions, third-party software named VideoSolo Screen Recorder can be a superior option.
How to Record Screen on Windows 11 with Xbox Game Bar
Xbox Game Bar has been pre-installed on your Windows 10/11 computers. It is designed for recording video game footage, but is also practical for other types of screen capture. To screen record on Windows 11 with the Xbox Game Bar, you can follow the simple steps below.
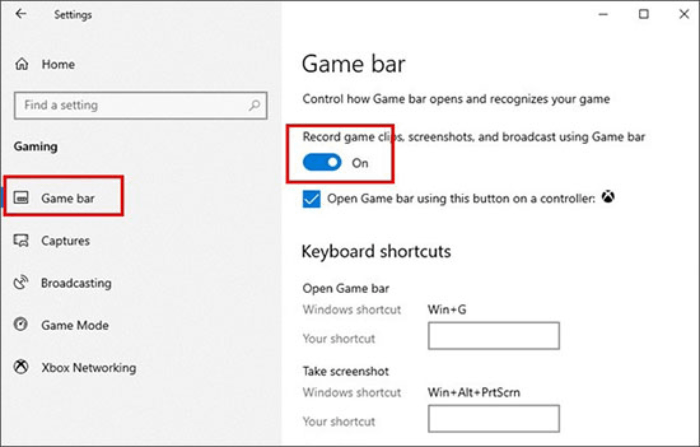
Step 1. Check if Windows Xbox Game Bar is Enabled
You should check if the Windows Xbox Game Bar is turned on first. Hit the “Windows” key, type “gamebar” and hit “enter”. If the first toggle you see isn't toggled on, please toggle it on.
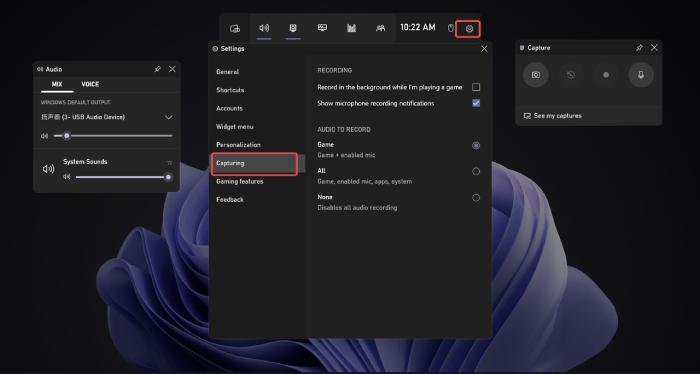
Step 2. Launch your Xbox Game Bar
Now, you should hold down your "Windows" key and "G" at the same time to launch the Game Bar. Click the gear icon on the center console to open your settings menu. Then, select "Capturing" to view and set your recording options.
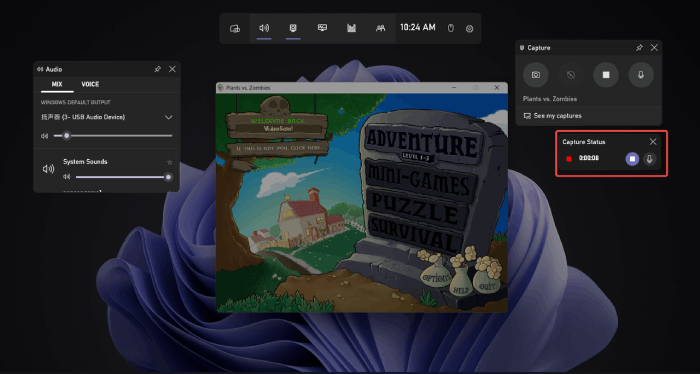
Step3. Start Recording your Screen on Windows 11
To start recording, press the "Windows" key, the "Alt" key, and the "R" key. In a moment, a small recording bar will pop up on the right. If you want to turn on your microphone, just click the mic icon.
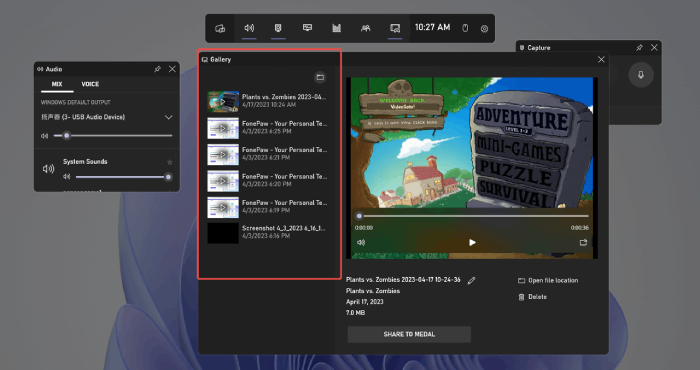
Step 4. Stop Recording and Preview
If you click “stop”, you will be informed that a clip was recorded. To preview your recording, click on the notification or go to your captures folder. Then, you can find your recorded video and save the video file.
• Before recording, you can preset the recording length by clicking the drop-down menu to set it to 30 minutes, 1 hour, etc. The audio sources, video quality, and mouse cursor are also available to be adjusted.
• You can set shortcuts to help easily control the recording process.
However, it should be acknowledged that there are some unavoidable drawbacks while using Xbox Game Bar:
- Game Bar has a limited video capture length of no more than 4 hours.
- You cannot adjust the recording area.
- It cannot record the webcam.
- It only works within a single app/process.
- No editing tools are offered for polishing your videos.
Considering these factors, you may want to hunt for a better alternative. Therefore, we will recommend you try VideoSolo Screen Recorder to solve the above limitations.
How to Record Screen on Windows 11 with Audio via VideoSolo
Compatible with both Windows and macOS, VideoSolo Screen Recorder is a multifunctional and efficient tool that helps you to screen record with audio in high quality. It sets no time limits and supports customizing the recording area. With this dedicated recorder, you can capture the microphone audio, system sound, and webcam simultaneously.
Whether you're using HP, Dell, Lenovo, or ASUS, VideoSolo Screen Recorder can work well with its straightforward interface in simple clicks. The following step-by-step guide will teach you how to screen record on Windows 11 with audio.
Step 1: Launch the Software, Choose the Video Recorder
Launch the VideoSolo Screen Recorder and select “Video Recorder”.
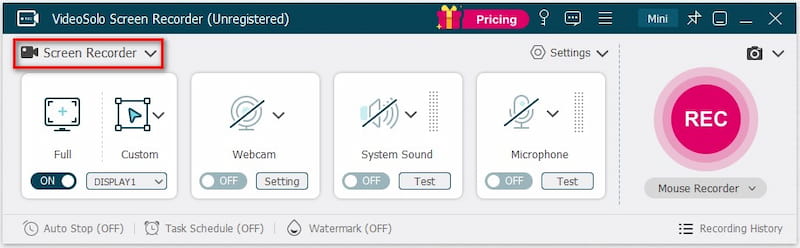
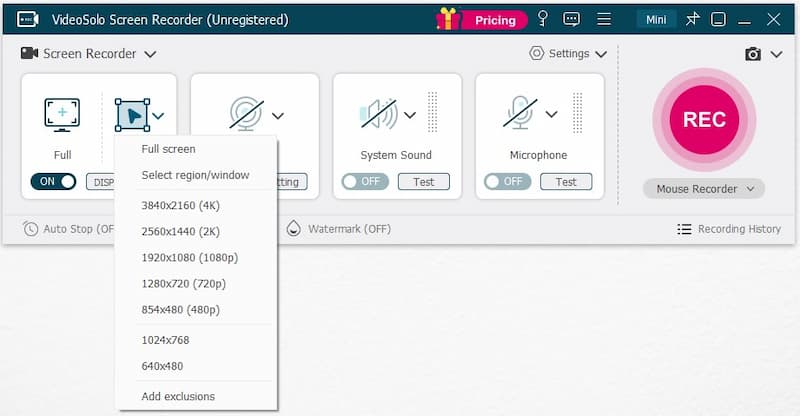
Step 2. Customize Recording Area, Webcam, and Audio Settings
By clicking “Custom”, you can select the recording region. From the Window option, you can enable the Lock and Record feature.
If you want to record your face, just open the webcam. Then, sounds from the system or microphone are set to be enabled by default. The volume can be adjusted via the slider.
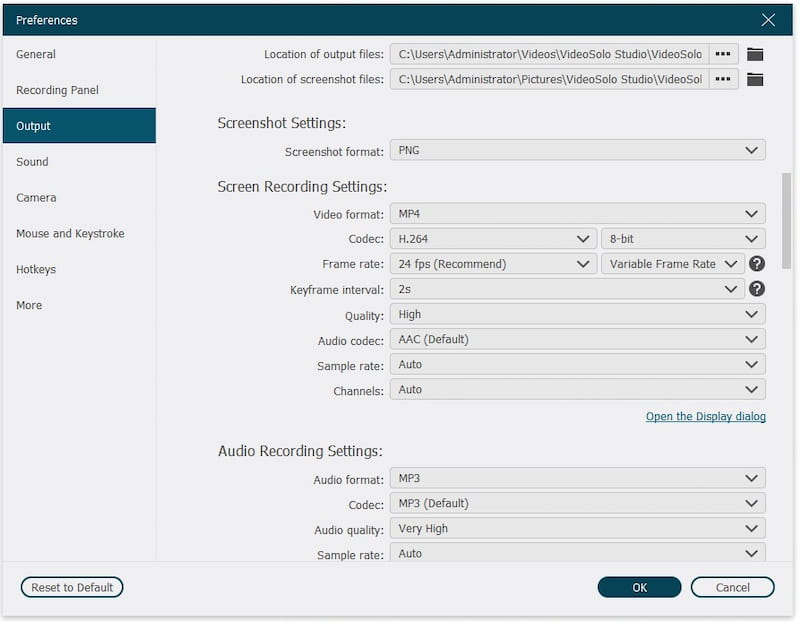
Optional Step. Adjust the Output Settings
Now, you can turn to the “Output Setting” to change the default destination folder and adjust the screenshot, video, and audio formats.
Step 3. Record Your Screen
After that, just click the “REC” icon to start recording. There will be a floating panel for you to add real-time annotations or take snapshots during the recording. If you want to stop, click the red rectangle icon. Then, you can preview and edit your recording with some built-in advanced editing tools.
How to Screen Record on PC Windows 11 via Wondershare
Wondershare DemoCreator is another powerful yet user-friendly screen recording software designed for Windows and Mac users. It allows you to record video, audio, and camera with system audio on Windows 11. You can easily choose to record the full screen, a specific window, or a custom-sized area, adapting to various recording needs. Also, during the recording, you can highlight the important information or add real-time annotations. Now, let's see how to record a screen on Windows 11 using this helpful tool.
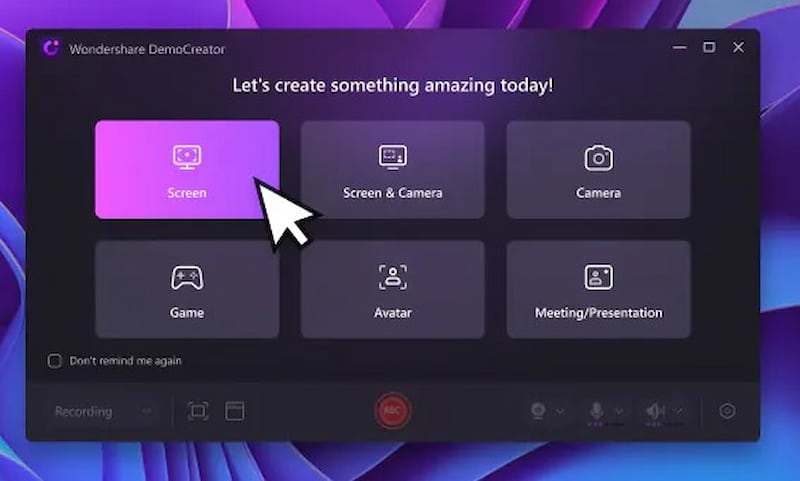
Step 1. Launch the Software, Choose the Screen Recorder
Download, install, and run Wondershare DemoCreator. You can see different recording modes on the main interface. Choose one as you want.
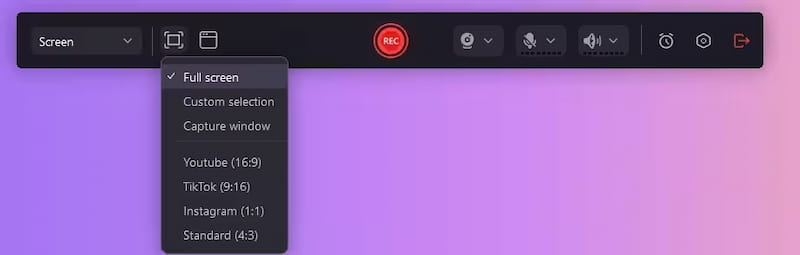
Step 2. Customize Recording Area and Webcam
Now, choose the recording area. DemoCreator allows you to record the full screen or customize the area as you like. It also offers specific area options for various social media. Additionally, you can choose to record the webcam, microphone and system audio or not.
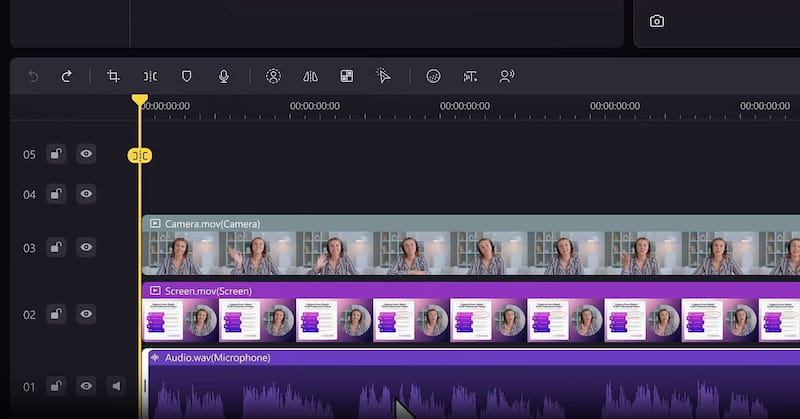
Step 3. Record Your Screen and Edit The Video
After that, hit the red "REC" button to begin recording and hit it again when it ends. DemoCreator offers lots of editing functions in the preview window, letting you trim, add effects, insert text and images, and more to create a professional-looking video.
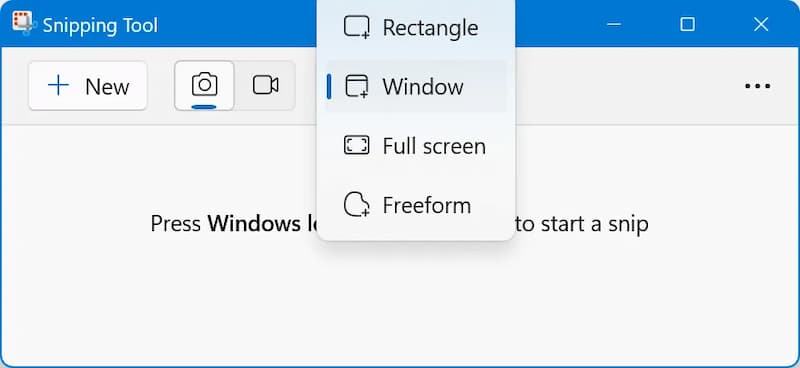
How to Screen Record on Windows 11 with Snipping Tool
Snipping Tool is a familiar and intuitive Windows app for capturing computer screenshots. In 2023, Microsoft added a brand-new screen recorder feature to it. This change obviously provides Windows 11 users with another option for recording the screen. The following is a step-to-step guide for your reference.
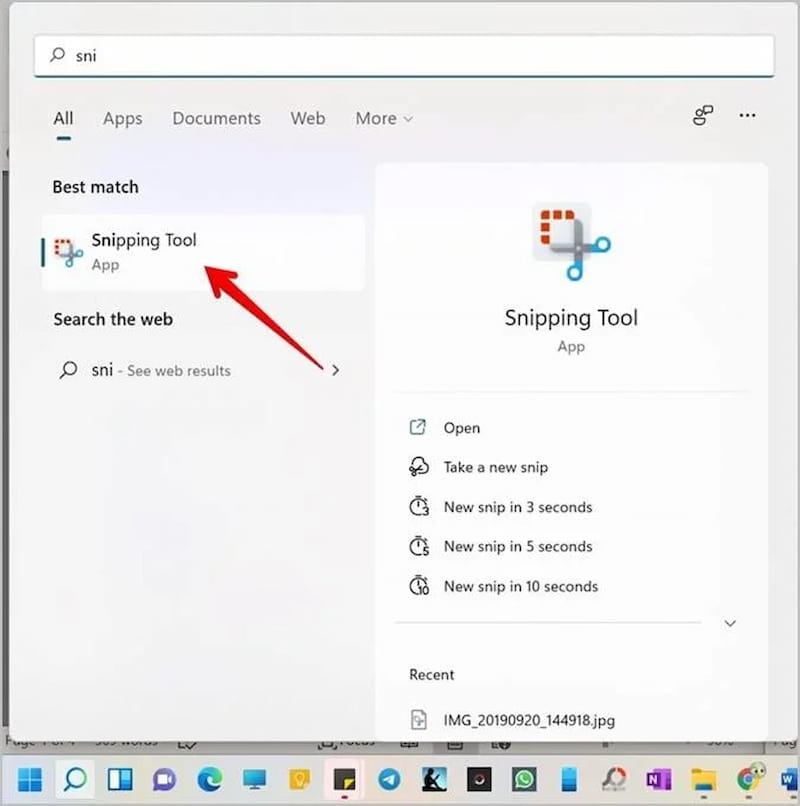
Step 1. Launch the Snipping Tool
Click on the Start button and navigate to the Start menu. Then, type “Snipping Tool” and tap “Enter” when it is listed in the search results.
Step 2. Enable Video Capture Mode
Click the video camera icon to activate the video capture mode.
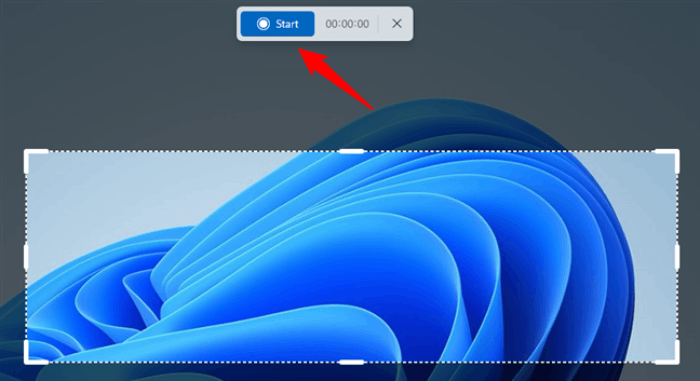
Step 3. Click the "+ New" Icon to Start Recording
Once you click “+New” to start a new screen recording session, you can drag and adjust the position and size of your recording area. When you finish the area set, just tap the Start button and the recording will begin after three seconds.
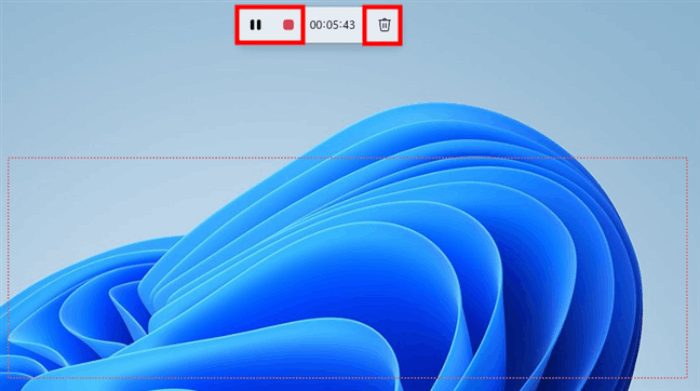
Step 4. Click the Stop Button to Stop Recording
When you want to stop the recording, press the red stop button. Then, Snipping Tool will automatically load the recorded video to the main window. If you are not satisfied with the video, you can also discard it by tapping the trash bin button.
How to Screen Record on Windows 11 with PowerPoint
If you don't want to download a third-party program, you can directly resort to Microsoft PowerPoint to record your screen activities, especially some presentations. With the recording feature of Microsoft PowerPoint, you can record the screen with audio and insert it into your slides. Here are some easy steps you can follow.
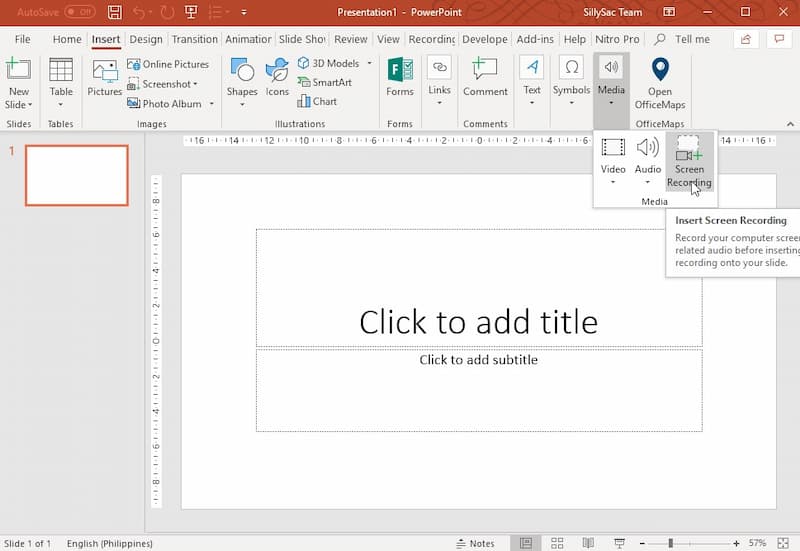
Step 1. Set Up Screen Recording
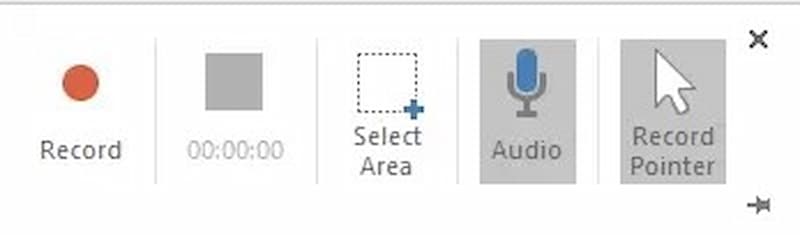
After opening PowerPoint, click the "Insert" tab. Then, select "Media" > "Screen Recording". A small toolbar will appear on the top of your screen. You can select the recording area by dragging the cursor. Also, there are options to enable the recording of audio and mouse movement.
Step 2. Start your Windows 11 Screen Recording
Once you are ready, you can click the red "Record" button to start the recording. During the recording, you can pause at any time.
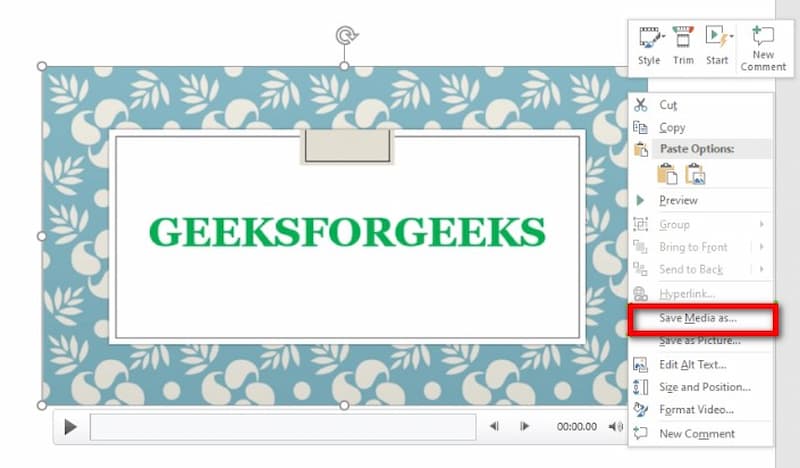
Step 3. Stop and Save the Recording
If you want to finish the recording, select the blue "Stop" icon, or press the "Windows", "Shift" and "Q" keys. Then, the recording will appear on the slide. Right-click it and select "Save Media as" to save it.
FAQs about Screen Recording on Windows 11
How do I record my screen on Windows 11 with sound?
For Xbox Game Bar, you need to open its toolbar and click Settings > Capturing. Then, enable "All" in the AUDIO TO RECORD section. This way, you can capture all computer sounds via Xbox Game Bar.
For Microsoft PowerPoint, the audio will be automatically recorded on the selected screen.
For Snipping Tool, it doesn't support audio recording yet.
For VideoSolo Screen Recorder, after you choose the Video Recorder mode, you can easily choose to record the screen with sound by clicking the relevant buttons.
Where is my screen recording stored on Windows 11?
For Xbox Game Bar and Snipping Tool, your recorded files can be automatically saved to a folder called "Captures" under "Videos". The files are all preserved in MP4 format.
For Microsoft PowerPoint, you can simply choose where to save your file at the last step.
For the third-party tool, the destination folder can be selected in your output settings based on your needs.
Conclusion
In conclusion, this post has displayed four practical methods and corresponding step-by-step guides to record the screen on Windows 11. The built-in tools Xbox Game Bar and improved Snipping Tool are very convenient and easy to grasp. PowerPoint is dedicated to recording presentations for study or work. However, if you want to enjoy more features ranging from unlimited recording length, and versatile output settings to multiple editing tools, VideoSolo Screen Recorder is worth a try.
You May Also Need: How to Record Screen on Windows 10 with Audio [3 Easy Ways]

