There are many conditions when you need to split a large video into smaller parts, for example, when you need to upload them for sharing, or sending the video to others through email or social chatting software. So, for many people who need to create videos or share them frequently, knowing more efficient ways to split videos on Windows/Mac would be a benefit and brings much convenience. So, in today's article, there will provide you 7 easy and professional ways to split a large video into smaller parts. Now, you can look at the first method, which is to use VideoSolo Video Converter Ultimate.
How to Split Video into Parts with VideoSolo Video Converter Ultimate
VideoSolo Video Converter Ultimate is a reliable software for Windows and Mac users to edit and convert videos offline with the simplest toolbox provided inside. Video splitting is one of its popular tools, as many people would turn to it for help to cut the video file into smaller parts. With the extra functions such as video converter, compressor, metadata editor, video enhancer, and so on, creating perfect video clips is not a difficult thing anymore with VideoSolo Video Converter Ultimate.
Key Features:
- Supports over 1000 formats to convert videos and audios to for free
- Offers the user-friendly UI to edit and convert videos within easy clicks
- Supports the highest 8K, 5K, 4K, and HD quality to output videos
- Provides the faster speed at 50X faster to edit, convert, and output videos quickly
- More helpful video editing tools provided to compress, enhance, or create better video effects before outputting
Step 1. Install and Open VideoSolo Video Converter Ultimate
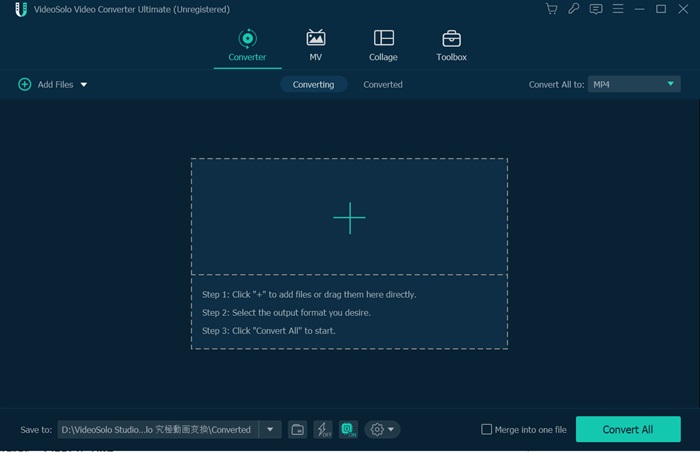
After clicking the download button to freely install VideoSolo Video Converter Ultimate, open the software on your Windows or Mac computer for being ready to split video into parts.
Step 2. Upload Video and Enter Video Editing Screen
Directly by clicking the “Add” button in the middle, and you can select to import the video file to VideoSolo Video Converter Ultimate for editing. Directly drag the file to the home page of the software is also workable. When the video is added, click the “Cut” icon provide under the video information.
Step 3. Split Video into Parts
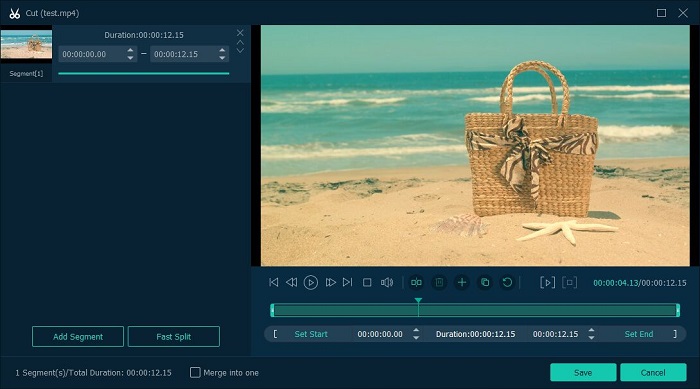
When you enter the video splitting window, select the starting and ending time of the video clip, or dragging the borders on the video timeline to select cutting the video clip based on your need. You can also add extra video segment to this current video by clicking the “Add Segment” button when you need. After the splitting is finished, just click “Save” to save the video clip.
Step 4. Select Video Quality and Convert
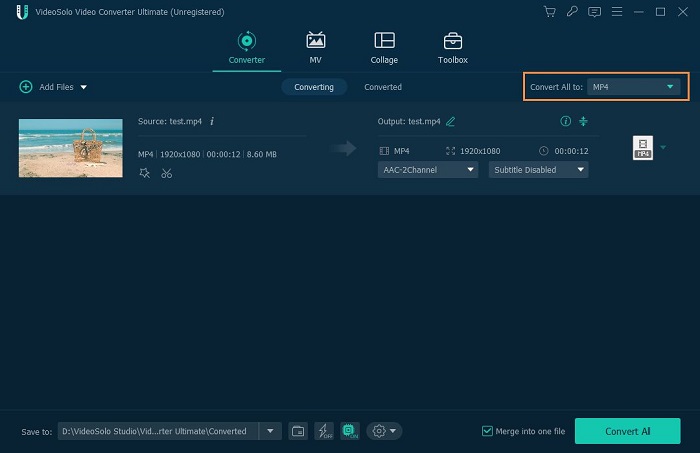
Finally, directly choose a format and quality on the top-right “Convert All to” menu. After this step, also click the “Convert” button to get the video saved offline again. Then you will get the video with smaller size.
Split Video into Parts with Windows Movie Maker
Windows Movie Maker is an in-built video editor developed by Microsoft for Windows users to edit videos on desktops without installing other third-party software. Although Microsoft has discontinued in maintaining it, users who have installed it before can split videos with Windows Movie Maker freely without costing extra fee. The software is classic but its operation to edit videos is not complicated. You can simply follow the easy steps here to split a large video into smaller parts for easy saving and transferring on Windows desktops.
STEP 1. Select the video you want to split into parts with Windows Movie Maker.
STEP 2. Go to “Video Tool” and choose the “Edit” option from the top menu bar to open the video editing window.
STEP 3. Now, change the length of the video you want to split by dragging the black lines. You can repeat this process for several times to split it into several parts at once. When the editing finishes, click “Split” to save them.

STEP 4. Finally, save the video clips by going to “Home” then choose “Save movie”. Then you can select MP4 or WMV to save the videos freely.
How to Split A Large Video Smaller Windows Photos App
Compared with Windows Movie Maker, Photos App is a well-developed in-built videos and images editor developed by Microsoft for Windows computers as well. This software is a free tool for everyone to use for editing videos without any cost. So, people can use it to split videos into parts when they don't want to find another software and download waste time. Now, open Photos App on your Windows computer and follow the steps to split video into smaller parts.
STEP 1. In Photos App, add the video you want to cut into smaller parts.
STEP 2. After adding the video, click the “Create” button and the editing window will be provided for you to edit it.
STEP 3. In “Edit & Create” part, there will have a “Trim” option, by clicking which and you can freely split the video according to your needs now. Also, repeat this step and you can cut the videos into more parts if you want.
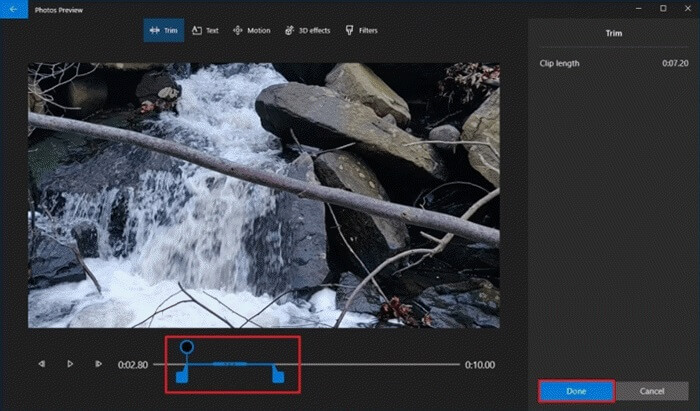
STEP 4. When the splitting is finished, save the videos by clicking to export them.
Split Video into Parts on Mac with iMovie
If you are a Mac user, using iMovie to split videos is also a good choice. Just like Windows Movie Maker and Photos App, iMovie is Mac's in-built video editing tool. It can help people to edit videos with great quality as Apple can always do. So instead of finding another free video editor that may compress your video quality, you should really try iMovie to get the video splitted into parts in original quality.
STEP 1. To begin, you need to open iMovie on Mac and then add the video you want to split to the software.
STEP 2. Then drag the video to the time bar, then each scene of the video can be presented for easily splitting into parts. Now you can directly click on the exact point and press “Command + B” to cut the video for splitting a long on into smaller parts.
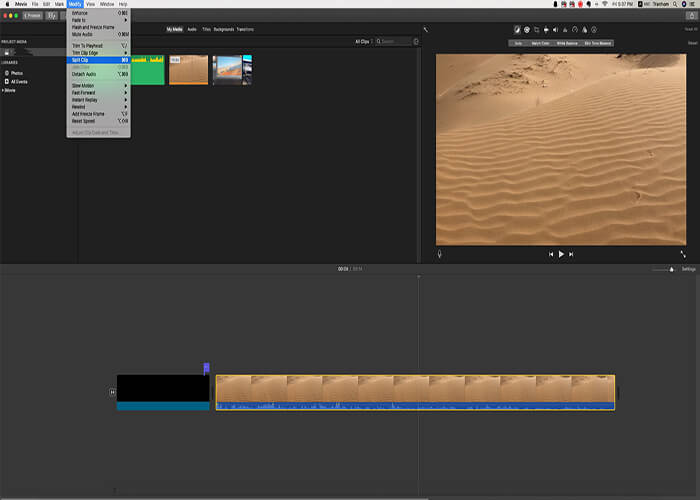
STEP 3. When you finish splitting the video, you can still use some other video editing tools provided in iMovie to adjust the video if you need.
STEP 4. Finally, directly save the video clips into different video files in iMovie.
Freely Split Videos on Windows/Mac Using VLC
Many people would use VLC to play media files on Windows/Mac, but do you know that this software can also work as a video editor with free editing functions provided? Although the way using VLC to split videos would be a little different, it is still easy to do it. You can directly follow the tutorial here to start splitting the video without the help of other software.
STEP 1. Open your video with the VLC software. Before playing the video, go to “View” and select to turn on the “Advanced Controls” option, then the red record button will be provided at the bottom.
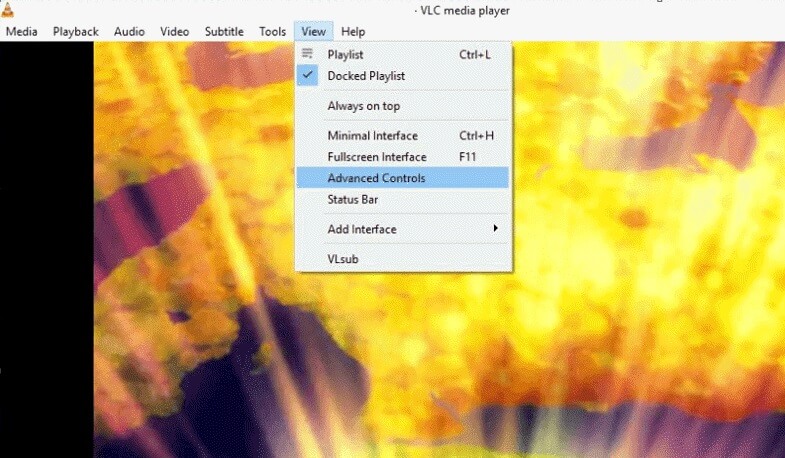
STEP 2. Now just play the video, and also press the red record button at the same time.
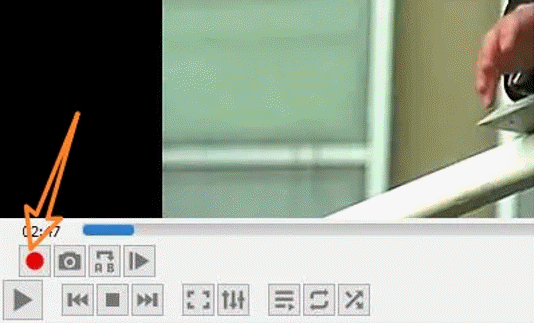
STEP 3. When the video plays to the timing you want to split it, directly click the red record button again, then VLC would stop recording, and by saving this recorded video clip offline, you get a smaller part splitted from the long video saved offline.
How to Use FFmpeg to Split Video into Parts
For people who don't want to use any video editing software to split video into smaller parts, here is a faster way you can try, which is using FFmpeg for entering the video splitting command to control splitting a long video into smaller parts. But it would be a little complex for some people who are not familiar with using computer commands to control some activities on the devices. If you want to try, you can directly follow these steps to cut a long video easily.
STEP 1. Install FFmpeg on your computer, then open it.
STEP 2. You need to enter the following command for splitting a video easily: ffmpeg -ss 00:00:00 -i input.mp4 -c copy -t 60 output.mp4
-ss is the starting time of where you want to start splitting the video, and -t is length of the video clip you want to cut it out. You must put -ss before -i for splitting the video successfully.
STEP 3. After entering and finish editing this command, press the “Enter” button on your keyboard, then the video will be saved to another video file when the splitting finishes.
How to Split Video Online Without Software
Finally, let's also see a way to split video into smaller parts online without the need to install any software. There are actually many free online tools available for splitting videos on any devices such as Windows, Mac, and mobile devices. Here would recommend you a popular option, which is Apowersoft. People can access this tool freely, but just need to make sure the video you are going to split is less than 100MB, because Apowersoft and many other online tools will not allow to add a video file that is larger than 100MB. If you also have the video that is less than 100MB, just follow the steps here to split it online with Apowersoft.
STEP 1. Open Apowersoft and upload the video you want to split online to the tool. Then select “Start Splitting” to begin splitting the video.
STEP 2. Use the knobs to split the video based on your needs. You can split more parts by repeating this step.
STEP 3. When the video is splitted now, click to save the video clips, and Apowersoft will prepare to download them offline for you.

In Conclusion
When you have the need to split a long video into smaller parts on Windows/Mac, you can try any of these 7 methods to easily split videos. But they would have different advantages and disadvantages, or device incompatibility. So before making your choice, compare them and select the best one. You will find it very simple to split and edit videos on computers! For me, my most recommended is VideoSolo Video Converter Ultimate, as it is an all-in-one utility that not only can help you to split video into parts, but also have many practical editing functions, such as adding background music to videos, adding filters to videos, adding subtitles to videos, etc., so that your videos can be shown in the most ideal way in your mind. Click the button below to free download this powerful tool to your computer now!