


Be it at work or in daily life, there are scenarios in which we need to record audio on Windows 10 like online meetings, singing, audio calls, streaming music, social media audio tracks, etc. That's actually as easy as falling off a log whether you want to record internal audio or the voice from a microphone. This post shows you how to record audio on Windows 10 in 3 workable ways. Now, you may want to get the rope here and pick out a preferred way to kick in.
Record Audio on Windows 10 with VideoSolo Audio Recorder [Recommended]
VideoSolo Audio Recorder is a popular expert at recording system audio and microphone voice. With over 20 recording modes, it literally works for any case to record online webinars, audio calls, streaming broadcasts, YouTube Music, voice memos, and so on. The output quality can be saved as MP3, M4A, WMA, AAC, FLAC, and WAV with up to lossless quality.
VideoSolo Screen Recorder
- Record screens for desktops, laptops, and mobile devices.
- Record the webcam standalone or with a customized overlay.
- Set a fixed window to exclude any unexpected disturbance.
- Enable real-time annotation during the recording.
- Provide an extra toolkit for post-processing.
Windows 11/10/8/7/Vista/XP macOS 10.7 or above
Being a recording expert with whistles and bells, VideoSolo Audio Recorder is intuitive and foolproof to record system computer audio and microphone for newcomers. Now, let's walk through how it works as follows.
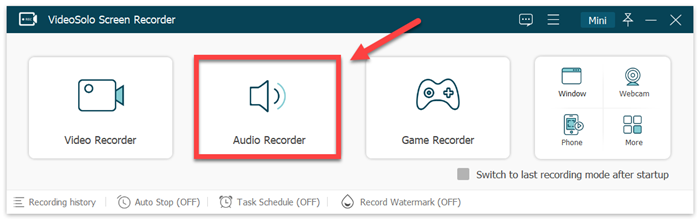
STEP 1. Launch VideoSolo Audio Recorder
Give it a click on the “Free Download” button above and install the software on your Windows PC. After that, launch VideoSolo Audio Recorder. Now, select “Audio Recorder” to proceed.
STEP 2. Adjust Audio Volume and Check the Sound
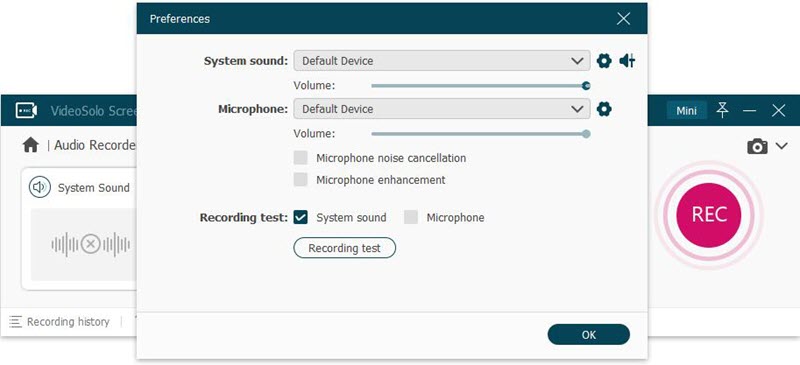
Depending on your needs to record audio on Windows 10, switch on “System Sound”, “Microphone”, or even both, and drag the bar to adjust a suitable volume.
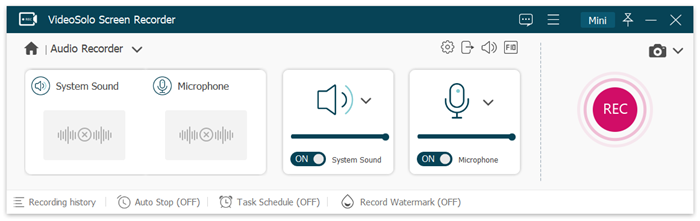
Then, click the “Speaker” icon to enable “Microphone noise cancellation” and “Microphone enhancement” if you want to record voice. Also, don't forget to perform an audio check before recording.
Note that you can go to “Preferences” to set up the audio format and audio quality if needed.
STEP 3. Record System Audio/Microphone Voice on Windows 10
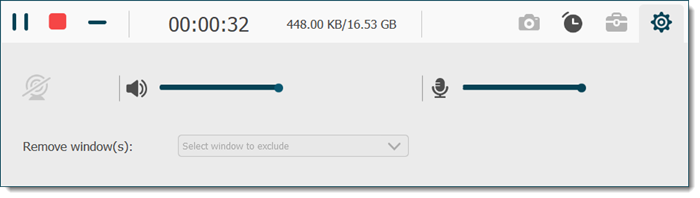
After you've got everything prepared, click the “REC” button to record internal audio or voice on Windows 10. You can adjust the volume during the recording. When done, click the “Red Square” icon to stop recording audio. Then, a window will be brought up and let you preview or crop the audio track if you want to.
Record Audio on Windows 10 with VideoSolo Audio Recorder [Recommended]
If you just want to record your voice from an internal or external microphone, the preinstalled Voice Recorder will be a good helper. This default app will record your computer microphone in M4A format yet with lossy quality. Now, you may want to see how to record sound on Windows 10 from your microphone.
STEP 1. Launch Voice Recorder on Windows PC
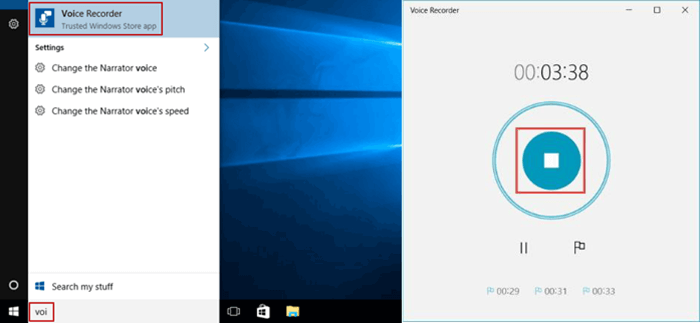
Click the “Windows Menu” and type “Voice Recorder” in the search bar. After that, select the app and launch it on your Windows 10.
STEP 2. Launch Voice Recorder on Windows PC
Go to “Windows Settings” > “System” > “Sound” and choose your input device. Then, click “Test your microphone” to see whether it's working fine.
STEP 3. Launch Voice Recorder on Windows PC
Back to the Voice Recorder, and click on the button to start recording your voice from the microphone. After you've done speaking your mind or singing a song, click the button to stop recording.
Easy as it is, Microsoft Voice Recorder only functions to record computer microphones. It is unable to record computer audio, on-screen activities, or webcam on Windows 10. Besides, it doesn't let you convert or crop the M4A audio file after the recording is done.
Record Audio on Windows 10 with Audacity [Free]
Audacity is a free and open-source audio software to take advantage of. This program works as an audio recorder for internal audio and voice from a microphone. Meanwhile, it's also a multi-track audio editor that allows you to generate different sounds and add effects to your recordings with real-time previews. Now, let's see how to record audio on Windows 10 using Audacity.
STEP 1. Download and Install Audacity
You can directly download and install Audacity from its official site. After the installation, open the software on your Windows PC.
STEP 2. Set up Recording Settings
Go to “Edit” > “Preferences” > “Recording” and see whether you should tick up more options like “Play other tracks while recording (overdub)”, “Detect dropouts”, etc.
STEP 3. Record Computer Audio via Audacity
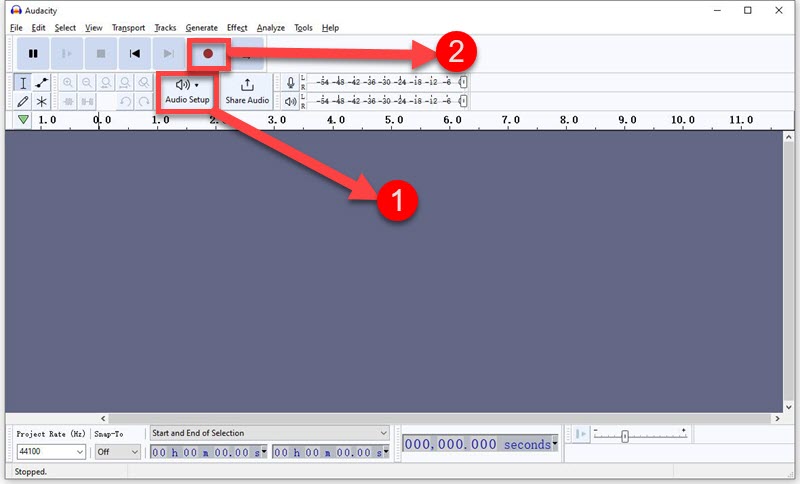
Click “Audio Setup” > “Recording Device” and choose to record computer sound or the microphone. Then, give it a click on the “Red Dot” icon to start recording audio on your computer. When done, click it again to stop recording,
Audacity is probably one of the best free audio recording software on the internet. However, the problem is that it's so difficult to get down to this software with its complex operations. If you're looking for a lightweight program, you may want to turn to VideoSolo Audio Recorder which makes it ever easy to record audio and capture screen activity with a webcam.
FAQs about Recording Audio on Windows 10
If you still have lingering questions, you may want to check out the following frequently asked questions and answers about recording audio on Windows 10.
Does Windows 10 have an audio recorder?
Yes, Microsoft Windows 11/10/8/7 all come with a default audio recorder, which is known as Voice Recorder in Part 2. This Voice Recorder enables Windows users to record voice from an internal or external microphone. The pity is that it cannot record the internal sound in the computer.
Can you record the internal audio of Windows 10?
To record the internal audio on Windows 10, you need to utilize third-party recording software like VideoSolo Audio Recorder. This dedicated software lets you record computer audio including both the system sound and microphone voice with lossless quality. Better yet, it can also record the computer screen and the webcam.
How can you screen record with audio on Windows 10?
If you're looking for a way to record the computer screen with audio, then the default Voice Recorder and Audacity may let you down. Luckily, as a versatile recording software, VideoSolo Audio Recorder outperforms. It takes no effort to record on-screen activities with internal sound or microphone voice. Moreover, you can add a webcam overlay if you want to. Let's check out the quick tutorial below.
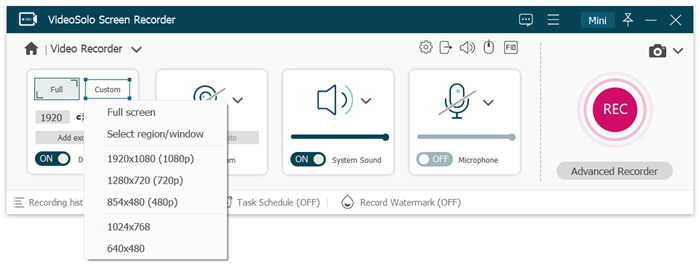
STEP 1. Launch VideoSolo Audio Recorder and choose “Video Recorder” to go on.
STEP 2. Set up a recording area or window on the screen. Next, turn on “System Sound” or “Microphone”.
STEP 3. Hit the “REC” button to start recording the screen along with the sound.
Conclusion
The in-built Voice Recorder is a nice choice if you want to record microphone voice with no need to download any software, but it doesn't support recording for internal sound. As for Audacity, it's too hard to get started for newbies and prone to run into errors when trying to record audio on Windows 10.
Therefore, VideoSolo Audio Recorder stands out for its ease of use and various recording modes for any scenario. It's easy to record system sound, microphone voice, computer screen, and webcam with lossless quality. What's more, there are more excellent features awaiting you to explore.

