"When I am an attendee, how can I achieve recording on GoToMeeting?"
GoTo Meeting offers an built-in recording feature but it only allows organizers to record GoTo Meeting conferences and store GoTo Meeting recordings in the cloud or local storage. That leads to a headache for attendees.
Therefore, you may want to learn how to record a GoTo Meeting as an attendee without permission. In this post, there are three worry-free methods to record GoTo Meeting online conferences on Windows, Mac, iPhone, and Android. Now, let's grasp the ideas here.
Can You Record GoTo Meeting?
It depends on. If you are an organizer or co-organizer, you are allowed to record a session using GoTo Meeting Cloud recording without storage limitations or saving it to your computer or mobile devices. However, as a participant, you cannot directly record GoTo Meeting conferences by yourself.
Besides, there are the following drawbacks you should get to know.
- Attendees are not allowed to record a session.
- Attendees cannot view recordings of over 20GB.
- GoTo Meeting recordings will be saved in the cloud for 365 days.
- The maximum length of a recording is 24 hours (2 hours with no attendees)
- Local recordings will be saved in unpopular formats like WebM and G2M.
- The recording will automatically stop if the hard disk space drops to below 100MB.
- Recorded videos are often spoiled by intermittent blank screens.
- GoTo Meeting cloud recording can be unstable if you have dodgy internet.
So the answer is obvious. If you are an attendee, you cannot use its default recorder. Moreover, if you want to record GoTo Meeting in popular formats like MP4, WMV, MOV, or others. Let's see how to record GoTo Meeting sessions without permission in 3 ways and get your best pick below.
Method 1. Record GoTo Meeting as Attendee on Windows/Mac with VideoSolo
VideoSolo Screen Recorder is a professional recorder that lets you record GoTo Meeting as an attendee. Since it'll record any onscreen activities, this recording expert makes it possible for you to record online conferences without permission. Compared to GoTo Meeting's in-built recorder, it provides you with a more stable HD recording and export to popular formats. You may want to familiarize yourself with its sparking features as follows.
- Record online meetings and webinars like GoTo meeting, Zoom meeting, Webex, Google Meet, Hangouts, Microsoft Teams, and so on.
- Offer smooth and stable recording without lag and watermark.
- Support up to lossless video quality with advanced codecs.
- Save recordings to universally used formats including MP4, WMV, MOV, F4V, and WebM.
- Make a professional video recording with a webcam overlay.
- Allow real-time annotations and highlights when recording the computer screen.
- Provide 9 screen modes for any recording scenarios.
- Edit online conference meetings afterward with in-built tools.
How to Record a GoTo Meeting with the Best GoTo Meeting Recording Tool
VideoSolo Screen Recorder can set your GoTo Meeting session fixed to avoid any unexpected distractions. Also, it's easy to record GoTo Meeting as attendee without permission. Now, let's learn how it works here.
Step 1. Select “Video Recorder” to Record Video and Audio of a Webinar
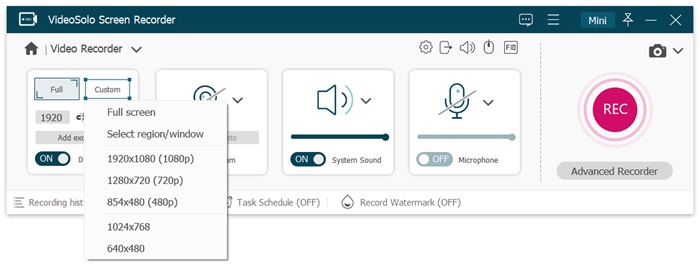
Launch VideoSolo Screen Recorder and then click “Video Recorder”. It can record the video and audio of the session.

Step 2. Make Pre-set for Your Recording and Make a Test
Now select the screen recording area. Usually, we use “Full screen” to record the entire area of a computer screen. If you only want to record a specific area, select “Custom” to customize. Also, you can select the GoTo Meeting window to record the session only.
Audio is so important in a session, make sure the system sound button is on to record the voices of the participants in the meeting. You may also need to record your speech in the meeting so the microphone button should be turned on too. You'd better click “REC” to make a test recording to make sure the volume is appropriate before the meeting starts.
Step 3. Start to Record and Edit While Recording
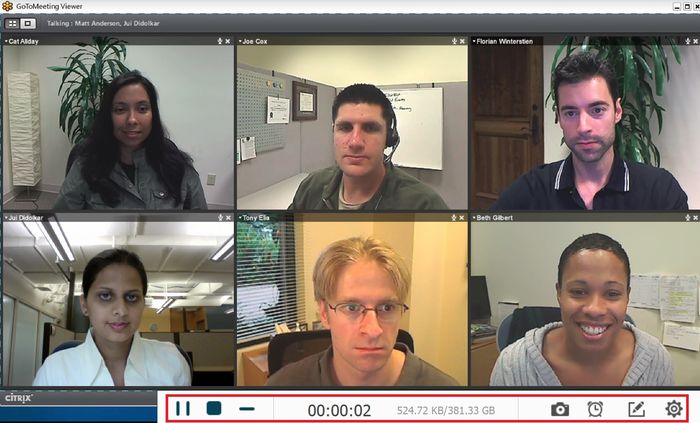
Click the round button “REC” to have a meeting recorded. While it's recording, you can make a snapshot to capture the important meeting scene, or add any notes in real time if necessary.
Step 4. Save and View Files You Made in the Recording
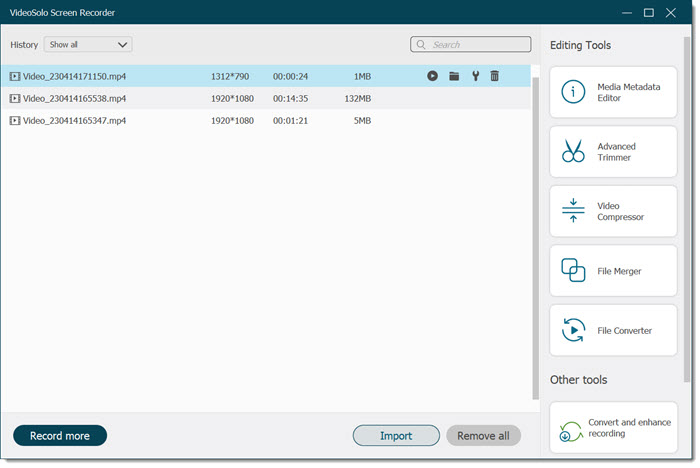
Click the Square button to stop recording, and then the recording will be saved in the output folder you set. You can also view all your video recordings and snapshots you made in the left column, click and choose to play directly. The videos will be saved in MP4 format by default. Easy to share and upload.
Method 2. Record GoToMeeting on Mobile Devices (iPhone/Android)
If you're using a mobile device to attend a GoToMeeting conference, that's an easy task to record the session as an attendee without permission using the default recorder on your iPhone or Android. To make it more clear, you can follow the tutorials below to see how to record a GoToMeeting session on mobile.
On iPhone
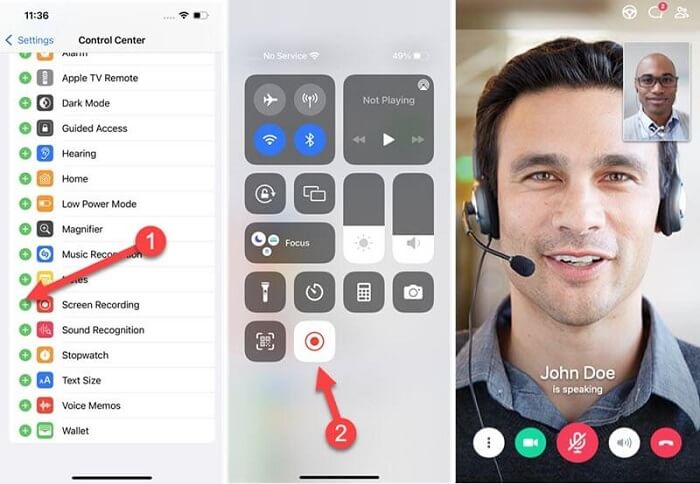
Step 1. First off, go to “Settings” – “Control Center” and tap the Green Plus icon to include Screen Recording in Control Center.
Step 2. Open the GoToMeeting app and then swipe down the screen to check the controls.
Step 3. Tap the Record button and it'll count down in 3 seconds.
Step 4. The status bar will turn red when recording. After the conference ends, you can click the status bar and select “Stop” to stop recording. The GoToMeeting recording will be saved to “Photos”.
On Android
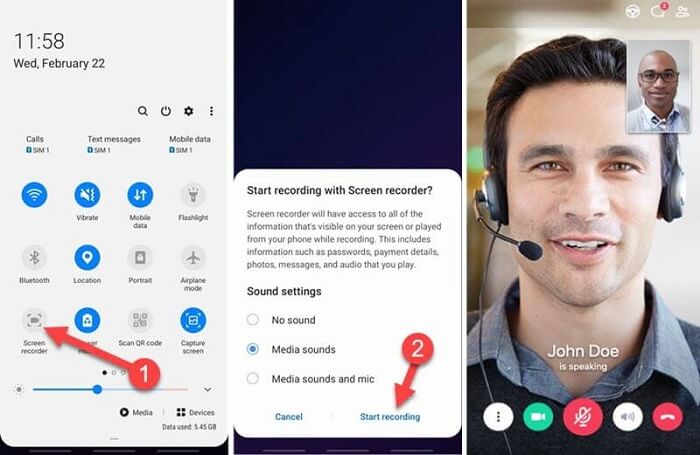
The steps to use the default screen recorder on Android devices vary from brand to brand. Here we use the Samsung Galaxy phone as an example.
Step 1. Swipe down the screen to look up the quick panel and select “Button order” to proceed.
Step 2. Drag the “Screen recorder” icon to add it to quick panel.
Step 3. Back to the session in GoToMeeting and swipe down the screen to select “Screen recorder”.
Step 4. Select “Media sounds and mic” and tap “Start recording”. After 3 seconds, the recording will start.
Step 5. You can draw lines in real-time. When the meeting ends, tap the “Square” icon to stop recording.Then, the GoToMeeting session will be saved in the Gallery app.
Method 3. Record GoToMeeting with Online Tools
Besides, an online screen recorder is a good choice. You don't need to download any recording software on Windows or Mac, but directly record GoToMeeting on the web. Convenient as an online tool is, it can be unstable and include a watermark. Moreover, online tools often allow SD recording quality only with a restricted length. What's worse, some meeting software will restrict online and default recorders from recording the conference due to privacy and security.
If you're okay with all these limitations, you might as well check out how to record GoToMeeting online in this part.
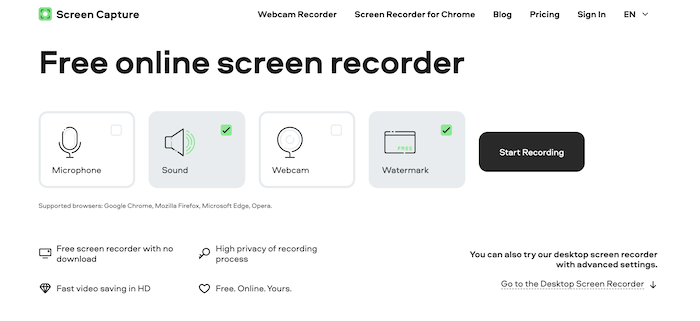
Step 1. Open ScreenCapture on your Chrome, Firefox, or Safari on the computer.
Step 2. Select the icons to turn on Microphone, Sound, or Webcam according to your need.
Step 3. Click “Start” Recording and select your session on GoToMeeting in the Application Window.
Step 4. Click “Share” and start recording. When the conference comes to the end, click “Stop sharing” at the bottom to stop recording. Now, you can download the GoToMeeting recording to MP4 on Windows/Mac.
FAQs about recording on GoToMeeting
Can you record a GoToMeeting session?
Yes, GoToMeeting recording is easy to achieve. You can record a GoToMeeting session using a built-in tool or other screen recording software, as we mentioned above.
Can you record a GoToMeeting if you are not the presenter?
Yes, of course you can! VideoSolo Screen Recorder is powerful to help participants record a GoTo Meeting for any device. Even if it has no recording GoTo Meeting app for android , it supports a connection between phones and computers by USB cables or wirelessly to record.
Final Words
If you're not the organizer of a GoToMeeting session, you may be upset with the inability to record GoToMeeting. Luckily, there are 3 ways here to make it possible even without permission.
If you're having an online conference on Android or iPhone, use the default screen recorder to record a GoToMeeting with ease. Online tools can record GoTomeeting on your computers, but it limits length for a recording. Besides, GoToMeeting may restrict online and default recorders from recording due to privacy and security.
In this case, a professional GoToMeetingrecording software like VideoSolo Screen Recorder is certainly the best choice with its high-quality visuals and entire security. Why not give it a shot and you'll see.


