



 Download Screen Recorder For FREE!
Need to voiceover your PowerPoint presentation but don't know where to start? There are actually only a few steps between you and the perfect audio for your slides. No matter what type of presentation you're working on a lesson, a business presentation, or a slideshow you want people to watch on their own- voiceover can add a nice finishing touch. In this post, we'll show you how to record audio on PowerPoint in two ways: using PowerPoint's own recorder or using an external recorder. We'll show you how to do both so you can decide which is best for you.
Quick Comparison: 6 Tools to Record PowerPoint Audio
| Tool | Primary Use Case | Noise Cancellation | Editing Capabilities | Overall Rating | Price |
|---|---|---|---|---|---|
| VideoSolo Screen Recorder | PowerPoint & screen recording | ✅ Yes | ✅ Built-in editing | 5/5 | Free / Paid |
| Wondershare Filmora | Recording + video editing | ✅ Yes | ✅ Advanced | 4.5/5 | Paid |
| VEED PowerPoint Recorder | Online presentation recording | ✅ Yes but limited | ✅ Online editing | 4.5/5 | Free / Paid |
| FonePaw Screen Recorder | Simple desktop recording | ✅ Yes | ✅ Basic editing | 4/5 | Free / Paid |
| ClassPoint | Interactive PowerPoint presentations | ✅ Yes but limited | ✅ Basic editing | 4/5 | Free / Paid |
| OBS Studio | Advanced screen & audio recording | ✅ Yes | ✅ Basic editing | 4.5/5 | Free |
Part 1. Record Audio Inside PowerPoint [Built-in Features]
PowerPoint already includes the ability to record, so you won't need a separate program to do this and have your narration play with your presentation.
How to Record Audio on PowerPoint in Windows
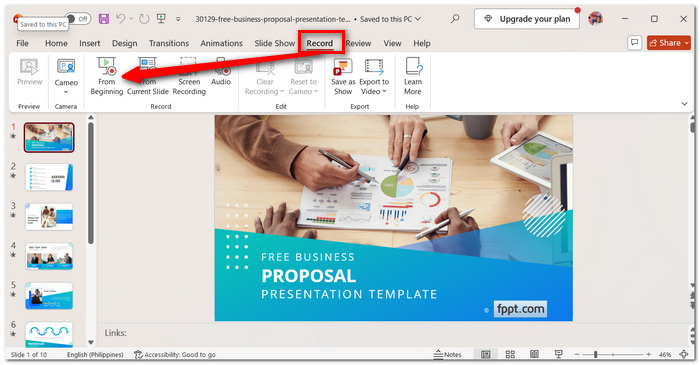
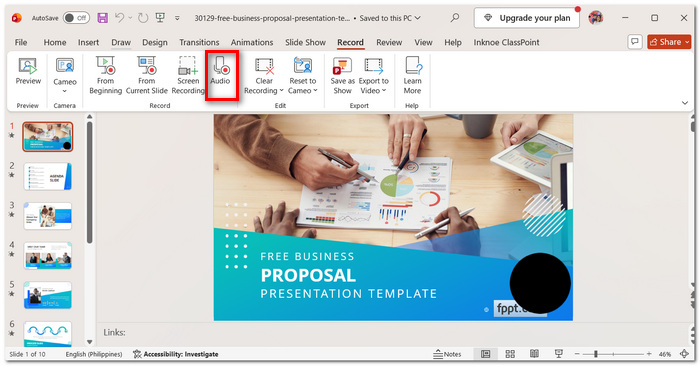
Step 1. Open the PowerPoint file. Click on the Record button near the top right, or Record > From Beginning from the menu.
Step 2. Check that the microphone is switched on, click on the Record button, and speak.
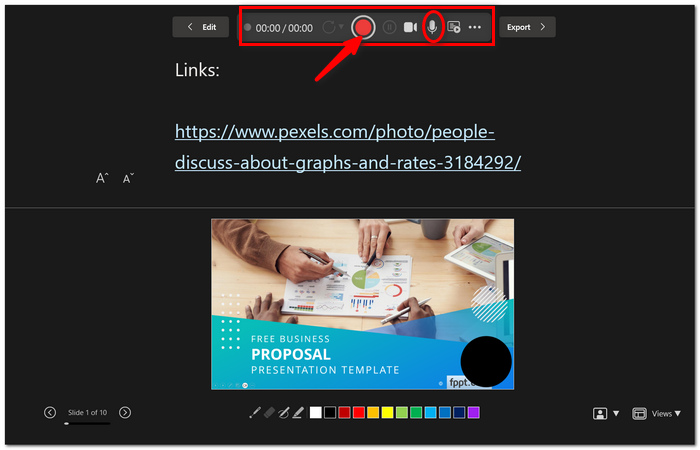
Step 3. Proceed to go through your slides, explaining. Click the Stop button once you are done.
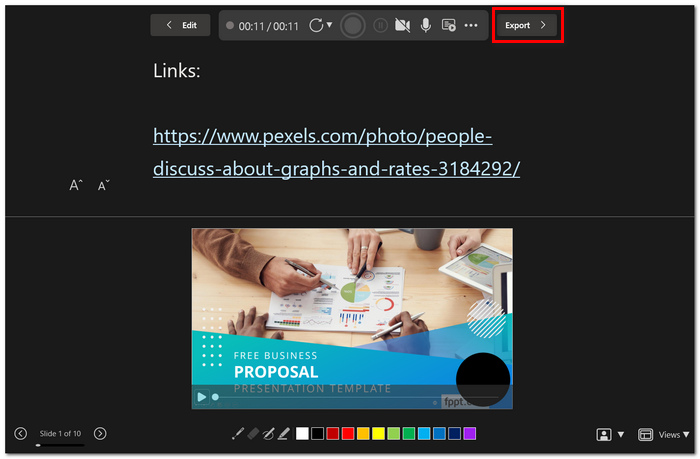
Step 4. Play back. Does the narration sound okay? Save the presentation, or go to Record > Export to Video if you need a shareable video.
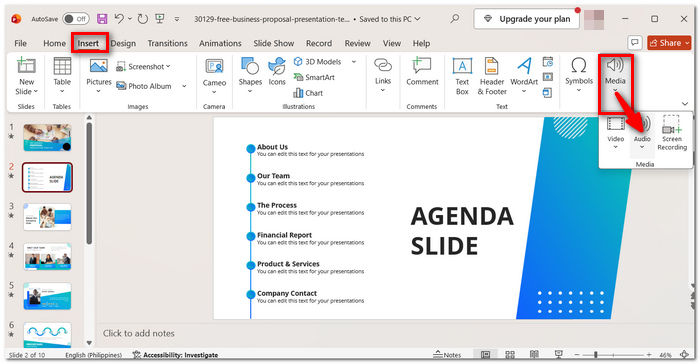
If you have a simpler audio clip, like one on one slide, select Insert > Media > Audio. Record, then listen and insert the clip.
How to Record Audio in PowerPoint on a Mac
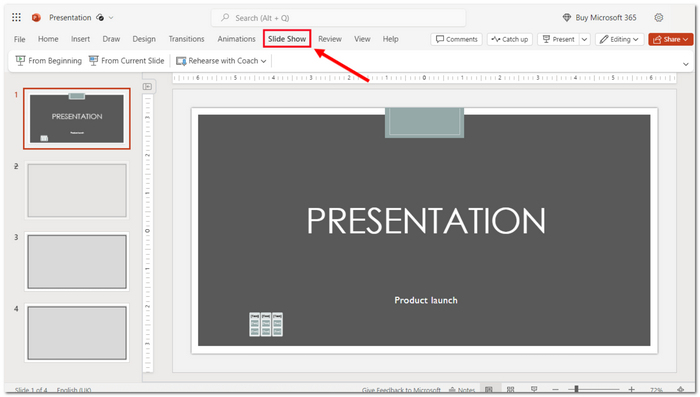
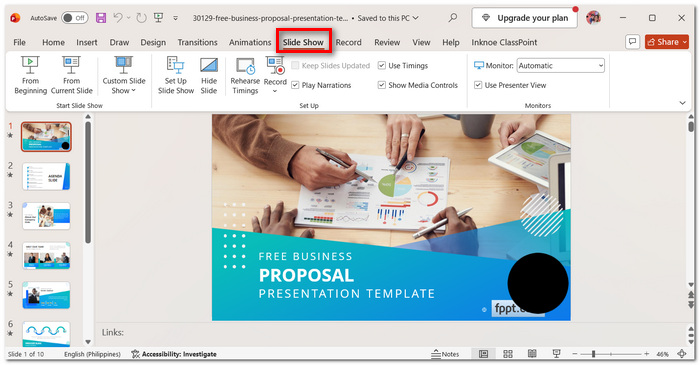
Step 1. On your PowerPoint presentation, select the Slide Show tab.
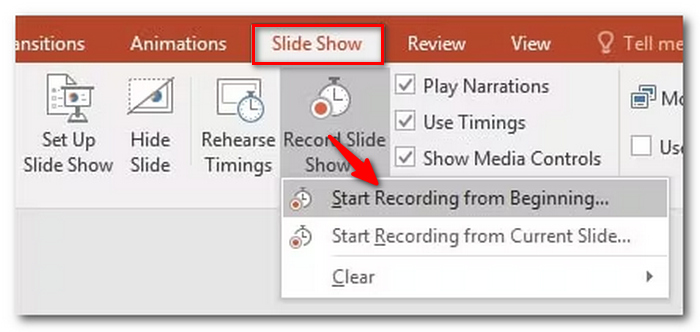
Step 2. Click Record Slide Show and select Start Recording from Beginning.
Step 3. Ensure that your microphone is activated. Begin the recording, and then, while presenting, introduce your slides.

Step 4. Move through the slides while speaking. Once complete, stop the slide show to record the narration.
Step 5. Please play the presentation to hear the recorded sound.
Your voice-overs are saved with each individual slide, so you may re-record any given slide.
Limitations of PowerPoint's Built-in Recorder
- • It doesn't offer specific native noise-reduction features to eliminate fan or room noise in your narration.
- • It is possible to cut a part of the inserted audio. However, it could also be necessary to re-record some part of each slide's narration.
- • Audio is stored with the presentation itself, so a deck with a lot of commentary or narration can get pretty big.
- • You do not have as many audio-processing options to choose from.
This way, if all you care about is recording a PowerPoint presentation with audio, then PowerPoint's recording feature will suffice. But if you want higher-quality voice recording, or more power to control the recording, you might want to consider a dedicated audio recorder instead.
Part 2. Best Way to Record Audio on PowerPoint [Editor's Choice]
VideoSolo Screen Recorder – Noise Cancellation & Screen + Audio Recording
Best for: PowerPoint presentations with narration.
OS: Windows & Mac
Rating: 5/5
VideoSolo Screen Recorder is a desktop application that records your screen, mic, and system audio simultaneously. It has noise cancellation and several simple editing features. It is another good choice for recording PowerPoint with narration.
 pros
- Records screen, microphone, and system audio all at once.
- Can cancel unwanted background sounds.
- Comes with hardware for trimming and editing recordings.
 Cons
- Certain premium features are supported by a paid plan.
How to Record PowerPoint Audio with VideoSolo Screen Recorder
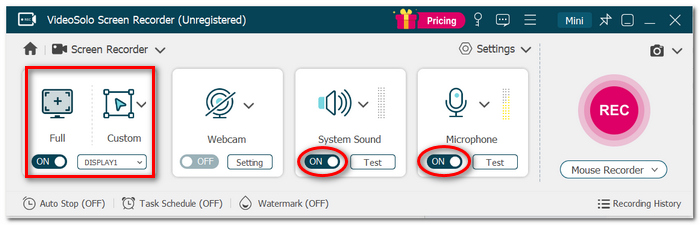
Step 1. Open the VideoSolo Screen Recorder and choose Screen Recorder.
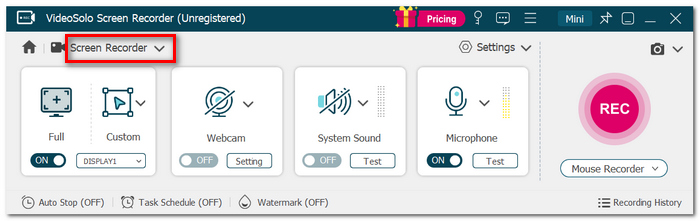
Step 2. Choose Full or Custom to save your PowerPoint. Also enable Microphone for narration and System Sound for computer audio.
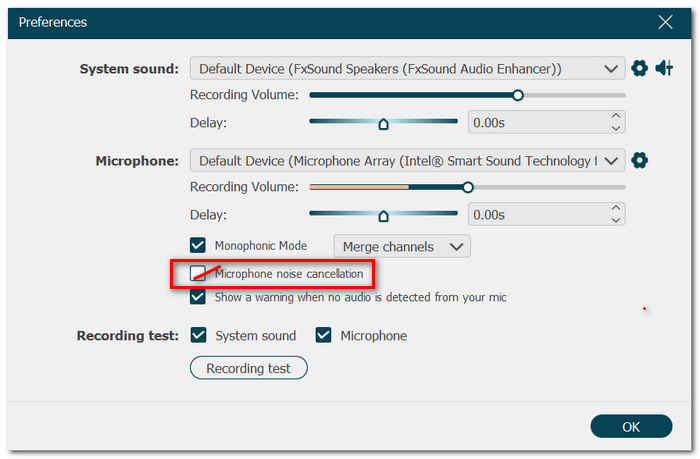
Step 3. Set the sound at the proper level and turn on active noise-cancelling. Open any of your PowerPoint slideshows.
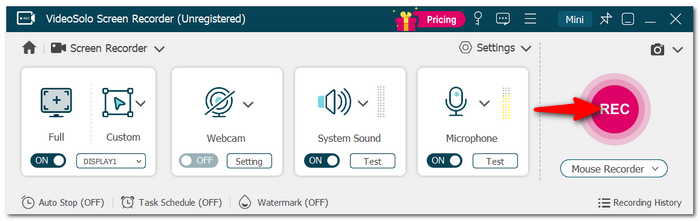
Step 4. Click REC and begin presenting. If you’re done, hit Stop.
Step 5. Preview and edit the recording. After that, save your recording.
The guidance can also indicate recording a PowerPoint presentation with audio and video in a single recording rather than inserting narration to each slide individually.
User Experience
On review websites, VideoSolo Screen Recorder is praised for having a straightforward recording process. Several reviews state that the product is very easy to use for recording classes, webinars, and any other screen recordings. There are some concerns raised about billing or licensing issues, so it might be better to get the details of the plan before purchasing.
Part 3. Other 5 Audio Recorders to Record PPT with Audio
1. Wondershare Filmora – Advanced Video Editing
Best for: Recording PowerPoint and polishing it afterward.
OS: Windows & Mac
Rating: 4.5/5
- • Enables you to record your screen, microphone, and system sound.
- • Powerful editing features after recording.
- • Record in full-screen, windowed, or selected area.
Limitation: It might be a little extra for some simple slide narration. Only some of the advanced features can be used by free plan users. Ease of use and editing in G2 is praised by G2 users, but a few users have felt that premium features are expensive.
How to Record PPT with Audio in Filmora
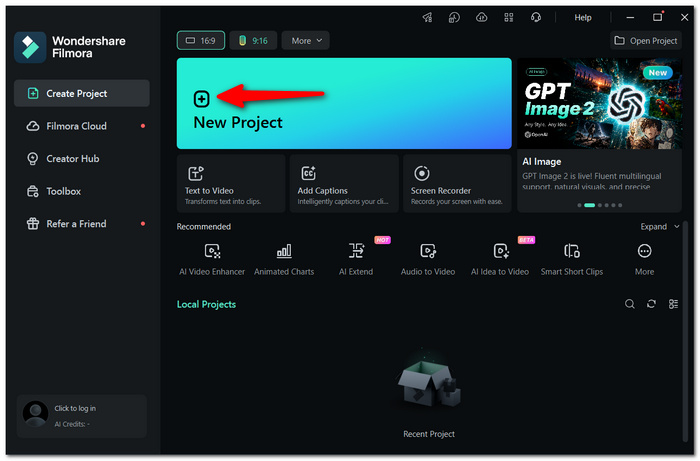
Step 1. Open Filmora and click New Project to get ready for the new video.
Step 2. Go to File> Record Media> Record PC Screen.
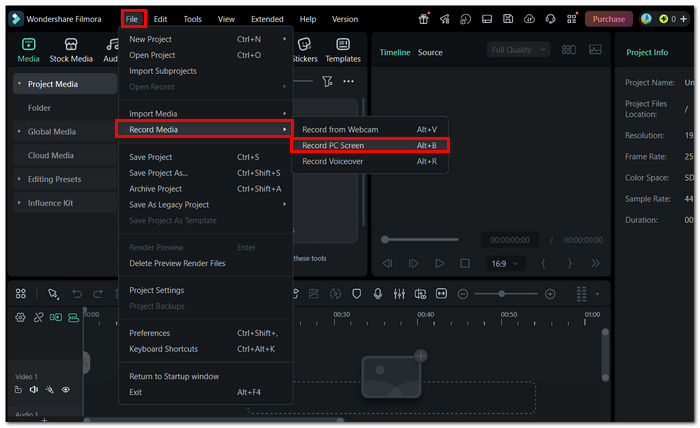
Step 3. Choose one of these options: Full Screen, Target Window, or Custom. You can turn on the Microphone for your narration and System Audio, as needed.

Step 4. Set the recording controls and click Start Recording. Open your PowerPoint and go through the slides you have.
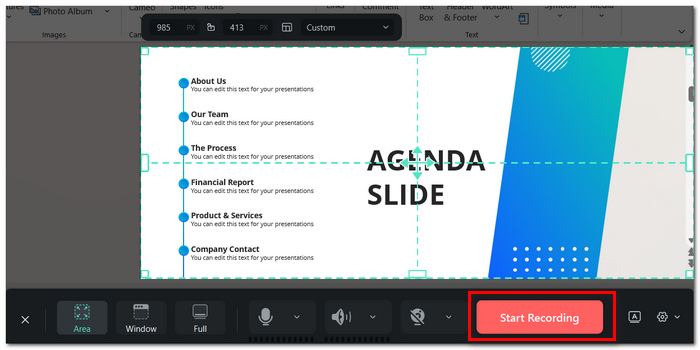
Step 5. Click Stop on the recorder once completed. Make some edits to the recording in Filmora, then save and export it.
User Experience: G2 presently gives Filmora a rating of 4.4/5 based on hundreds of reviews, with users frequently pointing out its easy-to-use interface and extensive selection of editing tools.
2. VEED PowerPoint Recorder – Browser-Based Recording
Best for: Quick PowerPoint recording without installing software.
OS: Windows & Mac
Rating: 4.5/5
VEED is a web-based on-screen and presentation recording tool that allows you to record PowerPoint, and microphone. Furthermore, it can also serve as a webcam recorder directly from your browser, and you can edit it after recording.
- • On the web, directly.
- • The screen has a record button and icons for the microphone and webcam.
- • Has an online editor, which can be used for quick changes.
Limitation: Relies on a browser and internet access, and some features like Clean Audio are only available with a paid plan.
How to Record a PowerPoint with Audio in VEED
Step 1. Open the PowerPoint Recorder within VEED. Upload your PowerPoint presentation or opt to record your screen.
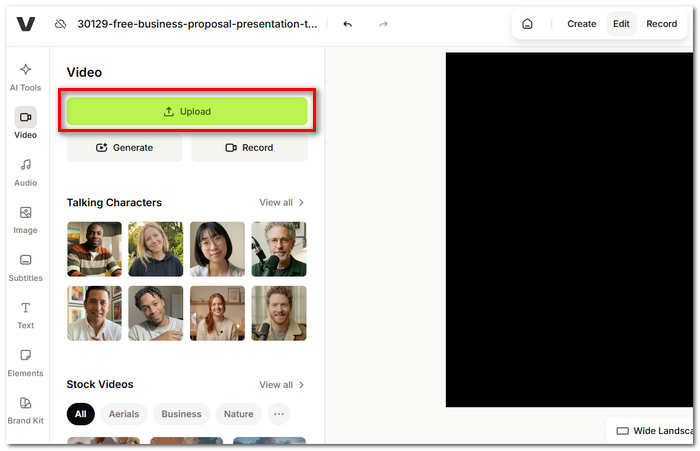
Step 2. Choose a layout and permit the use of the microphone and screen. During the evaluation session, please turn your microphone and webcam on, if you can.
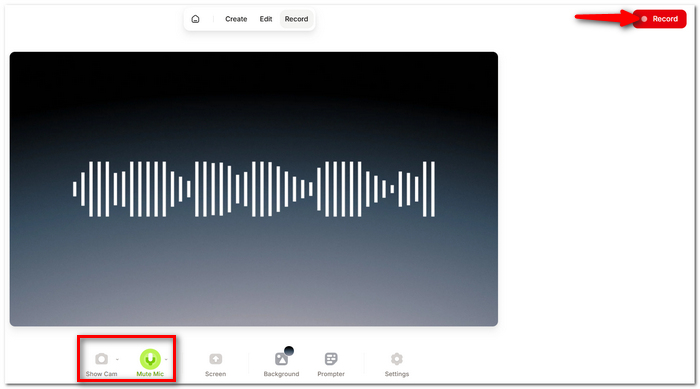
Step 3. Hit Record and open/display the PowerPoint slides by clicking the Screen.
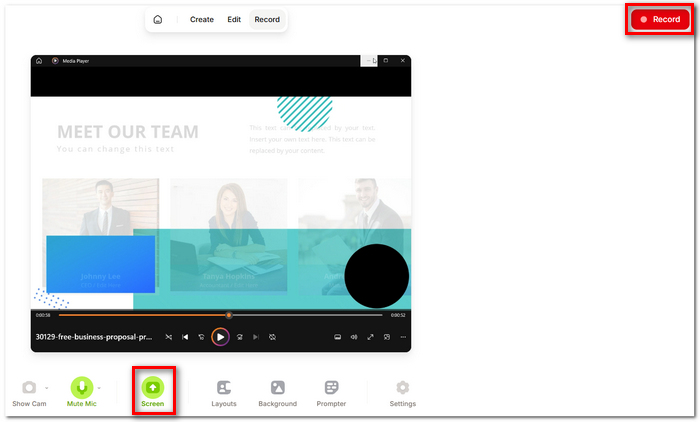
Step 4. Click the recording button again when done. Pre-listen to the recording, then click on either Edit or Finish Recording.
Step 5. Edit and export your presentation.
User Experience: PowerPoint recorder on VEED has a rating of 4.6/5 from more than 2,100 reviews on its product page. User comments praise the recorder's seamless integration for recording, editing, and sharing all within a single browser-based application.
3. FonePaw Screen Recorder – Easy Recording & Snapshot Tools
Best for: Simple PowerPoint recording with quick screen captures.
OS: Windows & Mac
Rating: 4/5
FonePaw Screen Recorder is a desktop screen recording software that records your screen and audio from the microphone and system. It features the most handy tools for screenshots, annotations, mouse effects, and rapid trimming.
- • Records microphone and system sounds at the same time.
- • Captures the selected screen while recording.
- • Basic annotation and mouse-effect tools.
How to Record Audio on PowerPoint with FonePaw Screen Recorder
Step 1. Open the FonePaw Screen Recorder. Choose Screen Recorder.
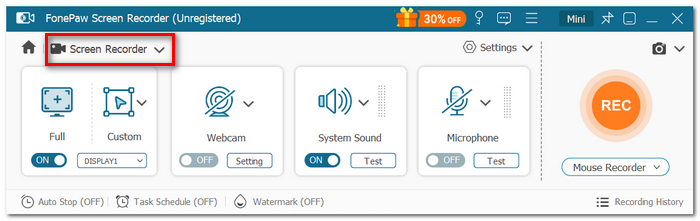
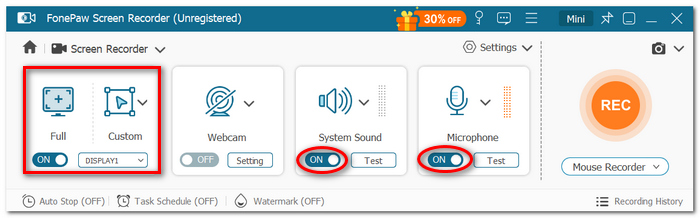
Step 2. You can choose a screen from Full, Custom, or the PowerPoint window. Enable both System Sound and the Microphone.
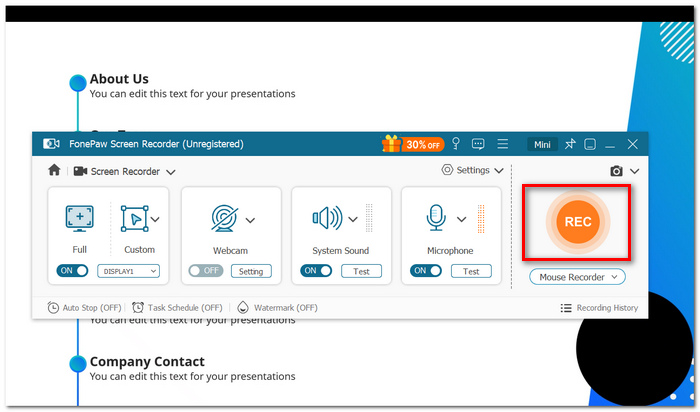
Step 3. Open the PowerPoint file, then click REC and begin the presentation.
Step 4. End the session by clicking Stop. Preview and trim the recording if it is too long, then save it.
This makes FonePaw a handy tool as it provides a convenient way to learn how to record audio on PowerPoint as well as record the slides.
User Experience: Per its site, FonePaw has 8+ million users and a 4.6/5 TrustScore. Its free set of tools for recording, using images, and annotating excels for those requiring everything in a single desktop application.
4. ClassPoint – Built-In Audio Activities
Best for: Teachers who want audio interaction inside PowerPoint.
OS: Windows & Mac
Rating: 4/5
Limitation: ClassPoint is for conference calls. It is good if you want to gather audio rather than record a PowerPoint with narration. ClassPoint is not a screen recorder if you want a high-quality presentation.
How to Use Audio Recording in ClassPoint
Step 1. Install and launch ClassPoint while playing PowerPoint. Open your presentation and insert an Audio Record activity on a slide.
Step 2. Enter Slide Show mode. Help participants enter using the ClassPoint session. Participants can either record their audio using their microphone or upload an audio file.
Step 3. Listen to or go through the recordings submitted. Download the sound files whenever you need.
User Experience: ClassPoint also has good customer reviews that pertain to its PowerPoint add-in and campus interaction. Capterra's current average score is 4.8/5 based on 266 reviews, highlighting its user-friendly nature and interactive teaching tools
5. OBS Studio – Advanced Audio Controls
Best for: Users who want detailed recording control.
OS: Windows, Mac & Linux
Rating: 4.5/5
A free open-source recorder like OBS Studio can record PowerPoint microphone system sound and other sources. We can have the most customization options on this recorder, in particular on the existing audio filters like Noise Suppression, Noise Gate, and Compressor.
- • Precision audio configuration and filtering.
- • Records from many sources simultaneously.
- • Fully free and open-source.
Limitation: It has a large number of settings, which can make the initial configuration more difficult for novice users.
How to Record PowerPoint with Audio in OBS Studio
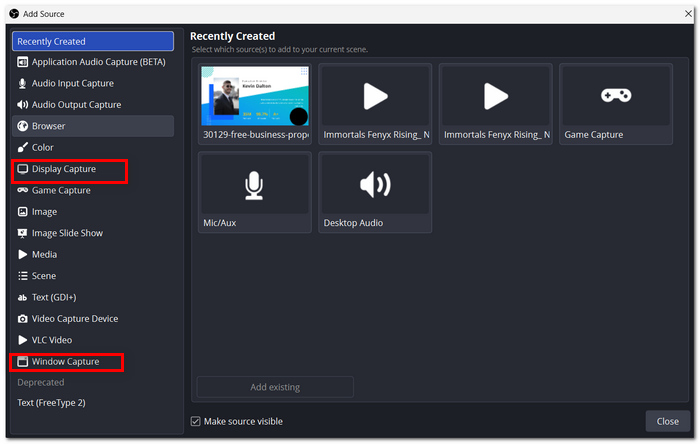
Step 1. Open OBS Studio. Add a Display or Window Capture source.
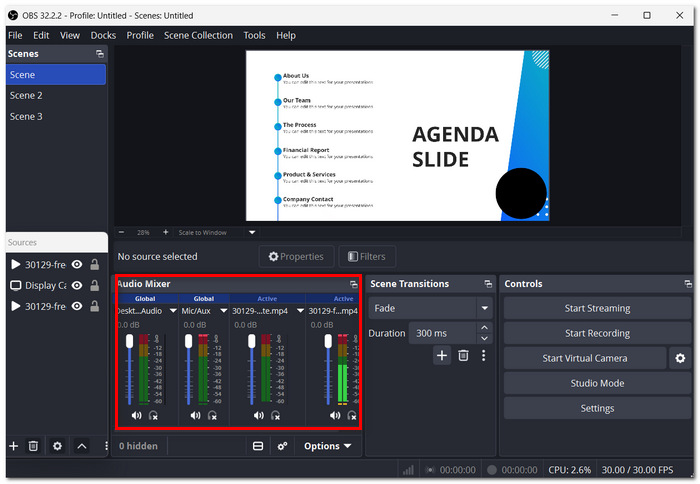
Step 2. In the Audio Mixer, make sure your microphone and desktop audio are on.
Step 3. Click Start Recording, open your PowerPoint, and begin the slideshow.
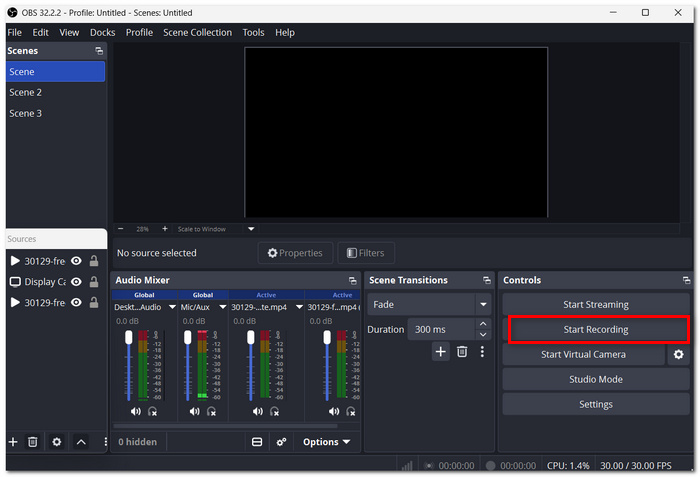
Step 4. Present your slides and try to speak. Log back into OBS and hit Stop Recording.
Step 5. Locate your completed recording in the folder you chose for output.
Part 4. FAQs on Recording Audio on PowerPoint
Why is it that when I jump from slide to slide, I am no longer narrating?
PowerPoint does not record voice-over while changing slides. Wait a few seconds, then speak as the next slide appears.
Will the narration be heard automatically when the PowerPoint is opened?
Yes. If you have recorded narrations, they are stored with your presentation and can be played during the slide show based on the recording timings.
What if I accidentally overwrite a good narration?
PowerPoint's recording controls allow you to erase the recording on the current slide, and also to remove recordings from all slides. But based on your circumstances, the Clear All feature should be used with caution, as it will remove several narrations at once.
Conclusion
So, once you go through these various methods, the biggest conclusion you can draw is that recording PowerPoint narration isn't technically difficult. It is easy with PowerPoint when you are narrating it simply; if you want more precise sound quality and recording controls, work with a recorder. When you know how to record a PowerPoint presentation with audio, you will be able to select the approach that is the best fit for your presentation.
More Readings
Capture screen activities, audio, webcam, gameplay, and mobile screens on Windows and Mac with high quality.

