



 Download Screen Recorder For FREE!
Hi, there are occasions when you might want to record a FaceTime call, be it an essential discussion, a hilarious chat, or anything you might want to watch back at another time. The hard part is capturing the audio at the same time as the video, with limits on recording varying between devices. In this how-to record FaceTime with audio tutorial, we will walk you through the various possible options for Mac, Windows, and iPhone, with some handy ways to fix common recording issues. We will also briefly explore the potential options for recording solutions, so you can decide which setup is right for you.
Quick Comparison: 6 Ways to Record FaceTime Audio
| Tool / Method | OS | Audio Capture Capabilities (Mic + Internal Sound) | Noise Reduction | Ease of Use | Score |
|---|---|---|---|---|---|
| VideoSolo Screen Recorder | Windows & Mac | Mic + system audio | Yes | Very Easy | 5/5 |
| Bandicam | Windows | Mic + system audio | Yes | Easy | 4.5/5 |
| QuickTime Player | Mac | Mic + limited internal audio | Limited | Very Easy | 4/5 |
| Record It! | iOS | Mic + screen audio* | Limited | Easy | 4/5 |
| DU Recorder | Android & Mobile | Internal audio + mic* | Basic | Easy | 4/5 |
*Audio capture during calls can vary because of iOS/Android restrictions and app permissions.
Part 1. How to Record FaceTime with Audio on Desktop (Mac & Windows)
1. VideoSolo Screen Recorder – System Audio + Microphone Recording (Ultimate Choice)
VideoSolo Screen Recorder is a desktop recording tool that records your FaceTime screen with sound from your microphone and system.
 Features
- Dual audio recording captures your microphone and computer sound simultaneously.
- Noise cancellation eliminates unnecessary background noise, resulting in a clearer call.
- Flexible screen capture saves ongoing screen activity of the full screen, selected areas, or components.
- Add your webcam feed to the call by recording it to your desktop, and then, during FaceTime, run the camera as well.
- The ability to pause/resume the recording, take a snapshot, and toggle the recording on and off.
 pros
- Video, microphone, and system sounds are all compatible.
- Intelligibility is restored by noise cancellation.
- Additionally, Microsoft IM for Mac is supported.
 Cons
- A paid plan is needed for some advanced features.
How to Record
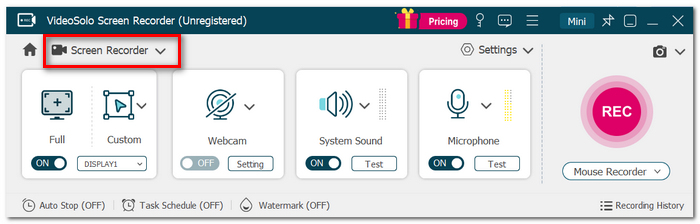
Step 1. Open VideoSolo Screen Recorder. Choose the Screen Recorder.
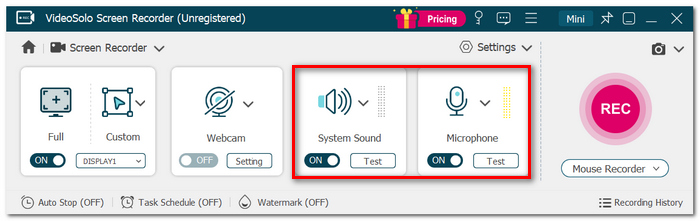
Step 2. Select your recording location. Switch on System Sound and Microphone.
Step 3. Open FaceTime and dial. Begin the recording from this moment.
Step 4. Click Stop when you have completed. Preview the recording and lock it.
User Review
With screen and audio recording, most people seem to agree that VideoSolo Screen Recorder is fairly easy to use. It would be a handy tool for recording FaceTime chat since it allows microphone and system sound to be recorded.
2. Bandicam – Lightweight Recording
Bandicam is a Windows-based lightweight screen recorder that can record your FaceTime session with microphone and computer audio.
pros
- Consumes minimal system resources during recording.
- Can record the microphone and the system sound at the same time.
- Brings live mouse and drawing effects while recording.
Cons
- Designed exclusively for Windows.
- The free version includes a watermark and a recording time limitation.
How to Record FaceTime with Bandicam
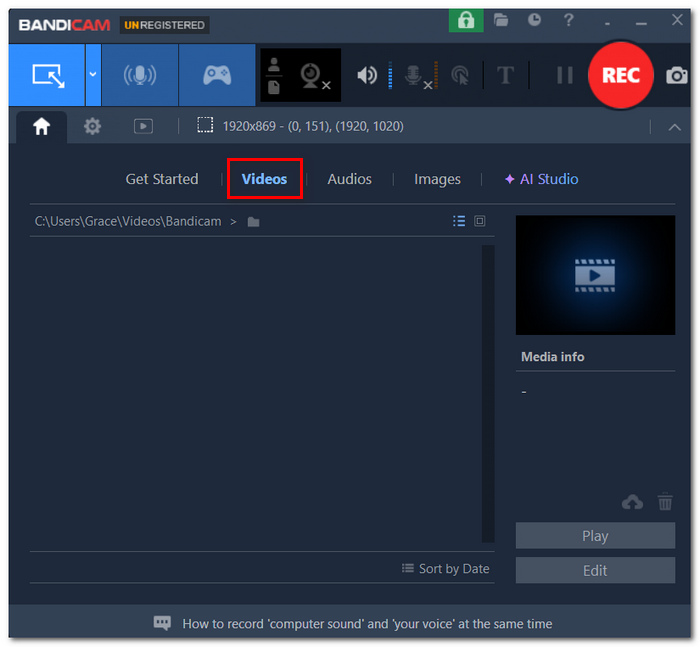
Step 1. Open Bandicam, then choose Video > Screen Recording.
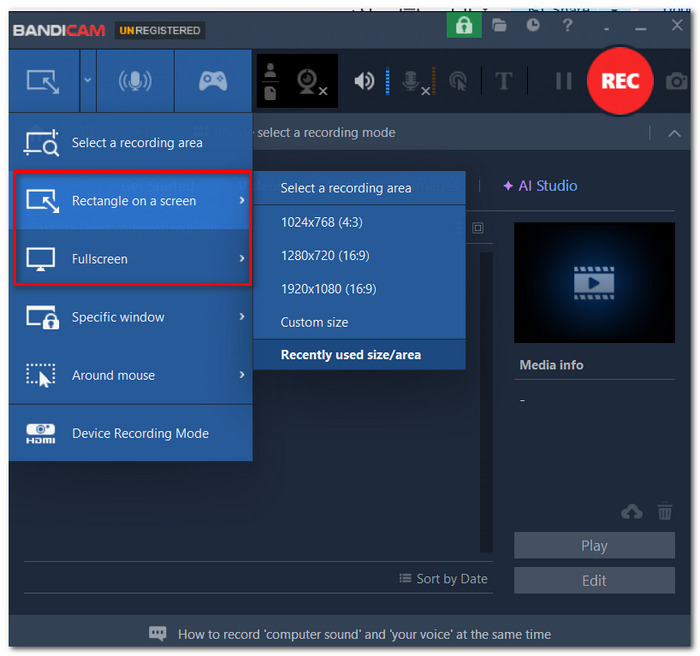
Step 2. Select Rectangle on a screen or Fullscreen.
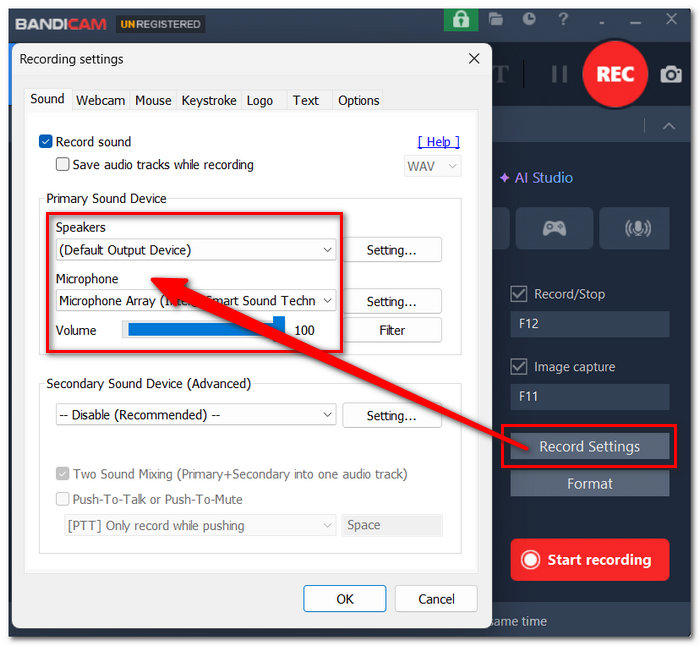
Step 3. Open the Recording Settings and enable the options for your microphone and your speaker/system audio.
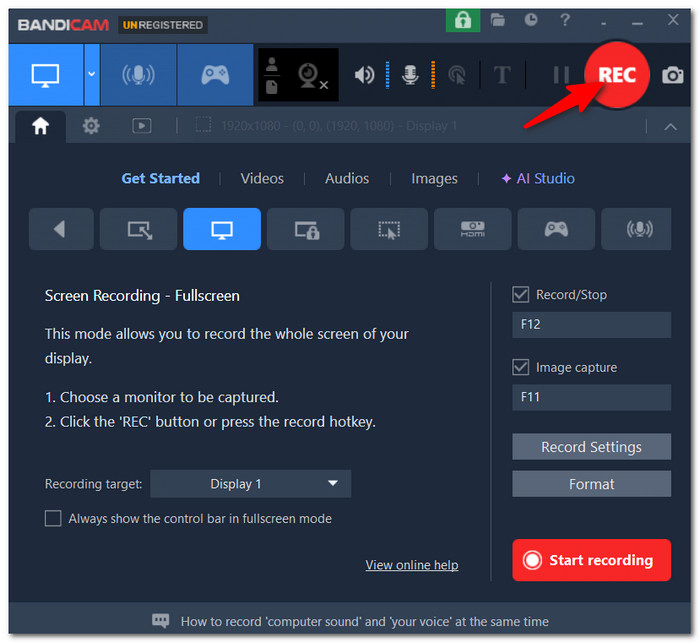
Step 4. Open FaceTime and take your call. Click REC or press F12 to start. Just talk normally when you are on a call.
Step 5. Press F12 once more to end the recording. Open the Home > Video tab to preview the recording.
This can be a simple solution if you want to screen-record FaceTime with sound without having to use a heavier screen recording program.
3. QuickTime Player – Built-In Mac Screen Recording
The built-in media player on Mac, named QuickTime Player, can be used to record the Mac screen and mic without installing any additional software.
pros
- Comes pre-installed with macOS, so no additional setup is required.
- The open interface is user-friendly for a novice.
- Rough, but effective for simple screen captures and microphone voice recordings.
Cons
- Access to internal audio capture may be limited by macOS.
- Fewer recording and audio controls than dedicated recorders.
How to Record FaceTime with QuickTime
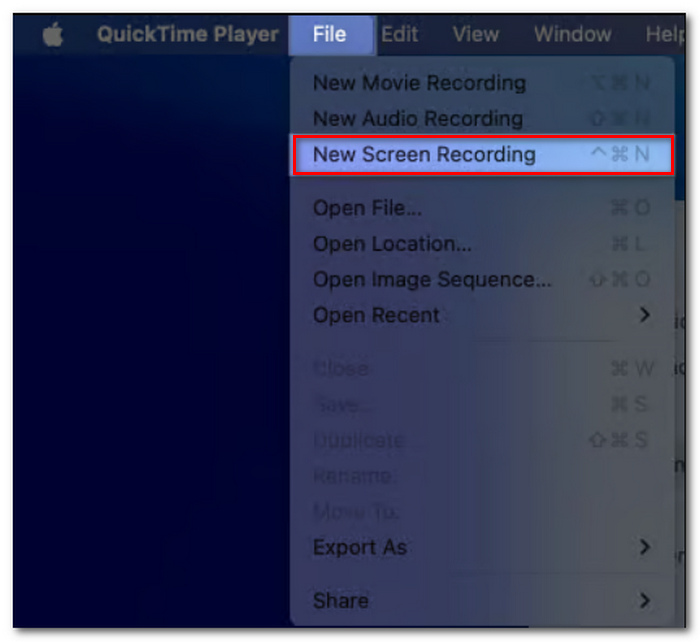
Step 1. Go to QuickTime Player. Open File > New Screen Recording.
Step 2. Click the Options button and choose the microphone you are using.
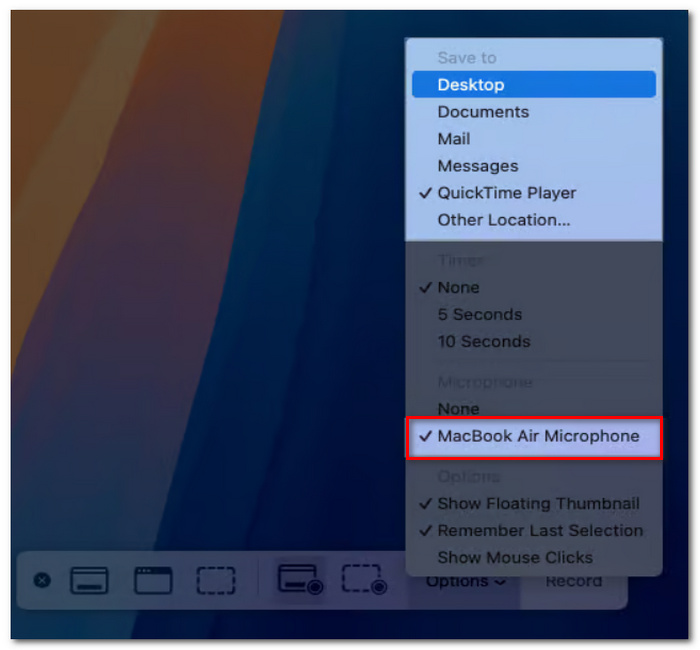
Step 3. Select the monitor or recording area. After matching the waveforms, click Record.
Step 4. Open a FaceTime call and join your call. Hit Stop in the menu bar when you are finished.
Step 5. Preview and save the recording.
Part 2. How to Record FaceTime with Audio on iPhone
1. Record it! – Quick iPhone Screen Recording
Record It! is a screen-recording app for iOS that enables recording your iPhone screen and includes microphone audio input.
pros
- Minimal interface for quick recordings.
- Supports microphone narration.
- Editing includes basic editing tools after recording.
Cons
- Some features are only available if you pay for them through the app.
- Not all FaceTime audio recordings are collectable due to the restrictions imposed by iOS.
How to Record FaceTime with Audio on iPhone via Record It!
Step 1. Download and launch Record It! on your iPhone. Grant the app the necessary permissions.
Step 2. Open the Control Center and tap and hold the Screen Recording button.
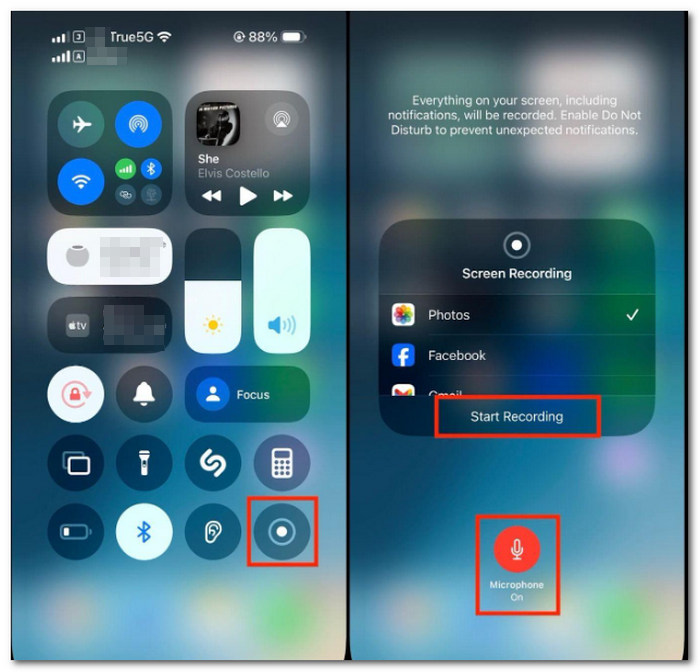
Step 3. Tap Record It! if this is a recording option listed. Followed by tapping the microphone if you wish to include your voice.
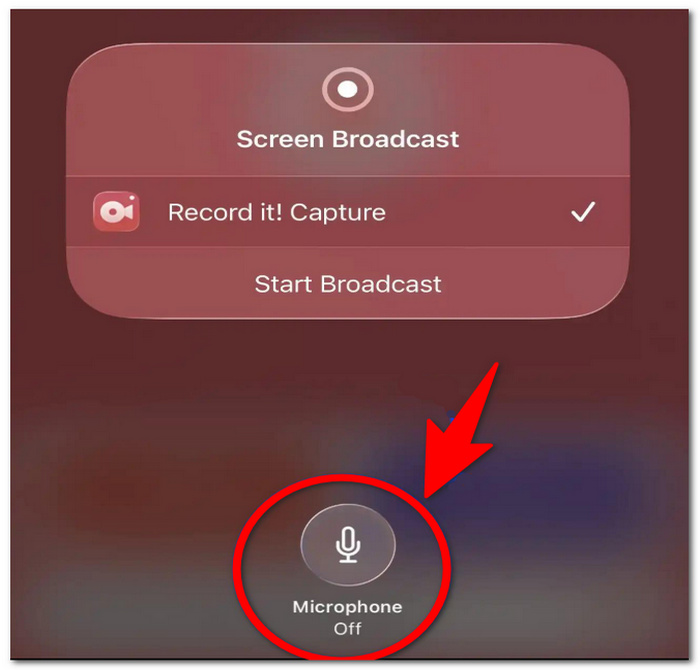
Step 4. Tap the red Screen Recording now. Open FaceTime and start your call.
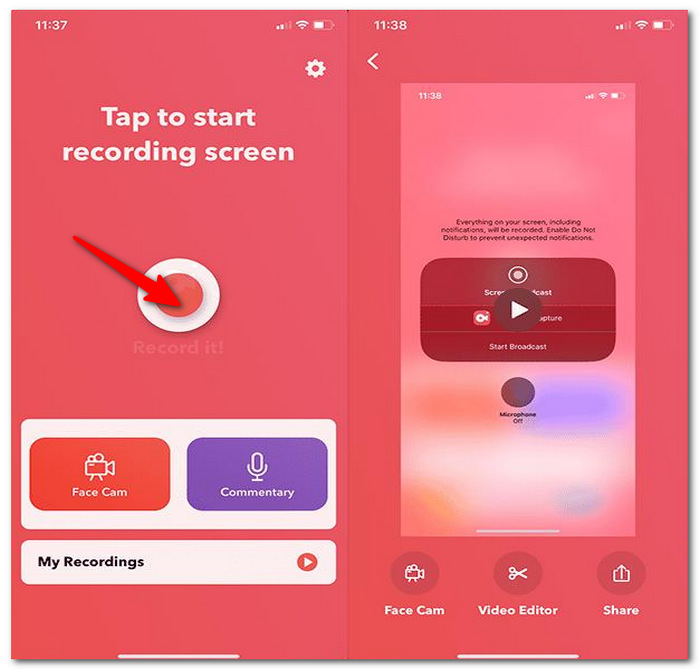
Step 5. When you finish, press Stop in the Control Center. Open Record It! To review or modify the recording.
To record a FaceTime call with sound, it isn't hard to do on an iPhone. I find that Record It! will record the screen and your microphone before starting the call. Be sure that, due to the restrictions in iOS, the app is able to record the call participants' voices. This may be worth investigating if your aim is to screen record FaceTime with audio.
2. DU Recorder – Internal Audio + Microphone Recording
DU Recorder is a mobile screen recorder that records the screen of your device, including internal device audio and microphone sound. Still, Android recorder only supports internal audio recorder for Android 10+ now, on Android device.
pros
- Support for internal audio recording and microphone.
- Allows for a choice of video quality and frame rates.
- Comes with some basic editing features like trimming and adding music.
Cons
- On-device and Android versions support internal audio recording.
- Audio behavior over a call may still be limited by Android.
How to Record FaceTime with DU Recorder
Note: FaceTime is an Apple service, and DU Recorder is only relevant here as an Android/mobile option for recording video calls. It will not record FaceTime on Android.
Step 1. Start and run DU Recorder. Grant access for the necessary screen capture and microphone.
Step 2. Go to Settings > Video > Audio Source. Turn on the Microphone or the Device & Microphone.
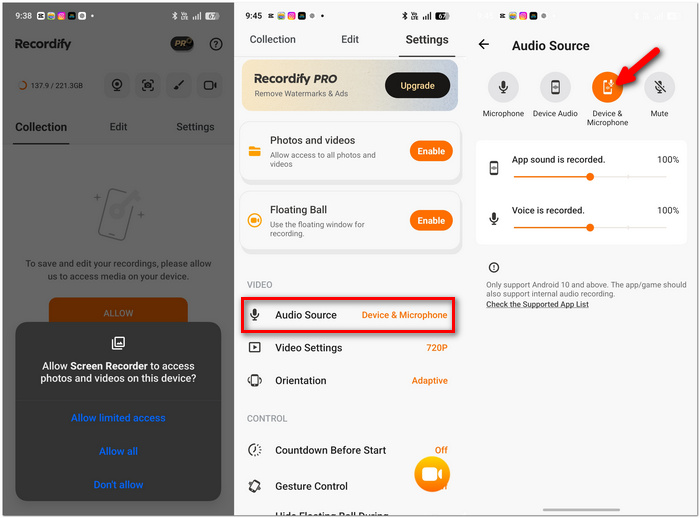
Step 3. Tap the recorder icon and accept the casting, then start the video call you intend to record.
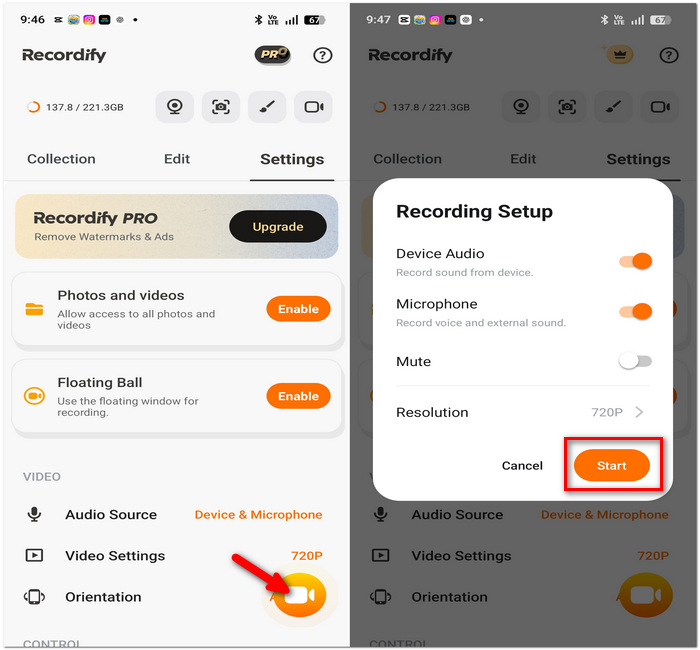
Step 4. Open the floating DU Recorder control and tap Stop. Open the recording in DU Recorder for preview/edit.
If your intent is to screen-record FaceTime with audio, you may also want to state that you are not using DU Recorder as a FaceTime recorder. Instead, the app should be introduced as a mobile video recorder alternative.
Part 3. Troubleshooting: Common FaceTime Recording Audio Issues
You may have trouble using FaceTime audio even if the recording itself looks fine. These are a few common issues and their straightforward fixes.
1. Screen Record FaceTime No Sound
Why it happens: It is due to the microphone being disabled, or FaceTime or another program being unable to record internal sound in iOS/macos.
How to fix: Make sure your microphone permissions and recording preferences are set properly before starting the call. Always test with a small recording first to make sure it's recording properly.
2. Only One Side of the Conversation Is Recorded
Why it happens: Your voice is being picked up by the microphones, but the other person's audio isn't playing as system sound.
How to fix: When recording from a desktop recorder, make sure that both the microphone and system sound are turned on. On the iPhone, ensure that the phone's settings have audio capture turned on.
3. Audio Is Out of Sync With the Video
Why it happens: It may be due to a heavy CPU load, very high recording settings, or a slower computer.
How to fix: Close all unnecessary applications, reduce the recording quality if possible, and upgrade your recorder and device.
4. Recording Has Background Noise
Why it happens: The microphone hears the noise of a computer's fans, the general noise of the room, or the sound of a keyboard.
How to fix: Record in a less noisy environment, use a higher-quality microphone, move it nearer, and enable noise reduction if your recording software has such a feature.
5. FaceTime Recording Stops Unexpectedly
Why it happens: If the drive fills, there is an overflow, or if it encounters a system restriction, it could have stopped recording.
How to fix: Create some space, close other applications in the background that are unnecessary, and record a short test run a few minutes before making an important FaceTime call.
Part 4. FAQs on Recording FaceTime with Audio
What recording format to use for a FaceTime call?
MP4 is a sensible option if you plan to share or edit your recording, as it is compatible with most standard video players and editing tools.
Can I record FaceTime while using headphones?
Yes, but audio recording depends on the recording technique. In some cases, if the person wears headphones, the audio of the other person is not recorded because the sound does not come through the computer speakers.
Will the recording include FaceTime notifications?
Potentially. Any notifications that appear on the screen while you're recording may become part of the video, so enabling Do Not Disturb or another Focus mode can help keep the recording clean.
Conclusion
Getting a FaceTime call recorded with good sound quality is really just about having the proper configuration for your tool and testing the audio before recording. This allows you to avoid some long After-Action Reports when it turns out parts of your call didn't record. And if all you need is a FaceTime audio screenshot, you don't even need to record a call. Just save a screenshot.
More Readings
Capture screen activities, audio, webcam, gameplay, and mobile screens on Windows and Mac with high quality.

