



 Download Screen Recorder For FREE!
Achieving clear, professional-quality audio in OBS Studio can be a bit of trial and error, in particular when you're new to the program. This video will show you how to record good audio on OBS, from selecting the perfect audio settings and balancing microphone levels to adding filters for minimizing background noise and maintaining a steady speaking voice. I'll also show you how to split your audio tracks for greater editing options, and reveal a much easier-to-use alternative, VideoSolo Screen Recorder, to recording video with OBS if you don't want to tweak OBS settings all day long.
Part 1. Prerequisite – Initial OBS Audio Configuration
Before I hit record, there are a few OBS audio settings I recommend adjusting to prevent common problems and ensure better consistency. Here's a quick adjustment to get better audio quality when recording with OBS.
1. Align System and OBS Sample Rates
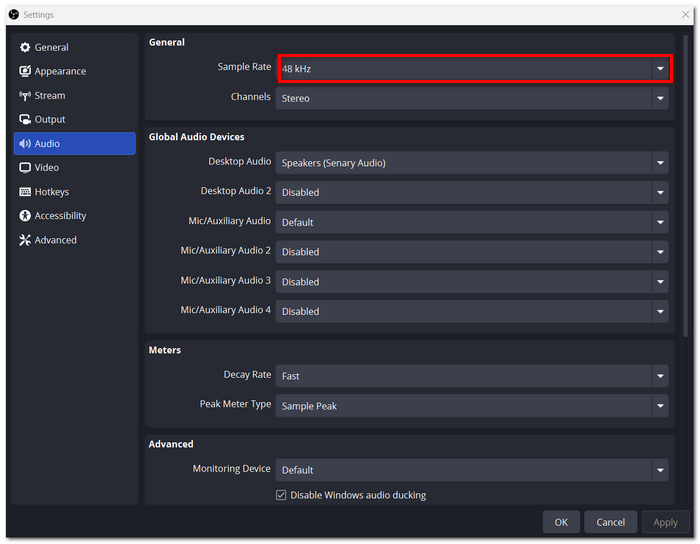
I set OBS Studio's sample rate to 48 kHz (Settings > Audio). Then I go into my computer's sound settings and set my recording device to 48 kHz (same as OBS) at 16- or 24-bit. The less difference between the sample rate at record time and playback, the better. This means no inadvertently trying to change the speed of things.
If you mainly need to capture playback from your computer, this guide explains how to record computer audio on Windows and Mac.
2. Assign the Correct Input Device
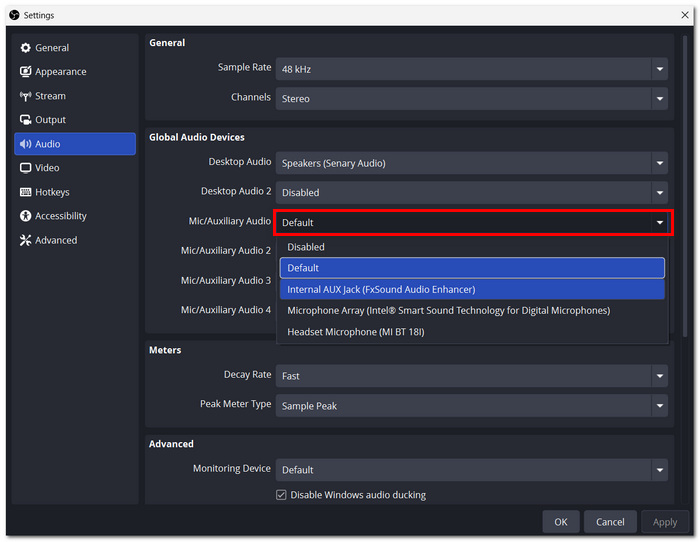
Then I choose my real microphone under Settings > Audio > Mic/Auxiliary Audio instead of "Default". This can help me ensure that I will be recording audio from the microphone that I want to use when recording on OBS. Having this checked out before recording can save me from finding out that I recorded the wrong audio source.
3. Configure Audio Channels
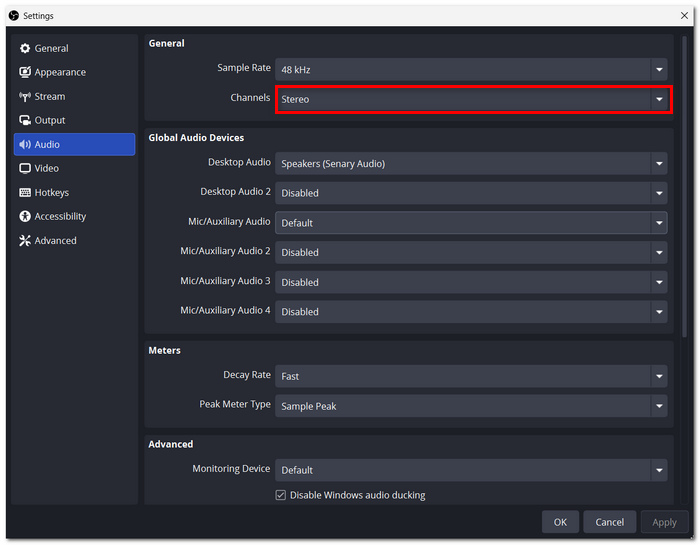
I verify the selected channel configuration and select Stereo if it is the correct configuration for the recording I want. The stereo configuration allows both left and right channels to be adjusted independently and is preferable for many sources that have stereo sound. When I am recording with a single microphone, I check to ensure my voice is recorded clearly and balanced.
Pro Tip: How to Balance Audio Levels in OBS
I verify the OBS Audio Mixer right before I start recording to confirm my voice is not too loud and does not interfere with the other sound in the background. The color of the meter is what I look out for. Green if the audio is soft, yellow if the audio is loud, and red if it's probably too loud.
For example, I start with a vocal track peaking between -12 dB and -6 dB and a desktop/game audio peaking between -24 dB and -18 dB to ensure the vocals are still prominent.
If you are comparing tools for voice recording, explore these audio recording software options for Windows and compare their recording controls and editing features.
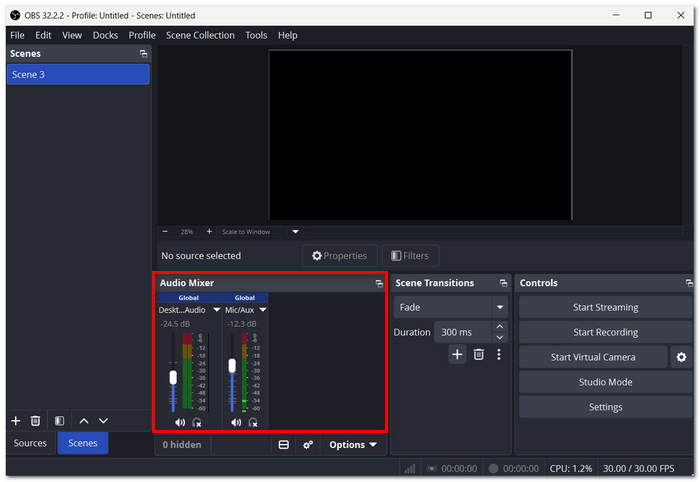
When I want to record lossless audio on OBS, I also look at the recording format and quality. Locate the best settings to record videos on OBS, and it's important to find the best balance of audio quality, video quality, and file size.
Part 2. How to Record Good Audio on OBS
I don't just record my video with this. I also use OBS screen recorder to record my audio, which I find to be clean and flat. When you get the correct OBS screen recorder filters and settings, your voice will stay even throughout.
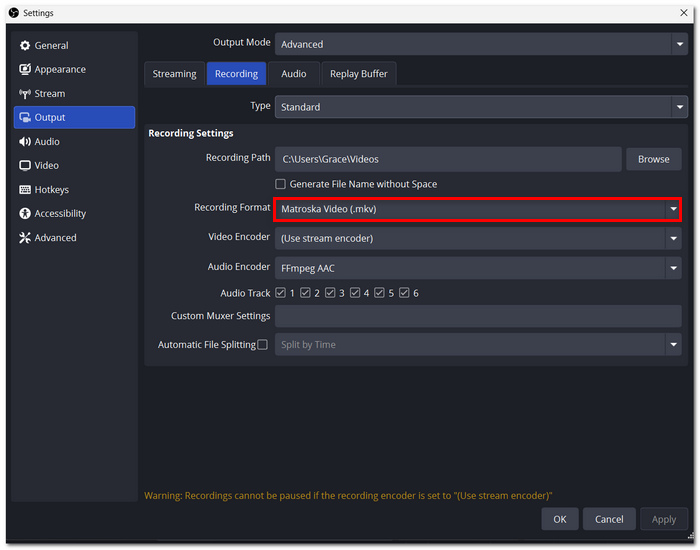
Step 1. Choose a recording format and the audio you want to record in Settings > Output > Recording. Make sure you select the microphone that you want to record from and test it with a quick recording.
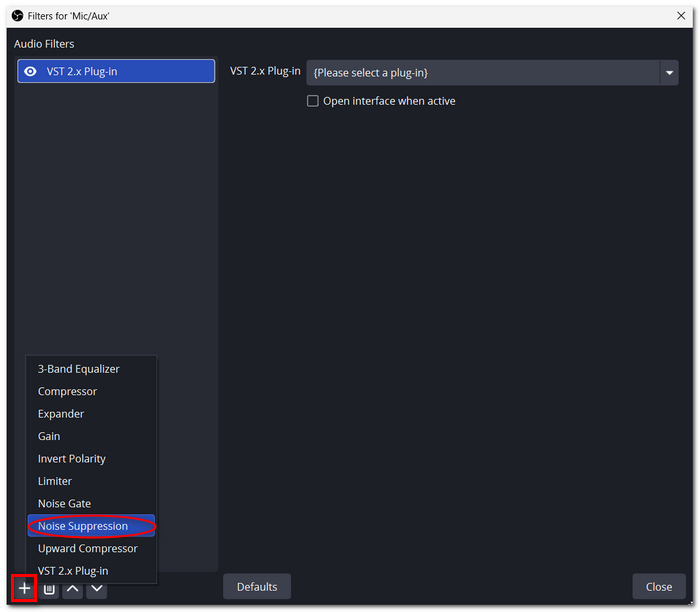
Step 2. In the Audio Mixer, go to the dropdown menu and select Filters. Hit the Add button and choose Noise Suppression if you're trying to get rid of fan noise or keyboard clicks. Experiment until your voice still sounds natural.
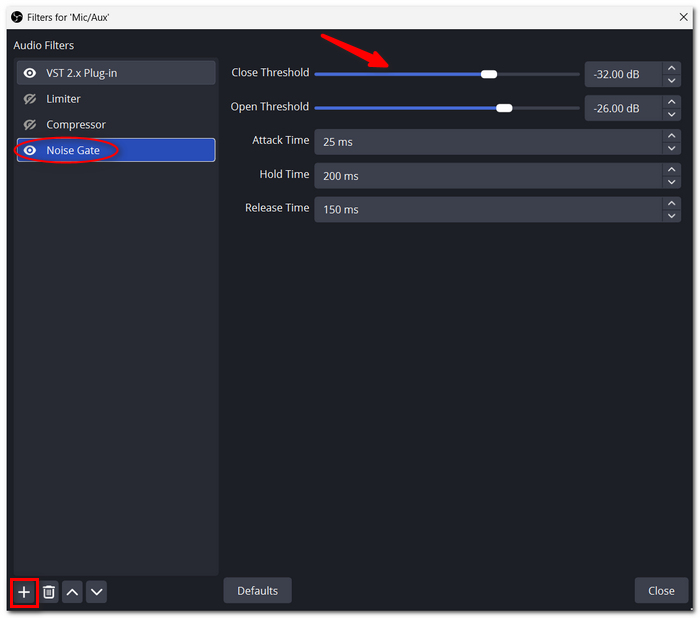
Step 3. Back in the same Filters window, also add Noise Gate. Set the open and close thresholds to ensure the microphone remains silent while you aren't speaking, but doesn't cut off the beginning and end of your speech.
Step 4. Insert the Compressor filter to tame your loud versus quiet voice moments. Tweak it while talking at your usual volume to end up with a more even recording.
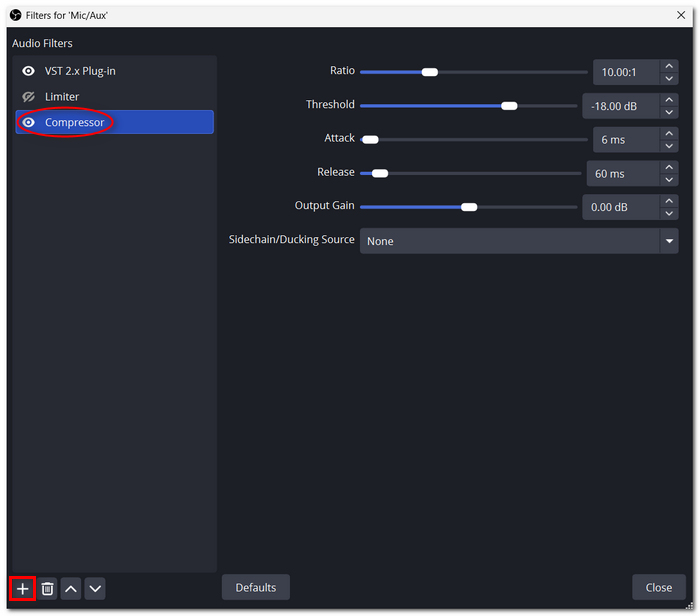
Step 5. Lastly, include a Limiter to reduce loud volume spikes. Adjust the threshold and listen to your audio to ensure that the audio isn't clipping or distorting.
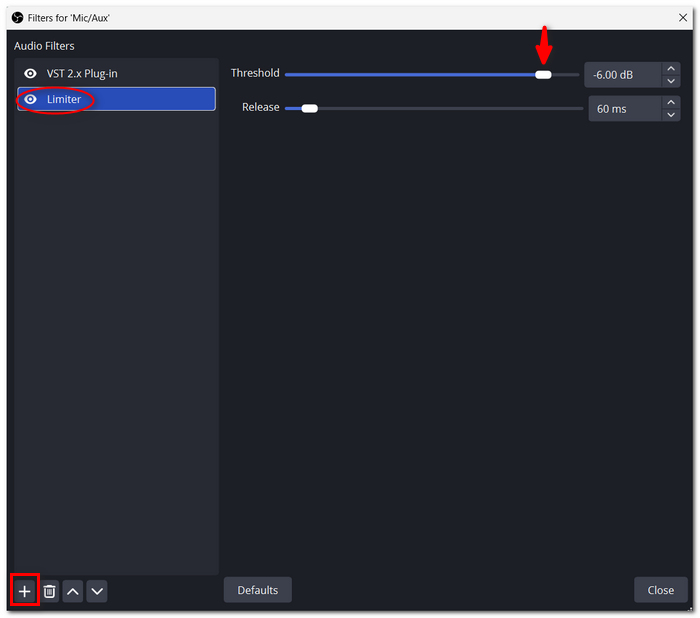
Windows users who still experience recording issues can explore these alternative ways to record audio on Windows 10.
Keep in mind: the OBS audio controls are great, but you will need to experiment with the filters for a while. If you get them wrong, your voice will sound odd, or words will be truncated. For example, I suggest using one filter and then recording and listening for a short while.
Part 3. Quick Solution: Record High-Quality Audio without OBS Complexity
I am aware that although OBS Studio gives abundant audio control options, the numerous filters can be quite complicated to configure, and I only need my audio to be recorded clearly without adjusting too many filters. In this case, I recommend VideoSolo Screen Recorder, which offers a simple recording process to meet your needs.
 Features
- AI-powered Noise Cancellation: It eliminates unwanted background noise, allowing your voice to come through more clearly.
- Automatic Gain Control (AGC): Ensures a more consistent loudness of the microphone.
- Multi-Track Recording: Some recording modes allow multiple audio sources to help with editing and mixing.
- Simple Recording Workflow: Users can configure their recording and then begin recording, instead of configuring an extensive chain of OBS filters.
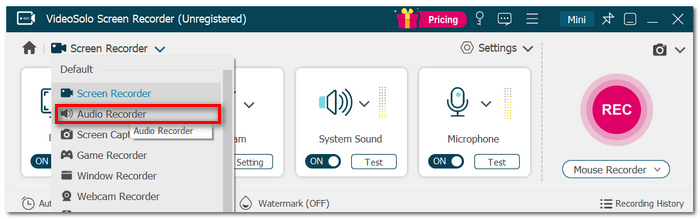
Here's how I would begin to record without setting up multiple filters in OBS to do the same. This program has a specific mode called Audio Recorder for recording sound from the PC, a microphone, or both.
Step 1. Download it and open it on your computer. Then click Audio Recorder.
Step 2. Turn on System Sound, Microphone, or both of them as required.
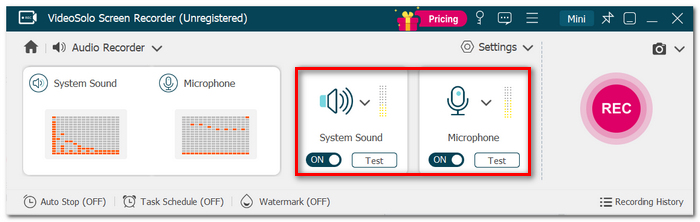
Step 3. Adjust the volume levels for the system and microphone, then use the available sound check to verify that everything is working. Click the REC button, then play the audio or speak into your microphone.
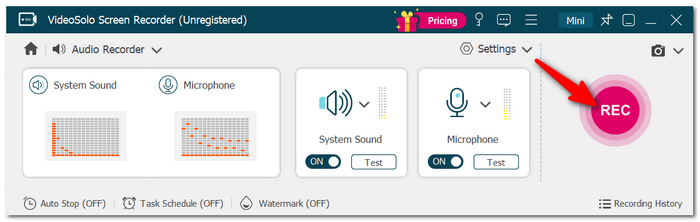
Step 4. Stop recording, review your recording, cut out the beginning or end of the recording if necessary, then save.
My Take on VideoSolo Screen Recorder
For creators who find OBS Studio's audio filters a bit tricky, you might want to give VideoSolo Screen Recorder a shot. Its native Audio Recorder allows you to record microphone and system audio more efficiently, with various noise-cancelling and recording-quality settings for your voiceover, tutorial, and online videos.
Part 4. FAQs on Recording Audio on OBS
Why does my OBS video sound different from live audio?
OBS processes the sound differently in the recording due to audio monitoring, processing, or encoding. Verify advanced audio properties, and make sure that the audio monitoring isn't duplicated. Compare your recording with the live sound to determine where the difference appears.
Why is my microphone getting distorted if the OBS meter is not reaching red?
Distortion could occur before the signal gets to OBS in the first place. For example, if you set your microphone input gain too high or if your audio interface's built-in preamp is clipping. Bring your gain on your mic or interface down, check any hardware processing you're using, and do a test recording with you speaking at your normal volume. The OBS meter won't always show you distortions that already happened earlier in the chain.
How can I monitor microphone audio without creating an echo in OBS?
Open Advanced Audio Properties and check the Audio Monitoring setting on your microphone. If you're playing back your microphone through OBS and hearing yourself through your headset or interface, you're getting an echo or doubling of your voice. Use only the necessary monitoring path and headphones instead of speakers to avoid feedback.
Which recording format should I use to protect audio if OBS crashes?
While most of the time recording to the MP4 format in OBS is fine, it is slightly better to record in the MKV format: if recording is stopped abruptly, it is less likely the recording will be corrupted. OBS also has a "remux" feature that can convert MKV recordings to MP4 if and when required. This is valuable for lengthy tutorials, interviews, and live streams where losing the whole recording would be very expensive.
Conclusion
To record clear audio on OBS Studio with the right configuration, settings, filters, and recording methods, you can easily get clear audio on OBS Studio. Just make small changes and test your audio before hitting the record button for hours. To record lossless audio on OBS, your recording format and quality settings are just as important as microphone configurations. If you find OBS too difficult, you can go for VideoSolo Screen Recorder.
More Readings
Capture screen activities, audio, webcam, gameplay, and mobile screens on Windows and Mac with high quality.

